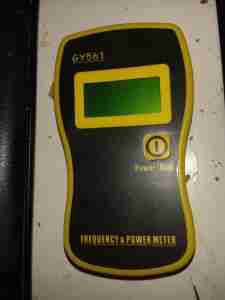
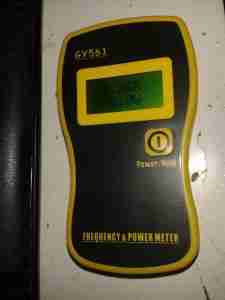
The latest addition to my radio shack is the GY561 frequency & power meter, which has already come in useful for measuring the output power of all my radios.

It’s a small device, roughly the same size & weight as a stock UV-5R. Power is provided by 3 AAA cells.

The display is a standard HD44780 8×2 module. The display on this unit isn’t backlit, so no operating in the dark.

The cover pops off easily to allow access to the internals, without having to remove any screws!
The 4 screws on the back of the unit hold the heatsink plate for the 50W 50Ω dummy load resistor.
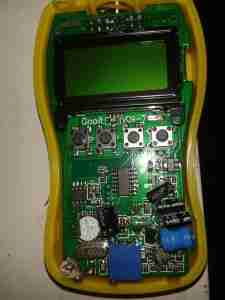
Removing the cover reveals a couple of adjustments, for frequency & RF power calibration.
There are also 3 tactile switches that aren’t on the front panel. According to the manual (which in itself is a masterpiece of Chinglish), they are used to software calibrate the unit if an accurate RF power source is available. I will attempt to do a reasonable translation when time allows.
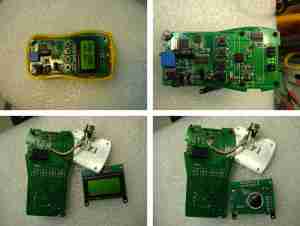
Disassembly further than this involves some desoldering in awkward places, so a search of the internet revealed an image of the rest of the internal components. In the case of my meter, all the part numbers have been scrubbed off the ICs in an attempt to hide their purpose. While it’s possible to cross-reference IC databooks & find the part numbers manually, this process is a time consuming one. Luckily the image I managed to locate doesn’t have the numbers scrubbed.

Under the LCD is some 74HC series logic, and a prescaler IC as seen in the previous frequency counter post. However in this unit the prescaler is a MB506 microwave band version to handle the higher frequencies specified.
In this case however the main microcontroller is an ATMEGA8L.
This is complemented by a SN54HC393 4-bit binary counter for the frequency side of things. This seems to make it much more usable down to lower frequencies, although the manual is very generous in this regard, stating that it’s capable of reading down to 1kHz. In practice I’ve found the lowest it reliably reads the frequency input is 10MHz, using my AD9850 DDS VFO Module as a signal source.
It did however read slightly high on all readings with the DDS, but this could have been due to the low power output of the frequency source.
Just like the other frequency counter module, this also uses a trimmer capacitor to adjust the microcontroller’s clock frequency to adjust the calibration.
The power supply circuitry is in the bottom left corner of the board, in this case a small switching supply. The switching regulator is needed to boost the +4.5v of the batteries to +5v for the logic.
Also, as the batteries discharge & their terminal voltage drops, the switching regulator will allow the circuit to carry on functioning. At present I am unsure of the lower battery voltage limit on the meter, but AAA cells are usually considered dead at 0.8v terminal voltage. (2.4v total for the 3 cells).
When turned on this meter draws 52mA from the battery, and assuming 1200mAh capacity for a decent brand-name AAA cell, this should give a battery life of 23 hours continuous use.
On the back of the main PCB is a 5v relay, which seems to be switching an input attenuator for higher power levels, although I only managed to trigger it on the 2m band.
Finally, right at the back attached to an aluminium plate, is the 50Ω dummy load resistor. This component will make up most of the cost of building these, at roughly £15.
On my DVM, this termination reads at about 46Ω, because of the other components on the board are skewing the reading. There are a pair of SMT resistors, at 200Ω & 390Ω in series, and these are connected across the 50Ω RF resistor, giving a total resistance of 46.094Ω.
This isn’t ideal, and the impedance mismatch will probably affect the calibration of the unit somewhat.
The heatsinking provided by the aluminium plate is minimal, and the unit gets noticeably warm within a couple of minutes measuring higher power levels.
High power readings should definitely be limited to very short periods, to prevent overheating.
The RF is sampled from the dummy load with a short piece of Teflon coax.
There’s a rubber duck antenna included, but this is pretty useless unless it’s almost in contact with the transmitting antenna, as there’s no input amplification. It might be handy for detecting RF emissions from power supplies, etc.
For the total cost involved I’m not expecting miracles as far as accuracy is concerned, (the manual states +/-10% on power readings).
The frequency readout does seem to be pretty much spot on though, and the ability to calibrate against a known source is handy if I need some more accuracy in the future.
I’ve also done an SWR test on the dummy load, and the results aren’t good.
At 145.500 MHz, the SWR is 3:1, while at 433.500 it’s closer to 4:1. This is probably due to the lower than 50Ω I measured at the meter’s connector.
These SWR readings also wander around somewhat as the load resistor warms up under power.
I’ll probably also replace the AAA cells with a LiPo cell & associated charge/protection circuitry, to make the unit chargeable via USB. Avoiding disposable batteries is the goal.

Any chance of that ‘Chinglish’ translation. I’m trying to set this thing for minimum power measurement. I’m more interested in determining the frequency over the power measurement. Some measurement of power would be nice.
Hi Mark,
There are no settings for the power displayed in normal use, the badly translated manual only has instructions for recalibrating the unit against a more reliable source. Changing this calibration on the unit would not make it any more accurate at displaying low power. How low power are you attempting to measure? From the factory, I’ve found the frequency displayed is usually spot on, against all the radios I have personally. The power level displayed is also fairly accurate. I haven’t been able to measure how low it will measure in power though.
73s,
2E0GXE
Hi Mark,
There’s a post up regarding the user calibration now.
Bear in mind that you require a calibrated RF source for this!
73s,
Hi. What is diode than 390ohm… Diode fire be.. Replace diode
Hi Ismail,
Do you mean the glass package connected to the centre of the 390Ω & 200Ω resistors? I’m not sure of the rating of this diode, as there aren’t any markings on it. You could try replacing with a 1N4148 high speed signal diode, the cathode appears to be connected to the resistors.
de 2E0GXE
Thanks, a useful post for me, as I’ve just bought one. Calibration certainly seems off for both frequency and power at UHF. Sadly it doesn’t read power levels at 24cm and neither power or frequency at 13cm. The latter is probably because of the low power source, so I’ll try it with higher power. BTW, is the multi-turn preset for setting exactly 5.000V?
Hi Squiffy,
I’m not sure on the setting of the multiturn pot – I never measured it 😉
Oh, upon reading the manual, it seems it doesn’t measure power above 500MHz, how annoying….
Hi Squiffy,
The MB204 prescaler IC is rated to 2.4GHz, but the firmware in the microcontroller is going to be the limit here, along with the division ratio that the MB205 is set to. RF design up into the microwave bands needs special voodoo to operate properly anyway, so it’s not something you’re going to find in a cheap Chinese meter 😉
I can confirm it does show power levels above 500MHz, but the sensitivity (and obviously the accuracy) is massively reduced. Some changes to the RF sampling circuitry may improve that.
BTW, the exposed inner section of the coaxial on mine was 10mm at one end and 12mm the other, which is hardly ideal…
Hi Squiffy,
I’d expect some roll-off above the rated frequency range, I’m no expert in the high end RF stuff so I couldn’t assist here. I didn’t measure the coax terminations, but it wouldn’t surprise me if they were similar on my unit.
Hello The Engineer.
i am not sure if you could help me.First thanks for the blog .and for this nice thread ,i bought this gy561 from aliex… but it came defected and they not want to refund or anything anyway my problem is when i turn on the unit it only show 00 and nothing else i only opened the unit and not seen any thing removed dfective etc….
Hi,
By the sound of it the RF front end has a fault, if it’s just displaying a zero reading. If it came defective, open a dispute – it should be replaced.
Thanks for reading,
de 2E0GXE
thank you for youre answer The Engineer unforftunally i have had opened but they refused so why i have just asking if it is a software problem and i can re program it or just a faulty joint etc … i will post a picture then or little video if possible ?
Hi,
It sounds like you’re having much trouble with this. You can check for bad solder joints on the board, but I don’t have a source for firmware for these units, so if it’s a factory programming issue, there’s no way to recover it unfortunately.
I’d issue a chargeback via my credit/debit card provider personally
Hi,
has anyone checked accuracy for ham hf 3-30 MHz? Tnx
Hi Vladimir,
I haven’t checked this personally, since I don’t have a HF rig in operation, but hopefully one of the other commenters can help out. It has been pretty accurate for me in the VHF/UHF bands though.
de 2E0GXE
Vladimir!
Frequency quite accurate on HF and VHF is my opinion, based on my use.
Power not too bad on HF, may be optimistic on VHF.
This is not a precision instrument, but useful if you just want to check out if your radio is working or not !
Hello there. this device switches off automatically every 80 seconds. Is it possible to cancel it? I want to close. I will be glad if you help me. this event is annoying.
Hi,
There isn’t a way of disabling the auto-power off as far as I’m aware.
Hola. Tengo uno que lo uso para medir frecuencia con la antena de goma. Le saco las pilas cuando no lo uso. La ultima vez le coloque las pilas y no encendio, las pilas estan bien, no se por donde empezar a revisarlo, tendras algun diagrama?. Gracias.
Hi Roberto,
Unfortunately I don’t have schematic diagrams for this unit. I would definitely check there’s battery voltage present on the mainboard, and also check the buttons are operating correctly. My unit also suffered from some bad solder joints, so check everything carefully.
Cheers