I posted a couple of weeks back that I was soon to be the recipient of a new gigabit symmetric link to the intertubes – and there was a bit of a caveat of their use of CG-NAT due to the exhaustion of the IPv4 address space.
To compensate I’ve routed everything over a VPN link in prep for this new connection, which does work fantastically well.
After a chat with their support guys – and I did actually manage to speak to someone in their Networks team, not just a customer support droid(!), they will soon be introducing a service where I can add a public IPv4 to my account, so I’ll be able to run at full gigabit speeds without the 100Mbit restriction of this VPN connection!
I’m told that this will be within the next couple of months, which is around the same lead time as the connection itself, so hopefully this will be live just in time for my new fibre.
Everyone who reads this website will know about the cost of living crisis – this is a global problem brought about by the combination of the Covid-19 pandemic, and the unfortunate situation in Ukraine at the present time.
For us in the UK, the costs of energy have skyrocketed in recent months, with our government permitting the energy companies to charge us all an extra £600 per year in electricity alone. Given I run servers, this isn’t particularly good news.
The cost of running the network infrastructure behind this blog is not insignificant – just the server alone runs me around £30-£40 per month just in power, and add onto that the £45 in connectivity costs. I don’t meter the power taken by the router, switch etc, so the total cost will be marginally higher.
Given the increases that have hit, I expect to see a 3x increase in power costs to run this blog on the current hardware – an unsustainable jump.
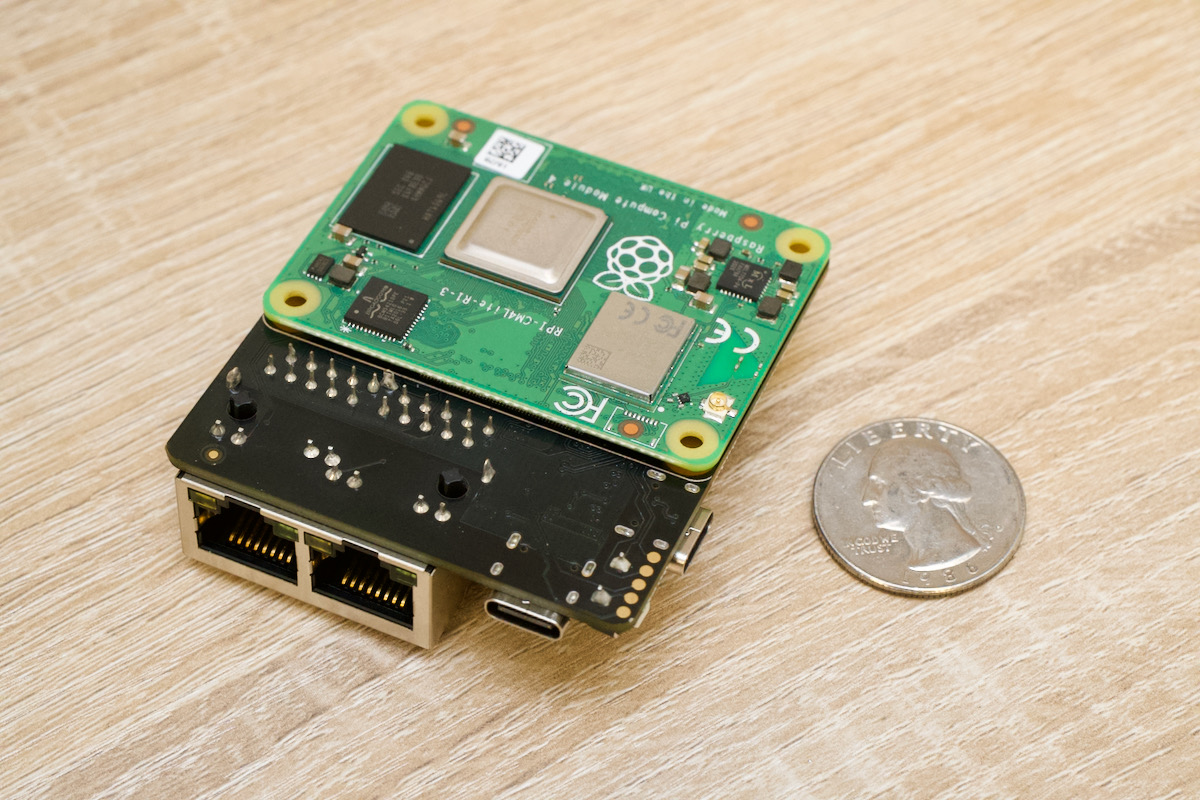
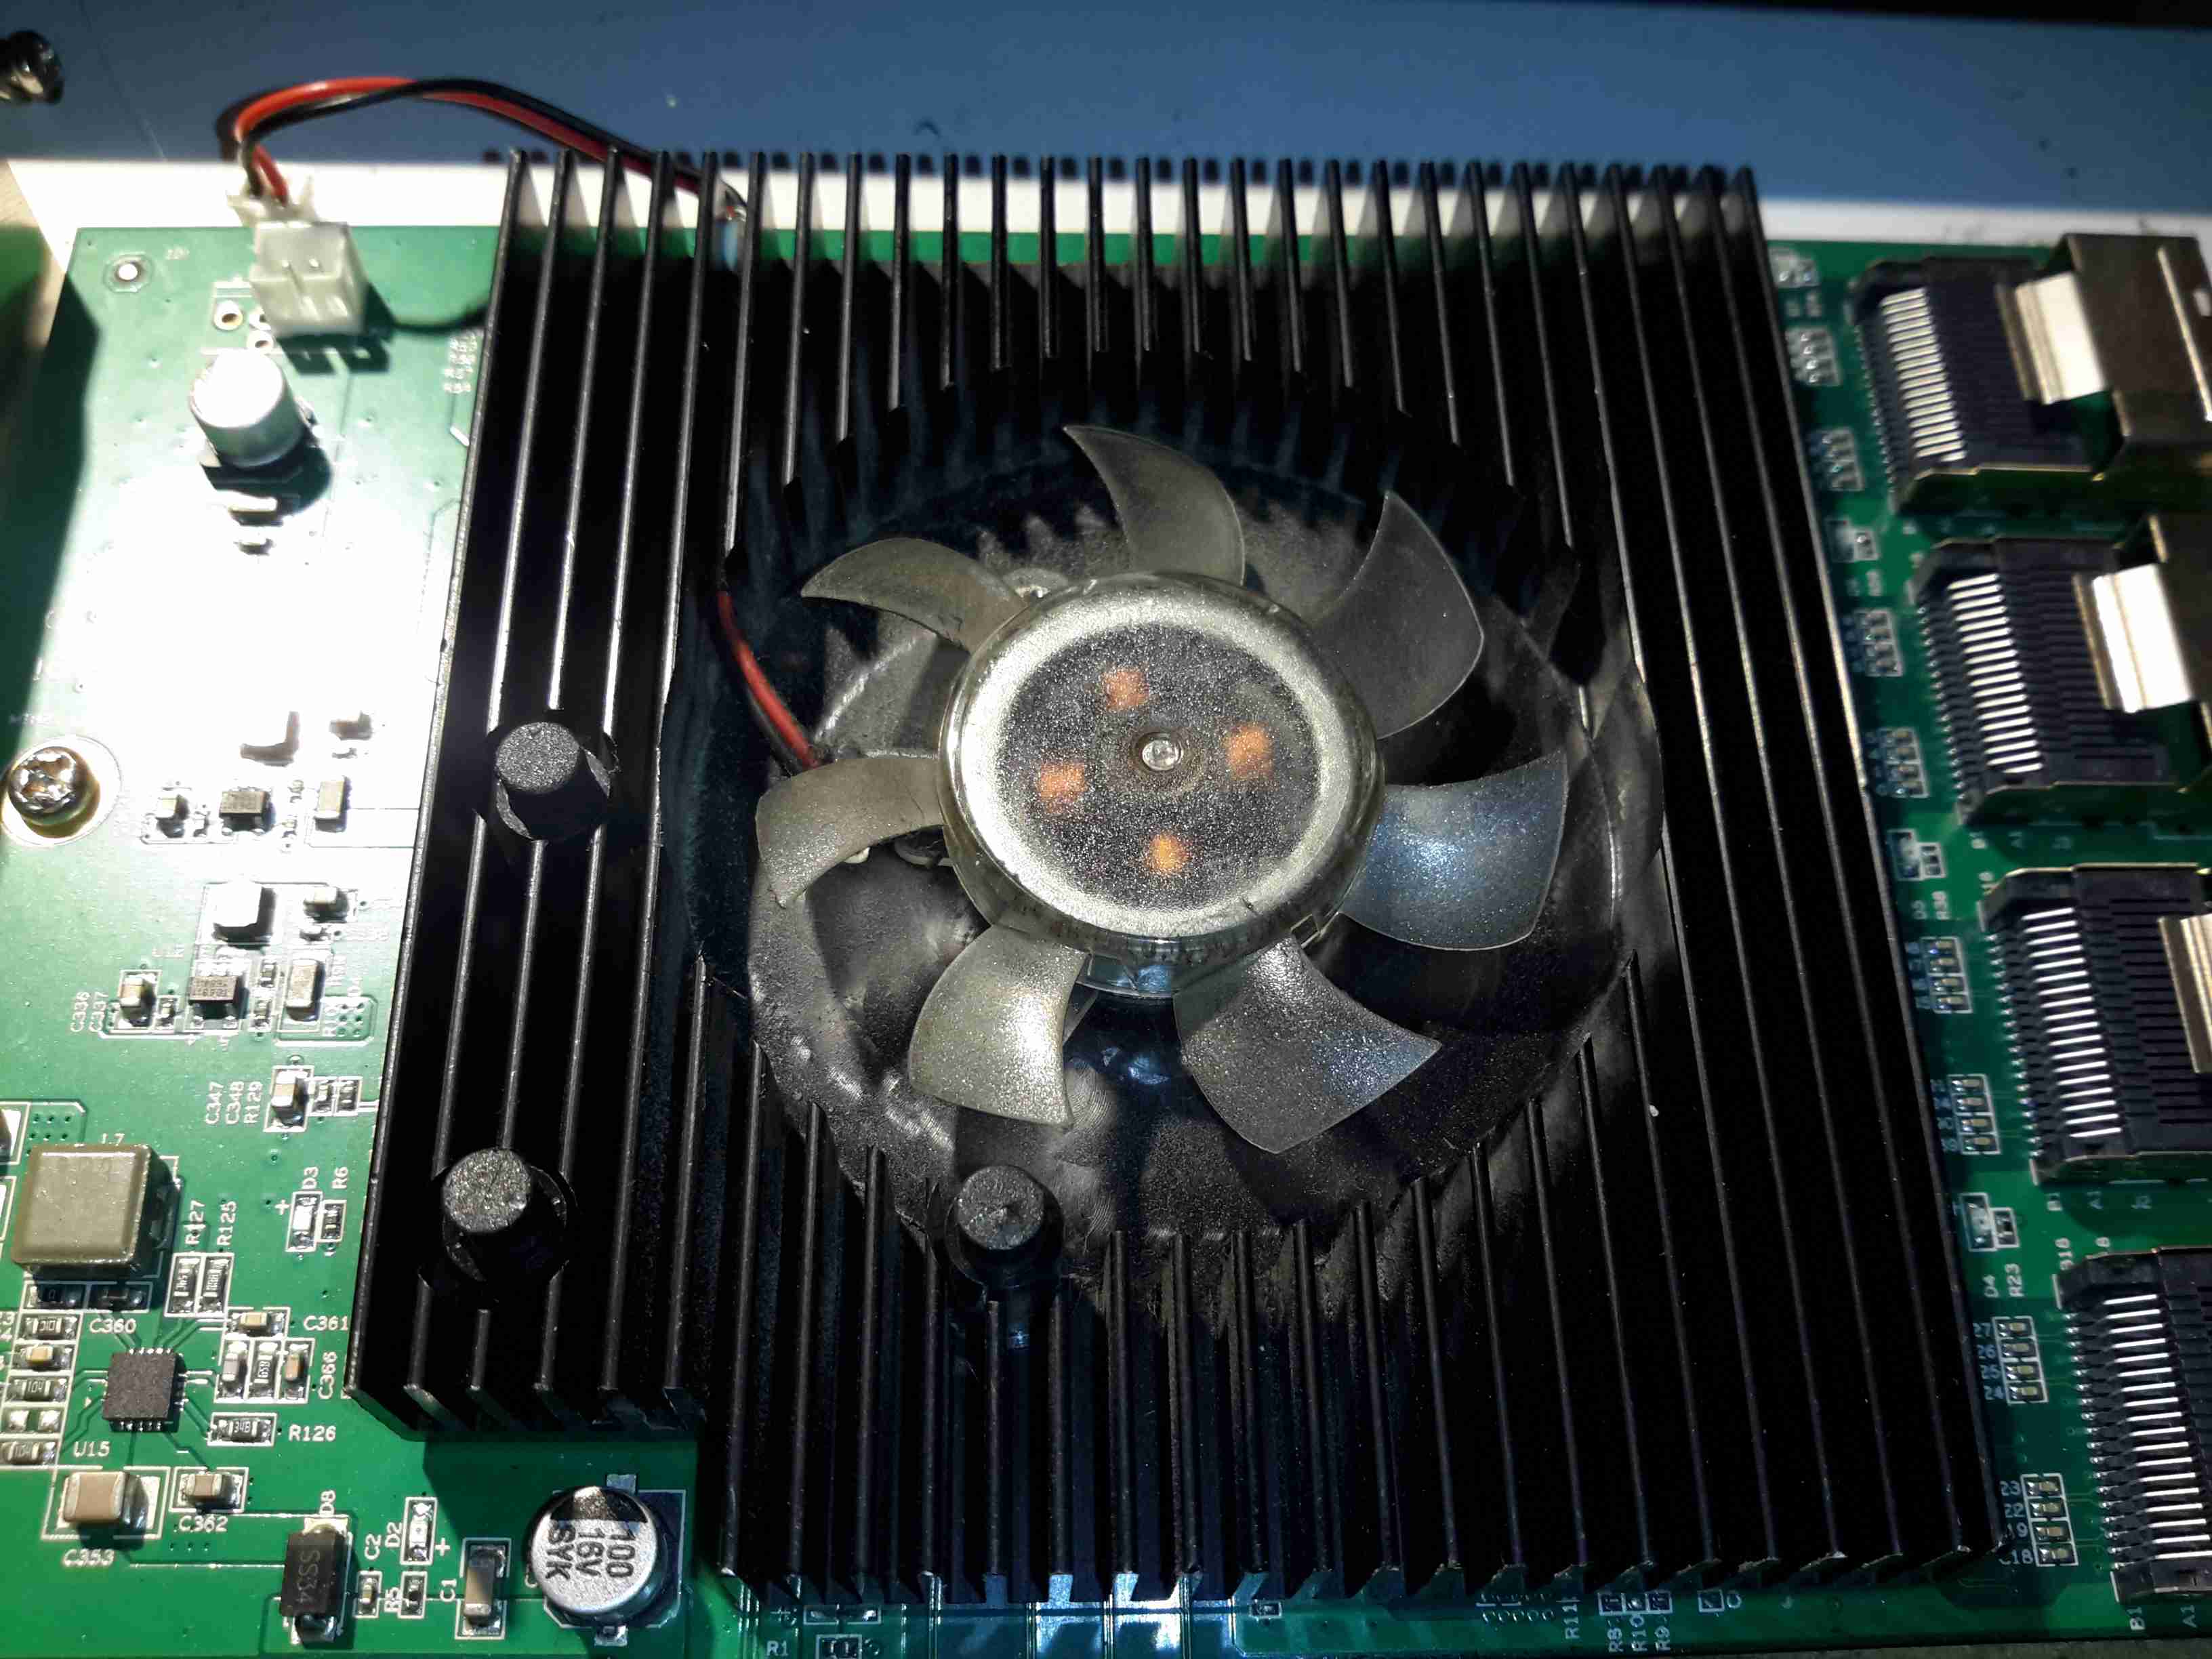
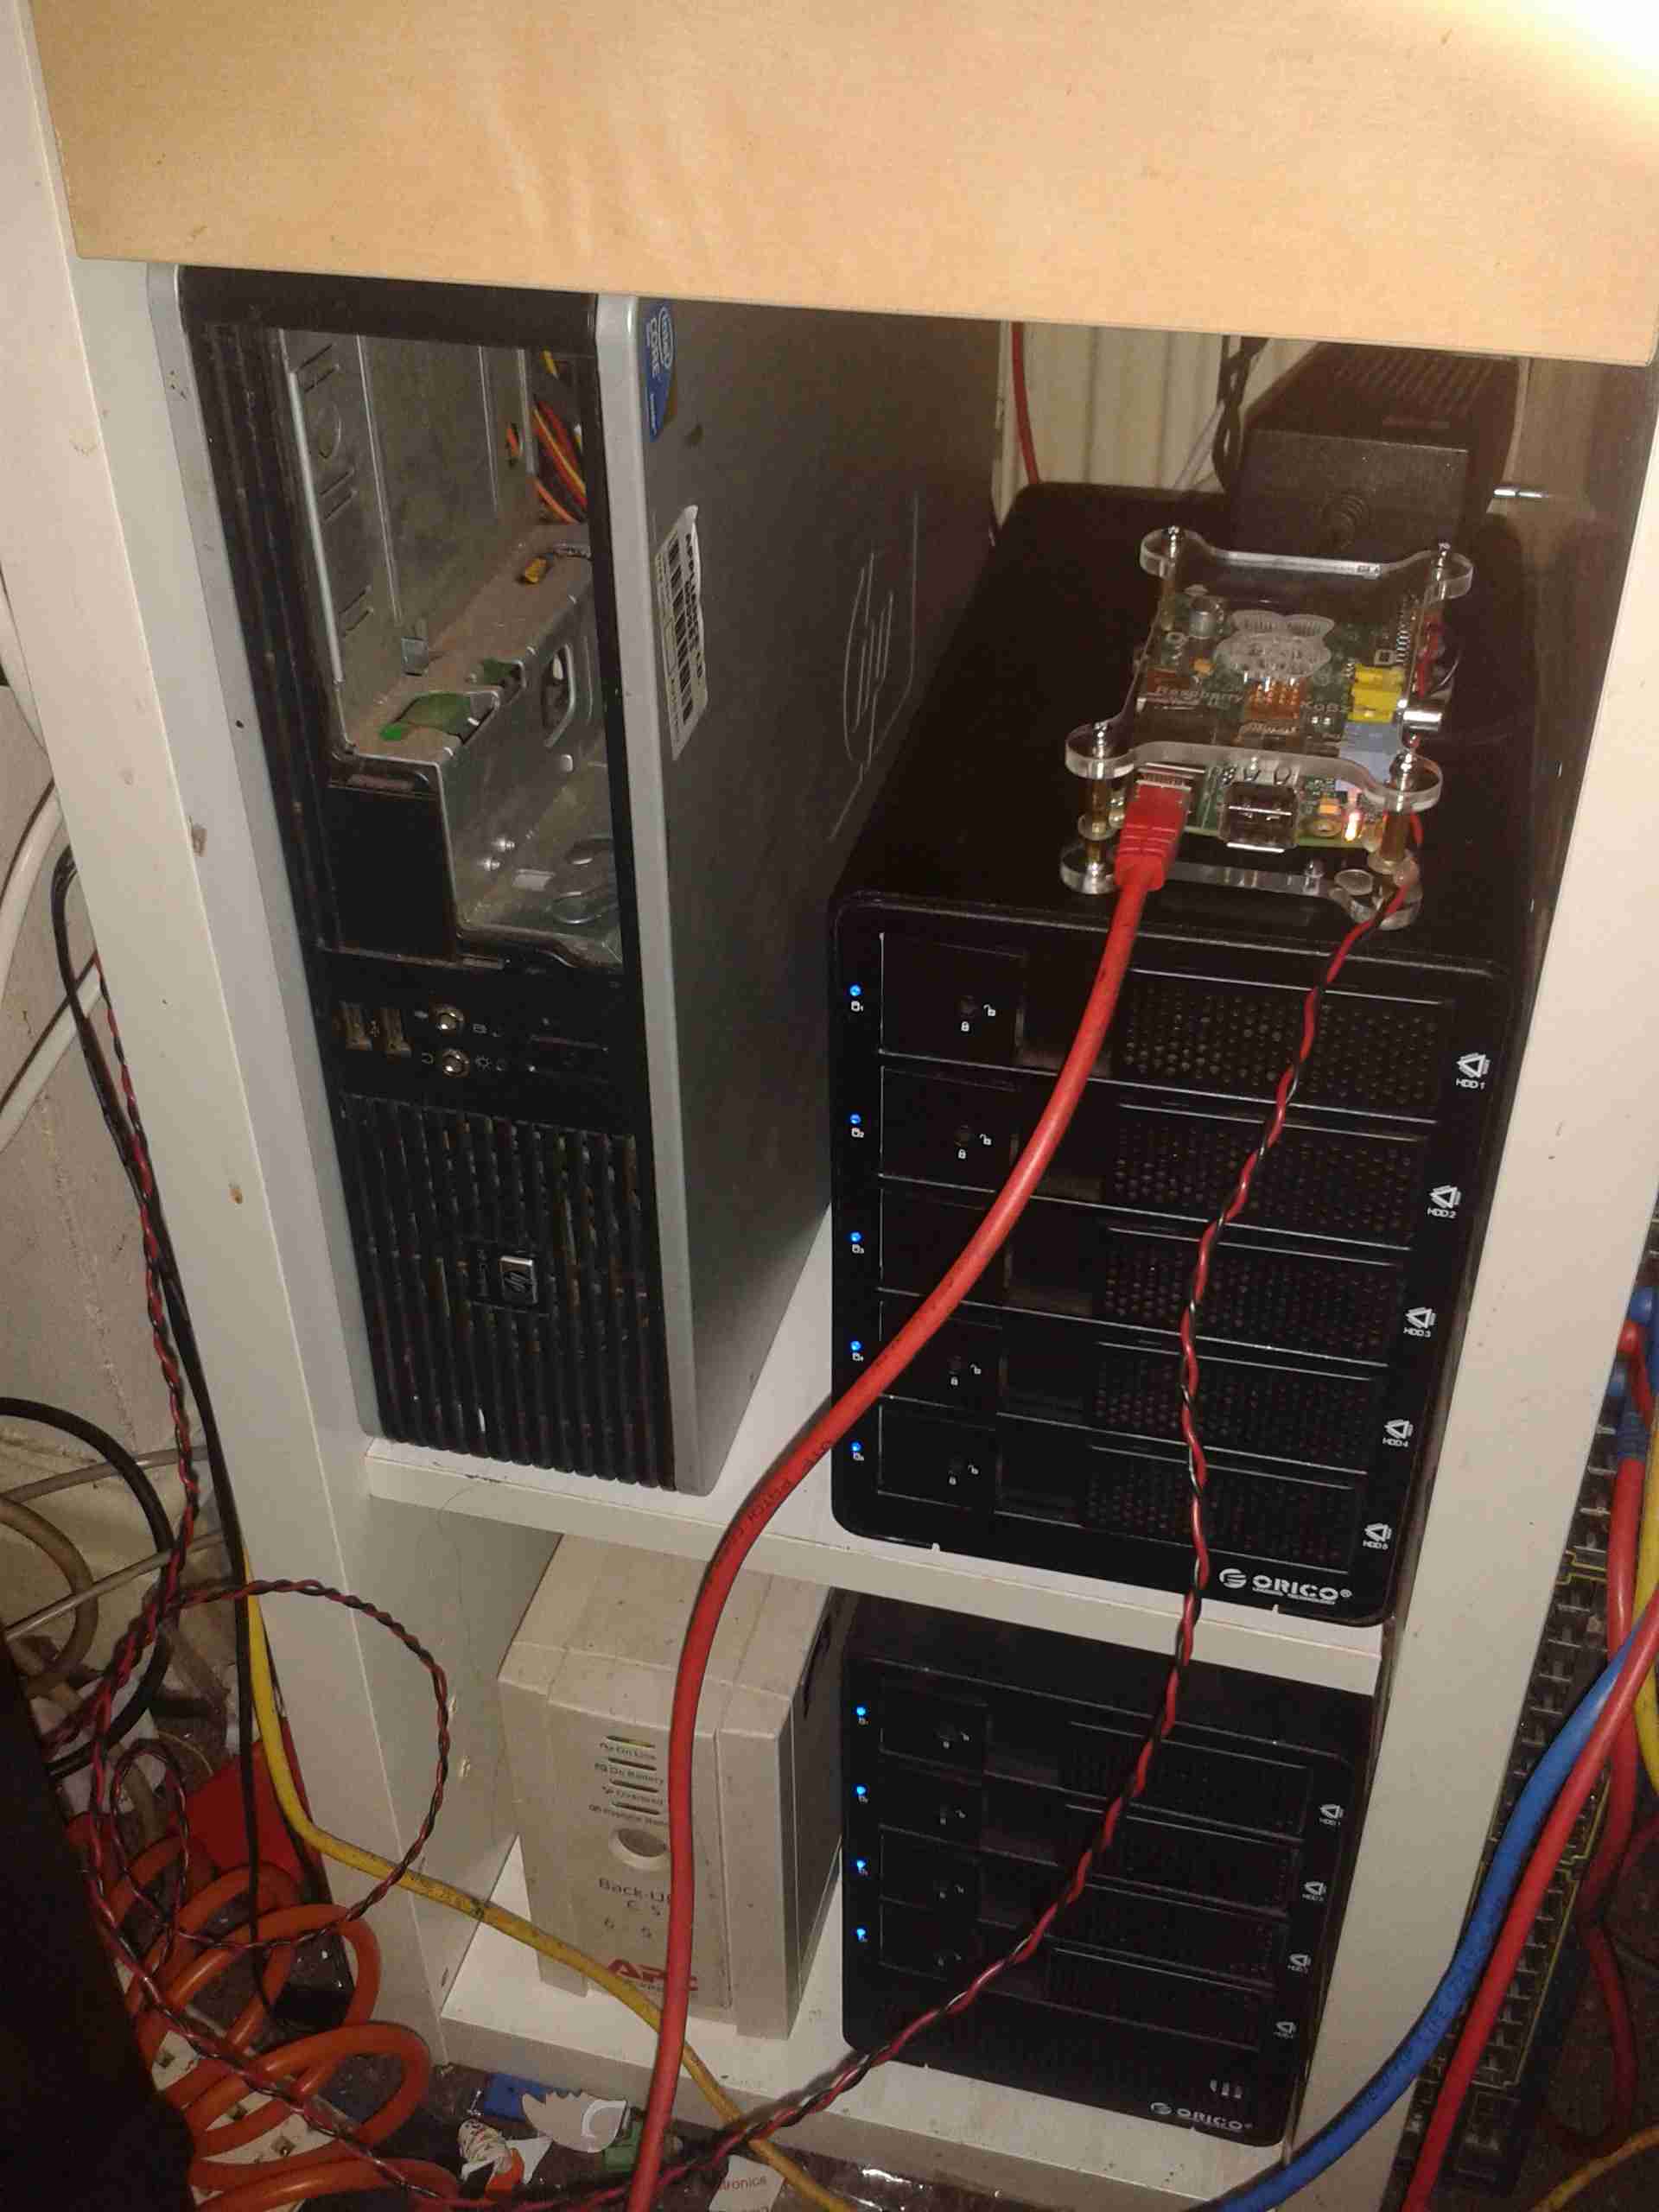
I’ve got a couple of Raspberry Pi’s floating around, at the moment uncommitted to any tasks, so I thought I’d use one of these. A Pi CM4 module in a support PCB with dual network links should so just fine. I ogirinally got this to build a Pi based router (what it was designed for) – nevermind!
I’m using the new 64-Bit version of Raspberry Pi OS, and a 128GB MicroSD card for storage, since this board doesn’t have an open PCIe lane for a NVMe drive.
A quick setup with Nginx, php-fpm & MariaDB & I’m in business! The site is now running on a Raspberry Pi! As a plus, everything does seem to be quicker than the old Apache setup too. I have for now dropped a few features of the site, just until I get a feel of how quick this new setup is going to be, but they should be back soon!
For 90% of the time I’ve run this website, it’s been run from a server in my house, over a domestic-grade ADSL connection. The problem has always been the very asymmetric download/upload bandwidth provided by domestic ISPs. Normally it’s about a 10:1 ratio these days (the current connection is 350MBit DL / 20MBit UL, which is even worse). Going back a few years, this wasn’t much of an issue – 99.9% of general ISP customers didn’t need a high upload rate, as they were only requesting web addresses, etc. Nowadays especially with the rise of online video services & social media, upload rates are more important than ever, since a good proportion of the population is uploading their own content daily.
Despite these changes in how the networks are utilised by the end users, the upload rates haven’t really improved much, which I’ve always found baffling.
Considering the bandwidth limitations imposed by such a connection on upload rates, the site’s done pretty well over the years, even though it can be a touch slow at times. I’ve been looking at changing this situation for a long time, watching to see if any of the direct fibre ISPs in the UK were going to get around to serving my area, such as Gigafibre, CityFibre or HyperOptic, but they unfortunately haven’t yet appeared anywhere near my locale.
Cue the entry of a new ISP: Brsk. These guys are building an entirely new fibre network, and just so happen to be doing the network build in my direct area at the moment. For only £5 more a month than I’m paying for the service I have now, I can now obtain full gigabit symmetric connectivity!
There’s one small caveat to the service, which wouldn’t bother the average member of the public, is a serious block to how I use my internet connectivity – they don’t hand out globally addressable IPv4 addresses. This is ostensibly due to the global IPv4 address shortage. Instead, they use CGNAT to address their endpoints, which renders me unable to route anything out to the global internet from my connection. Luckily there are ways around this issue.
I do have access to some public IPv4 addresses that are currently unallocated, in another networking installation, which also runs a VPN into my home network. So it’s just a matter of hooking up my primary server to that VPN, and routing one of the spare IPv4s over the private link from the router at the other site. This will limit thing somewhat, as the other site link is a 100MBit symmetric leased-line, however that’s still an 80MBit improvement in upload rate overall.
This latter solution of routing a public IP over VPN to a private endpoint is something I’ve already done in preparation – and it works great. The firewall on the site router provides extra protection for the server, and even with the VPN overhead it’s just as quick as it was before.
Since they’re still building out the network, I’ve only been able to place a preorder, and the connection will be installed (allegedly) sometime in July. Once the new link is in, I can get rid of my existing provider.
Once the link’s installed I’ll provide some updates!
Having had a wee issue with Jellyfin Media Server’s database this week after an upgrade, I decided to avoid the requirement for a 24 hour database rebuild, to start backing things up with Borgmatic. Borgmatic is a handy wrapper script to automate BorgBackup.
location:
    # List of source directories to backup.
    source_directories:
        - /etc/jellyfin
        - /var/lib/jellyfin

    # Path to BorgBackup repository
    repositories:
        - /export/ServerData/jellyfin_database

retention:
    # Retention policy for how many backups to keep.
    keep_daily: 7

consistency:
    # List of checks to run to validate your backups.
    checks:
        - repository
        - archives

hooks:
    # Custom preparation scripts to run.
    before_backup:
        -  systemctl stop jellyfin

    after_backup:
        - systemctl start jellyfin
This is a very simple configuration, which does the following steps:
Stops the Jellyfin server
Runs Borg on both configuration directories – /etc/jellyfin & /var/lib/jellyfin.
Checks the repo & existing archives for consistency
Restarts the Jellyfin server.
Now, whenever the SQLite 🤮 databases backing up the frontend decide to have a shitfit, it should be a relatively simple matter to restore to the last good backup. In my case I have a cronjob set to run every night. Once someone adds proper MySQL support, I will migrate over to a proper database server instance. 😉
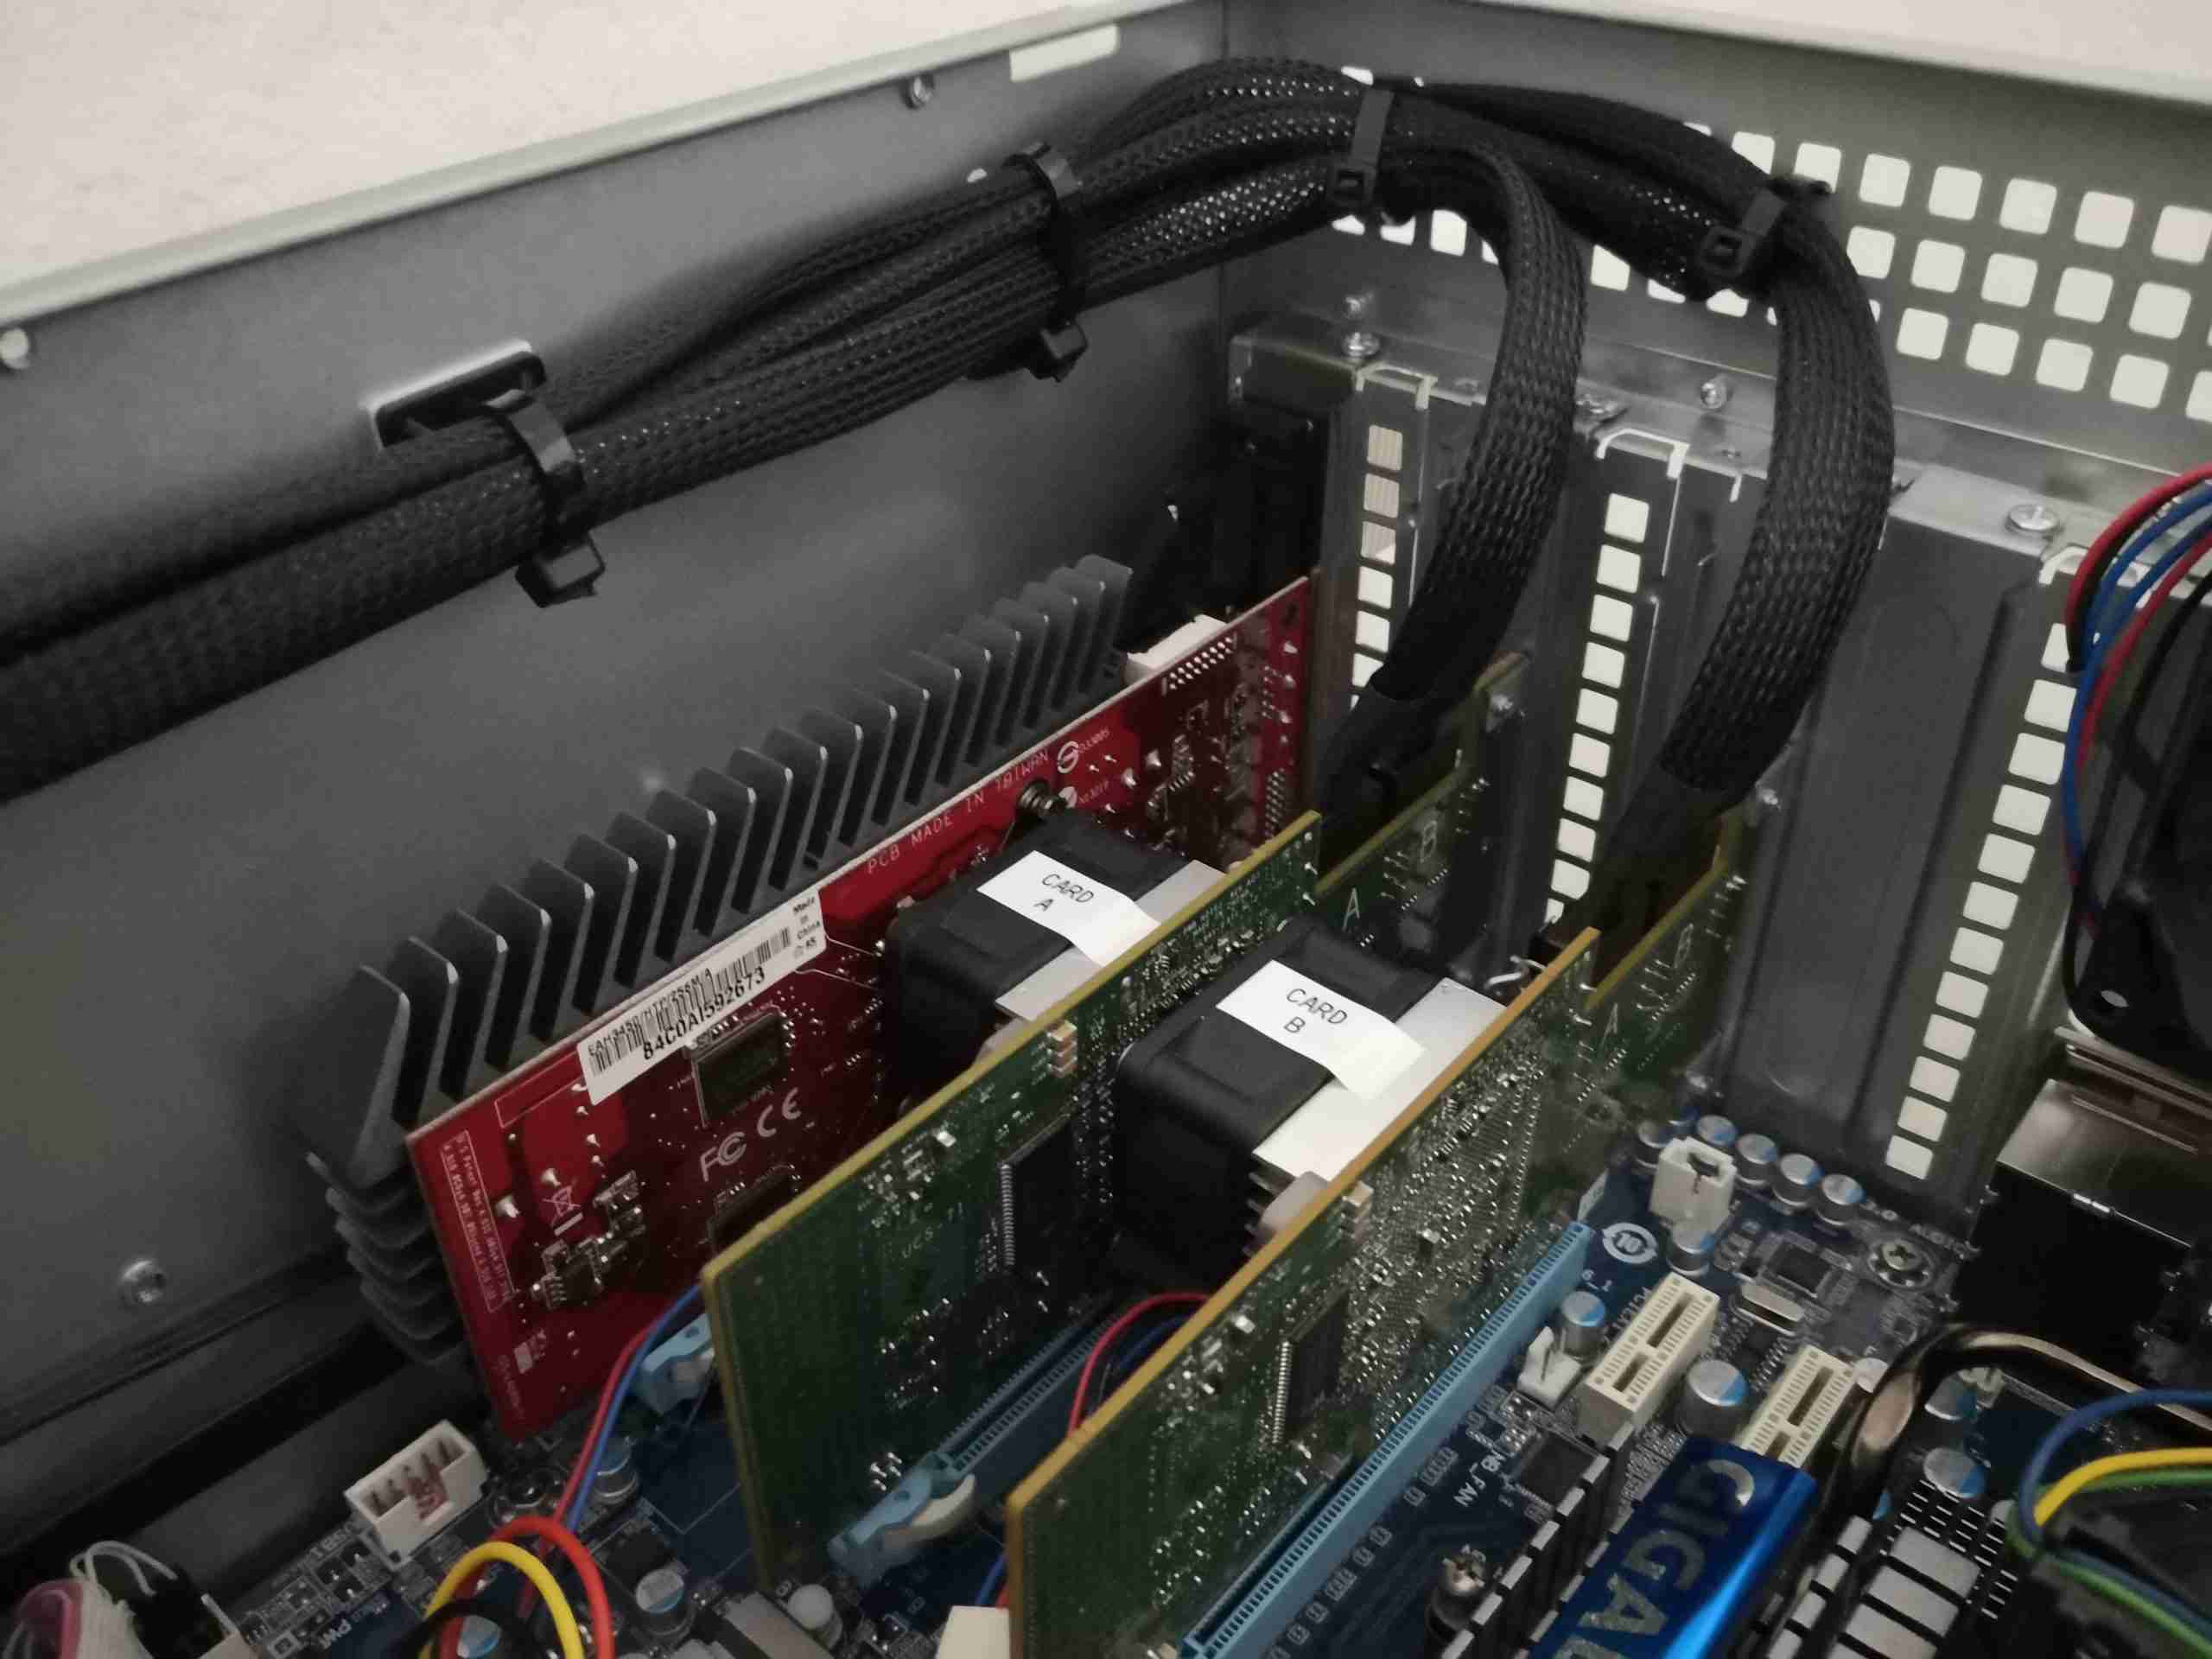
So, it’s time to finish off the upgrades to the core storage server on my network. Now a new motherboard, CPU & RAM have been obtained (MSI GA-X58-USB3), Core i7 950, 12GB), along with new SAS/SATA HBAs for the disk rack I can get everything fitted into place.
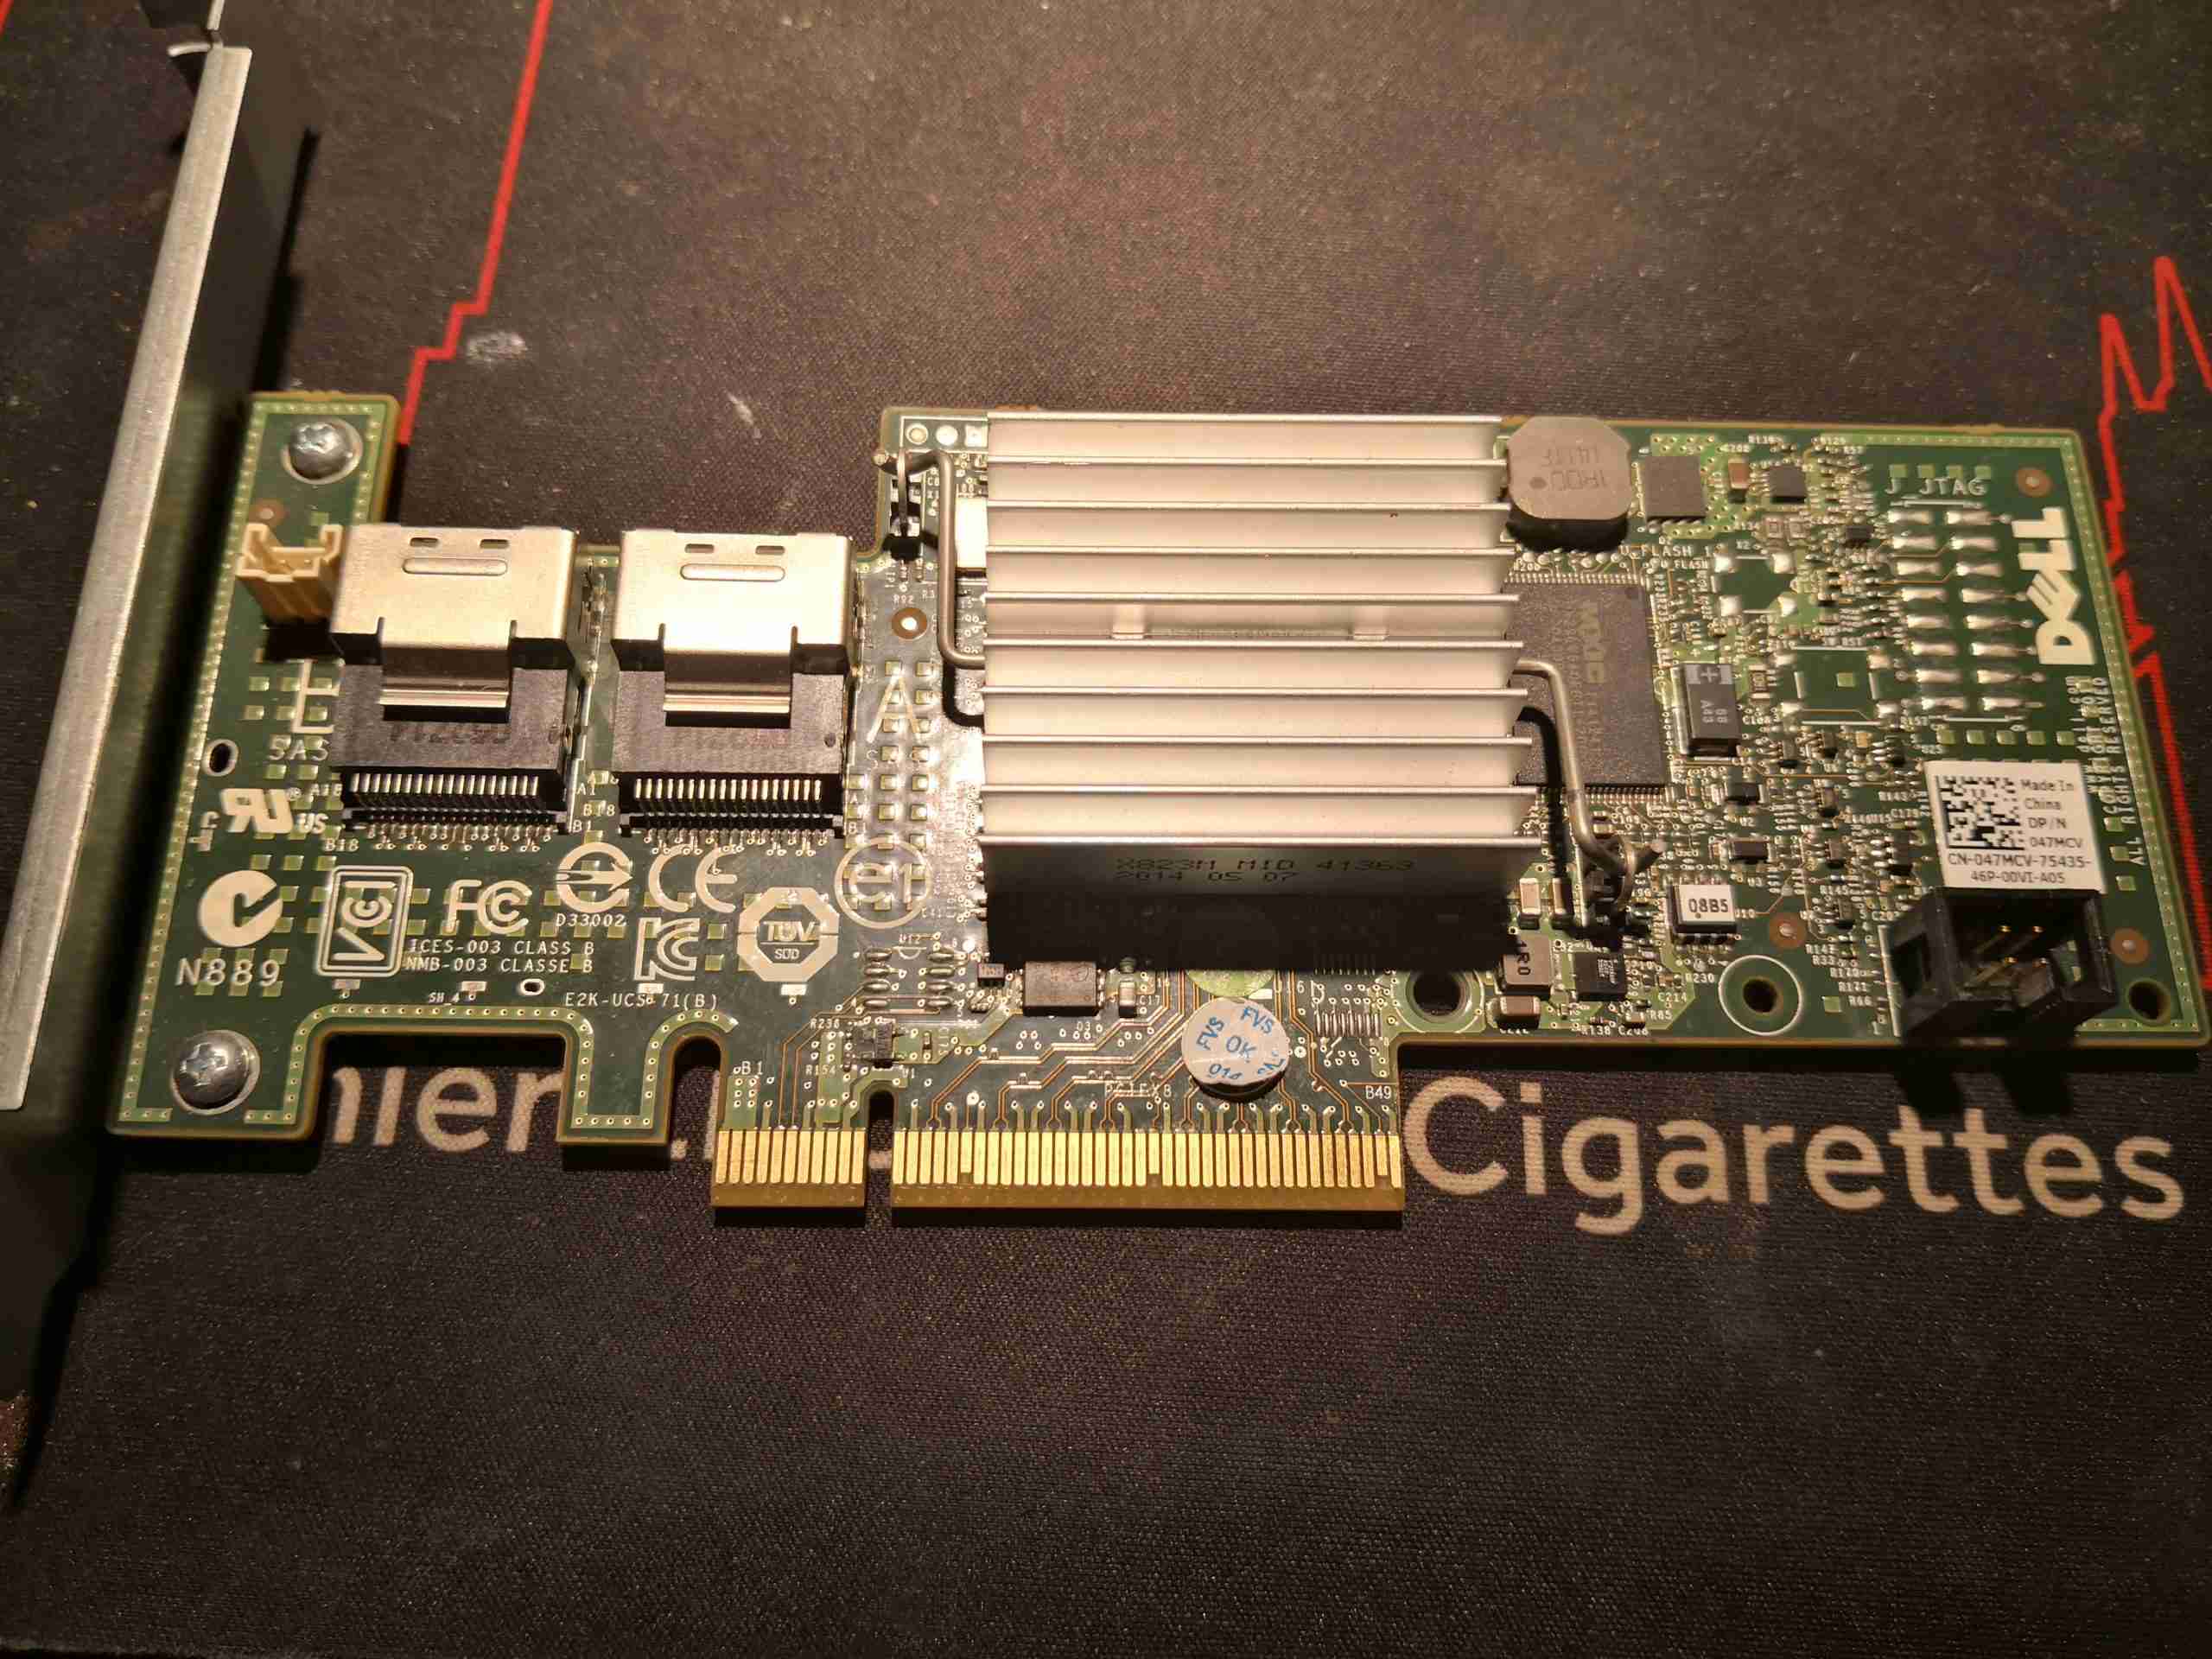
Dell H200 SAS RAID Card
Proper branded LSI HBA cards are expensive so I went with the cheaper option & obtained a pair of Dell H200 RAID cards. These have custom firmware flashed to them, but luckily can be crossflashed to a standard LSI firmware to become an LSI9211-8i card – providing 8 lanes of either SAS or SATA connectivity on a pair of SFF-8087 ports. Flashing these cards was very simple, once I managed to work my way into the EFI shell on my main machine, which I was using to do the flashing. Find all the firmware files & required software here:
One thing I left out from the flashing was a BIOS – this means that the boot process is speeded up, but also means the system BIOS cannot see the disks connected to the cards, so they’re not bootable. This isn’t a problem however, as I never plan on booting from the data storage disk array.
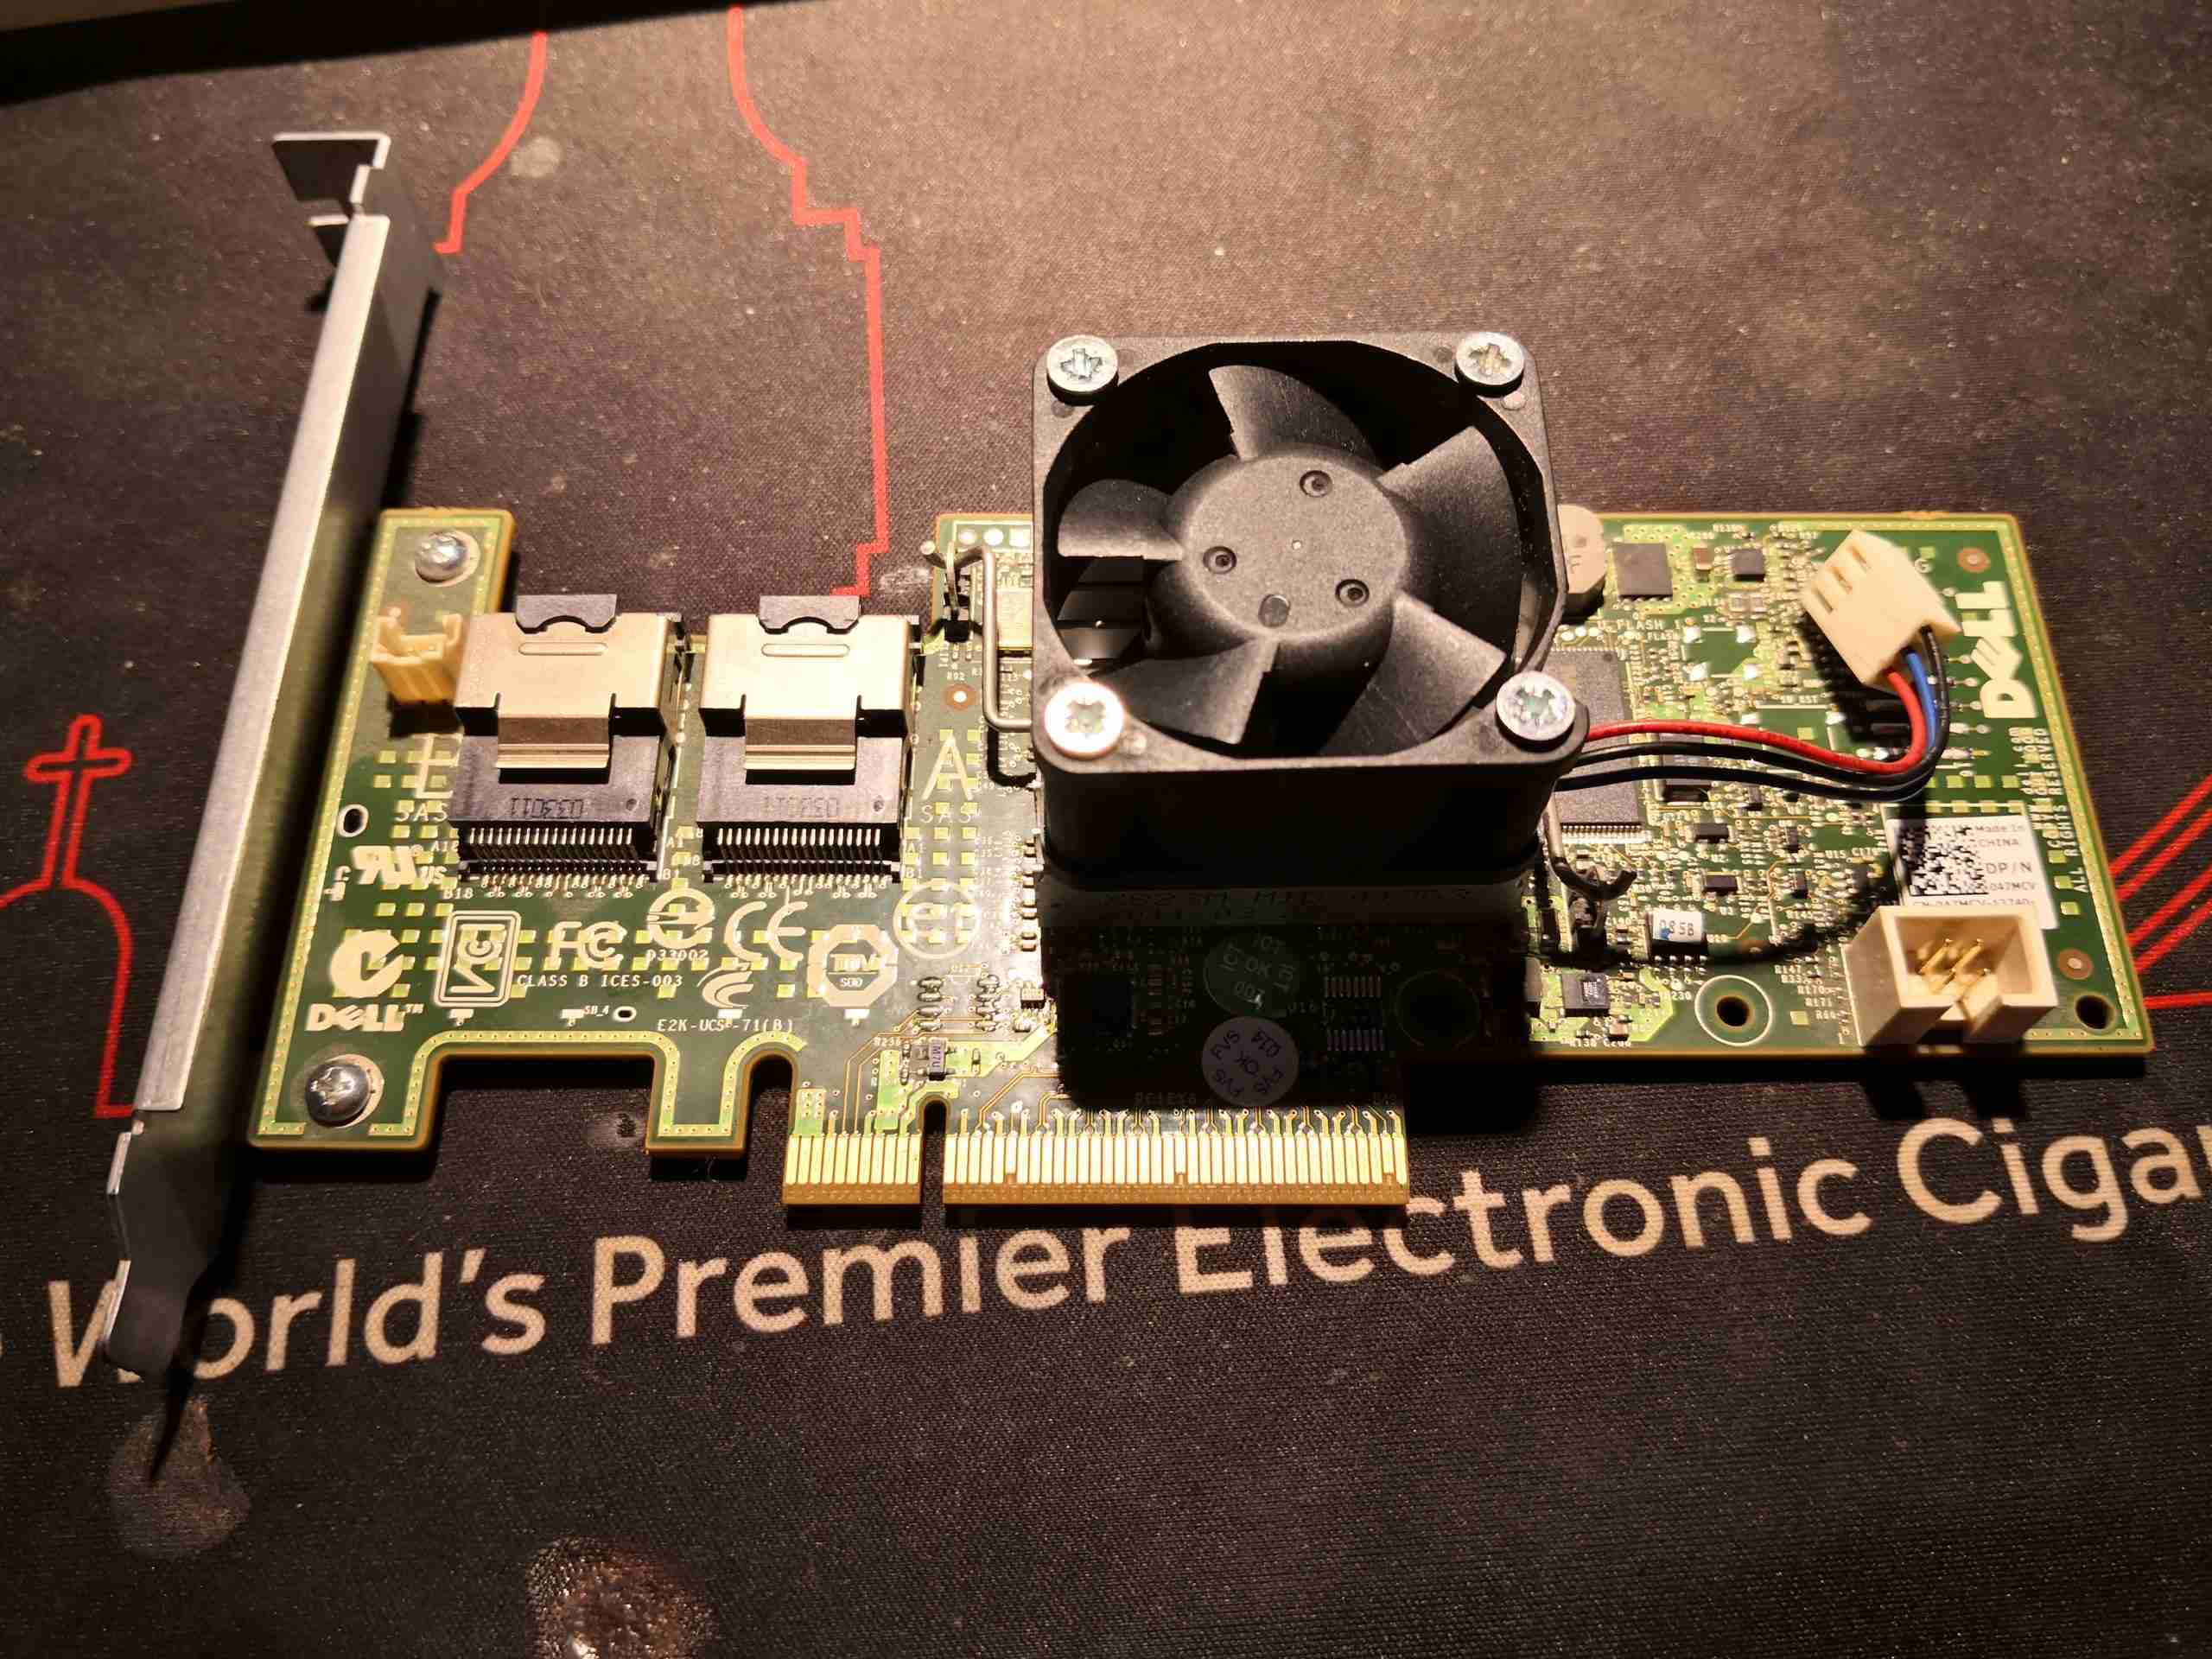
Active Cooling
The SAS2008 RoC (RAID on Chip) on these cards runs at around 8.5W thermal power, so some active cooling is required to keep temperatures within check. I have attached a 40mm fan to each card’s factory heatsink, using M3x25mm screws. Getting the screws to grab the heatsink was the tricky bit – I needed to crimp the outer corners of the fins together slightly, so when the screws are driven in, the gap is forced to expand, which grabs the threads. The fans will be connected to spare headers on the motherboard for speed monitoring.
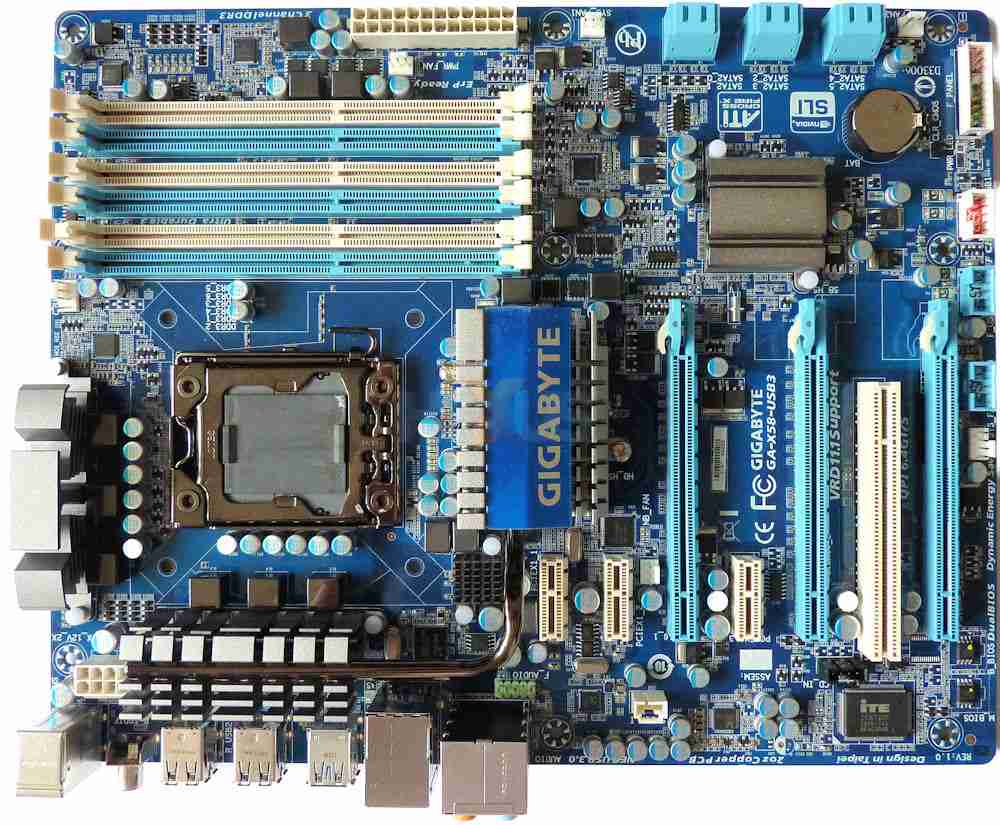
GA-X58-USB3
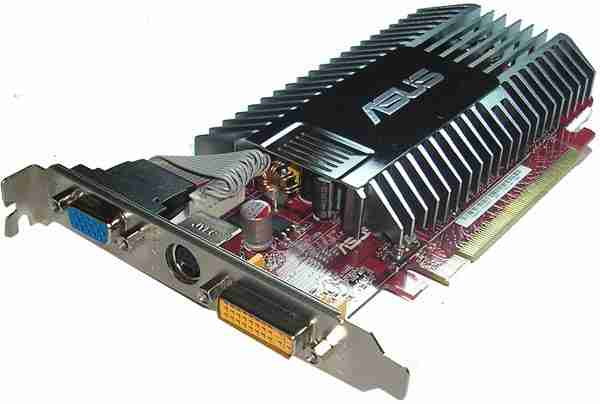
It was a struggle finding a motherboard with the required number of high-lane-count PCIe slots. Even on modern motherboards, there aren’t many about within a reasonable price range that have more than a single x16 slot, and since I’m going with the new HBAs, a single slot is no longer enough. The motherboard I managed to obtain has a pair of x16 slots, and a x4 slot (x16 physical), along with a 3 x1 slots. The only downside is there’s no onboard graphics on this motherboard, so an external card will be required. Another cheapie from eBay sorted this issue out.
ATI Radeon HD3450
Since I need to use the x16 ports for the disk controllers, this card will have to go into the x4 slot.
Motherboard Installed
Here the board has been installed into the new chassis, along with it’s IO shield. Both HBA cards are jacked into the x16 slots, with the SAS/SATA loom cables attached. I did have to grab longer cables – the originals I had were only 500mm, definitely not long enough to reach the ports on these cards, so 1m cables are used. The fans are plugged in with extensions to a pair of the headers on the motherboard, but the MB doesn’t seem to want to read RPM from those fans. Nevermind. While the fans are a little close to the adjacent cards, the heatsinks run just about warm to the touch, so there’s definitely enough airflow – not forgetting the trio of 120mm fans in the bulkhead just out of shot, creating a breeze right through the chassis.
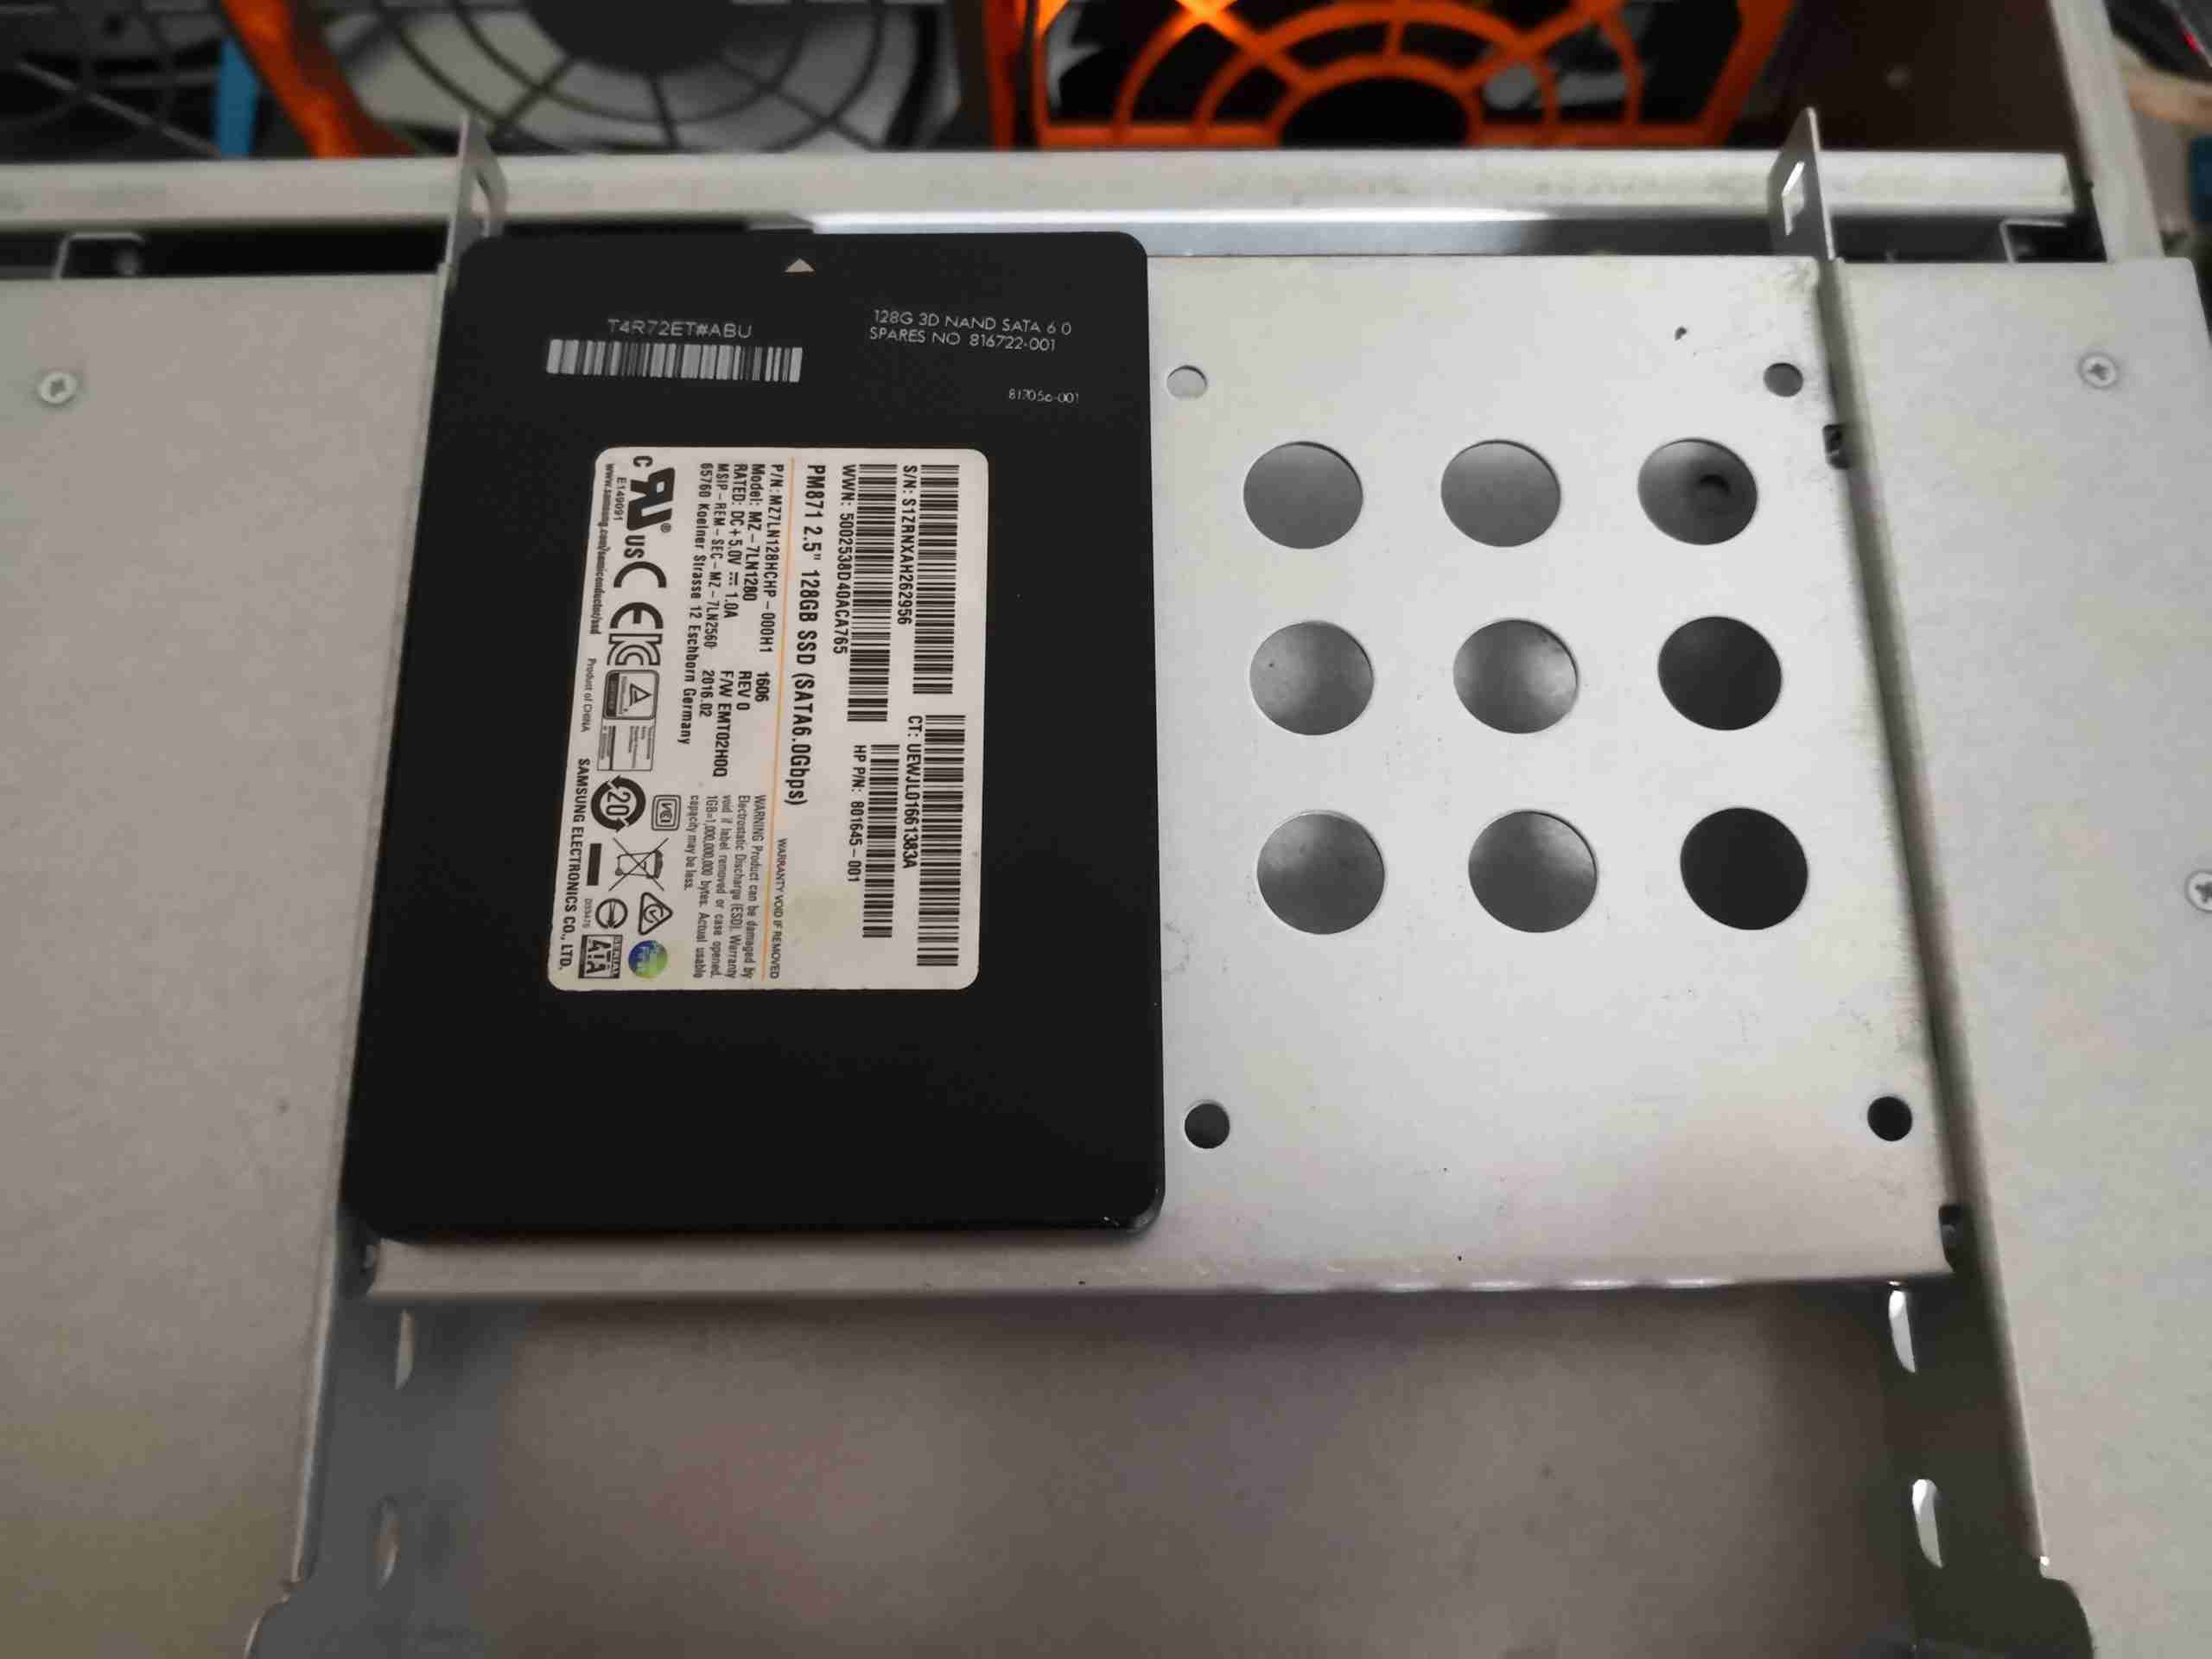
Boot SSD
Since the onboard SATA ports are in a better position, I was able to attach the boot SSD to the caddy properly, which helps tidy things up a bit. These slot into the 5-¾” bays on the front of the chassis, above the disk cage.
Loom Closeup
To take up the excess cable length, and tidy things up, the data loom to the disk cage is cable-tied to self-adhesive saddles on the side of the chassis. This arrangement also helps cooling air flow.
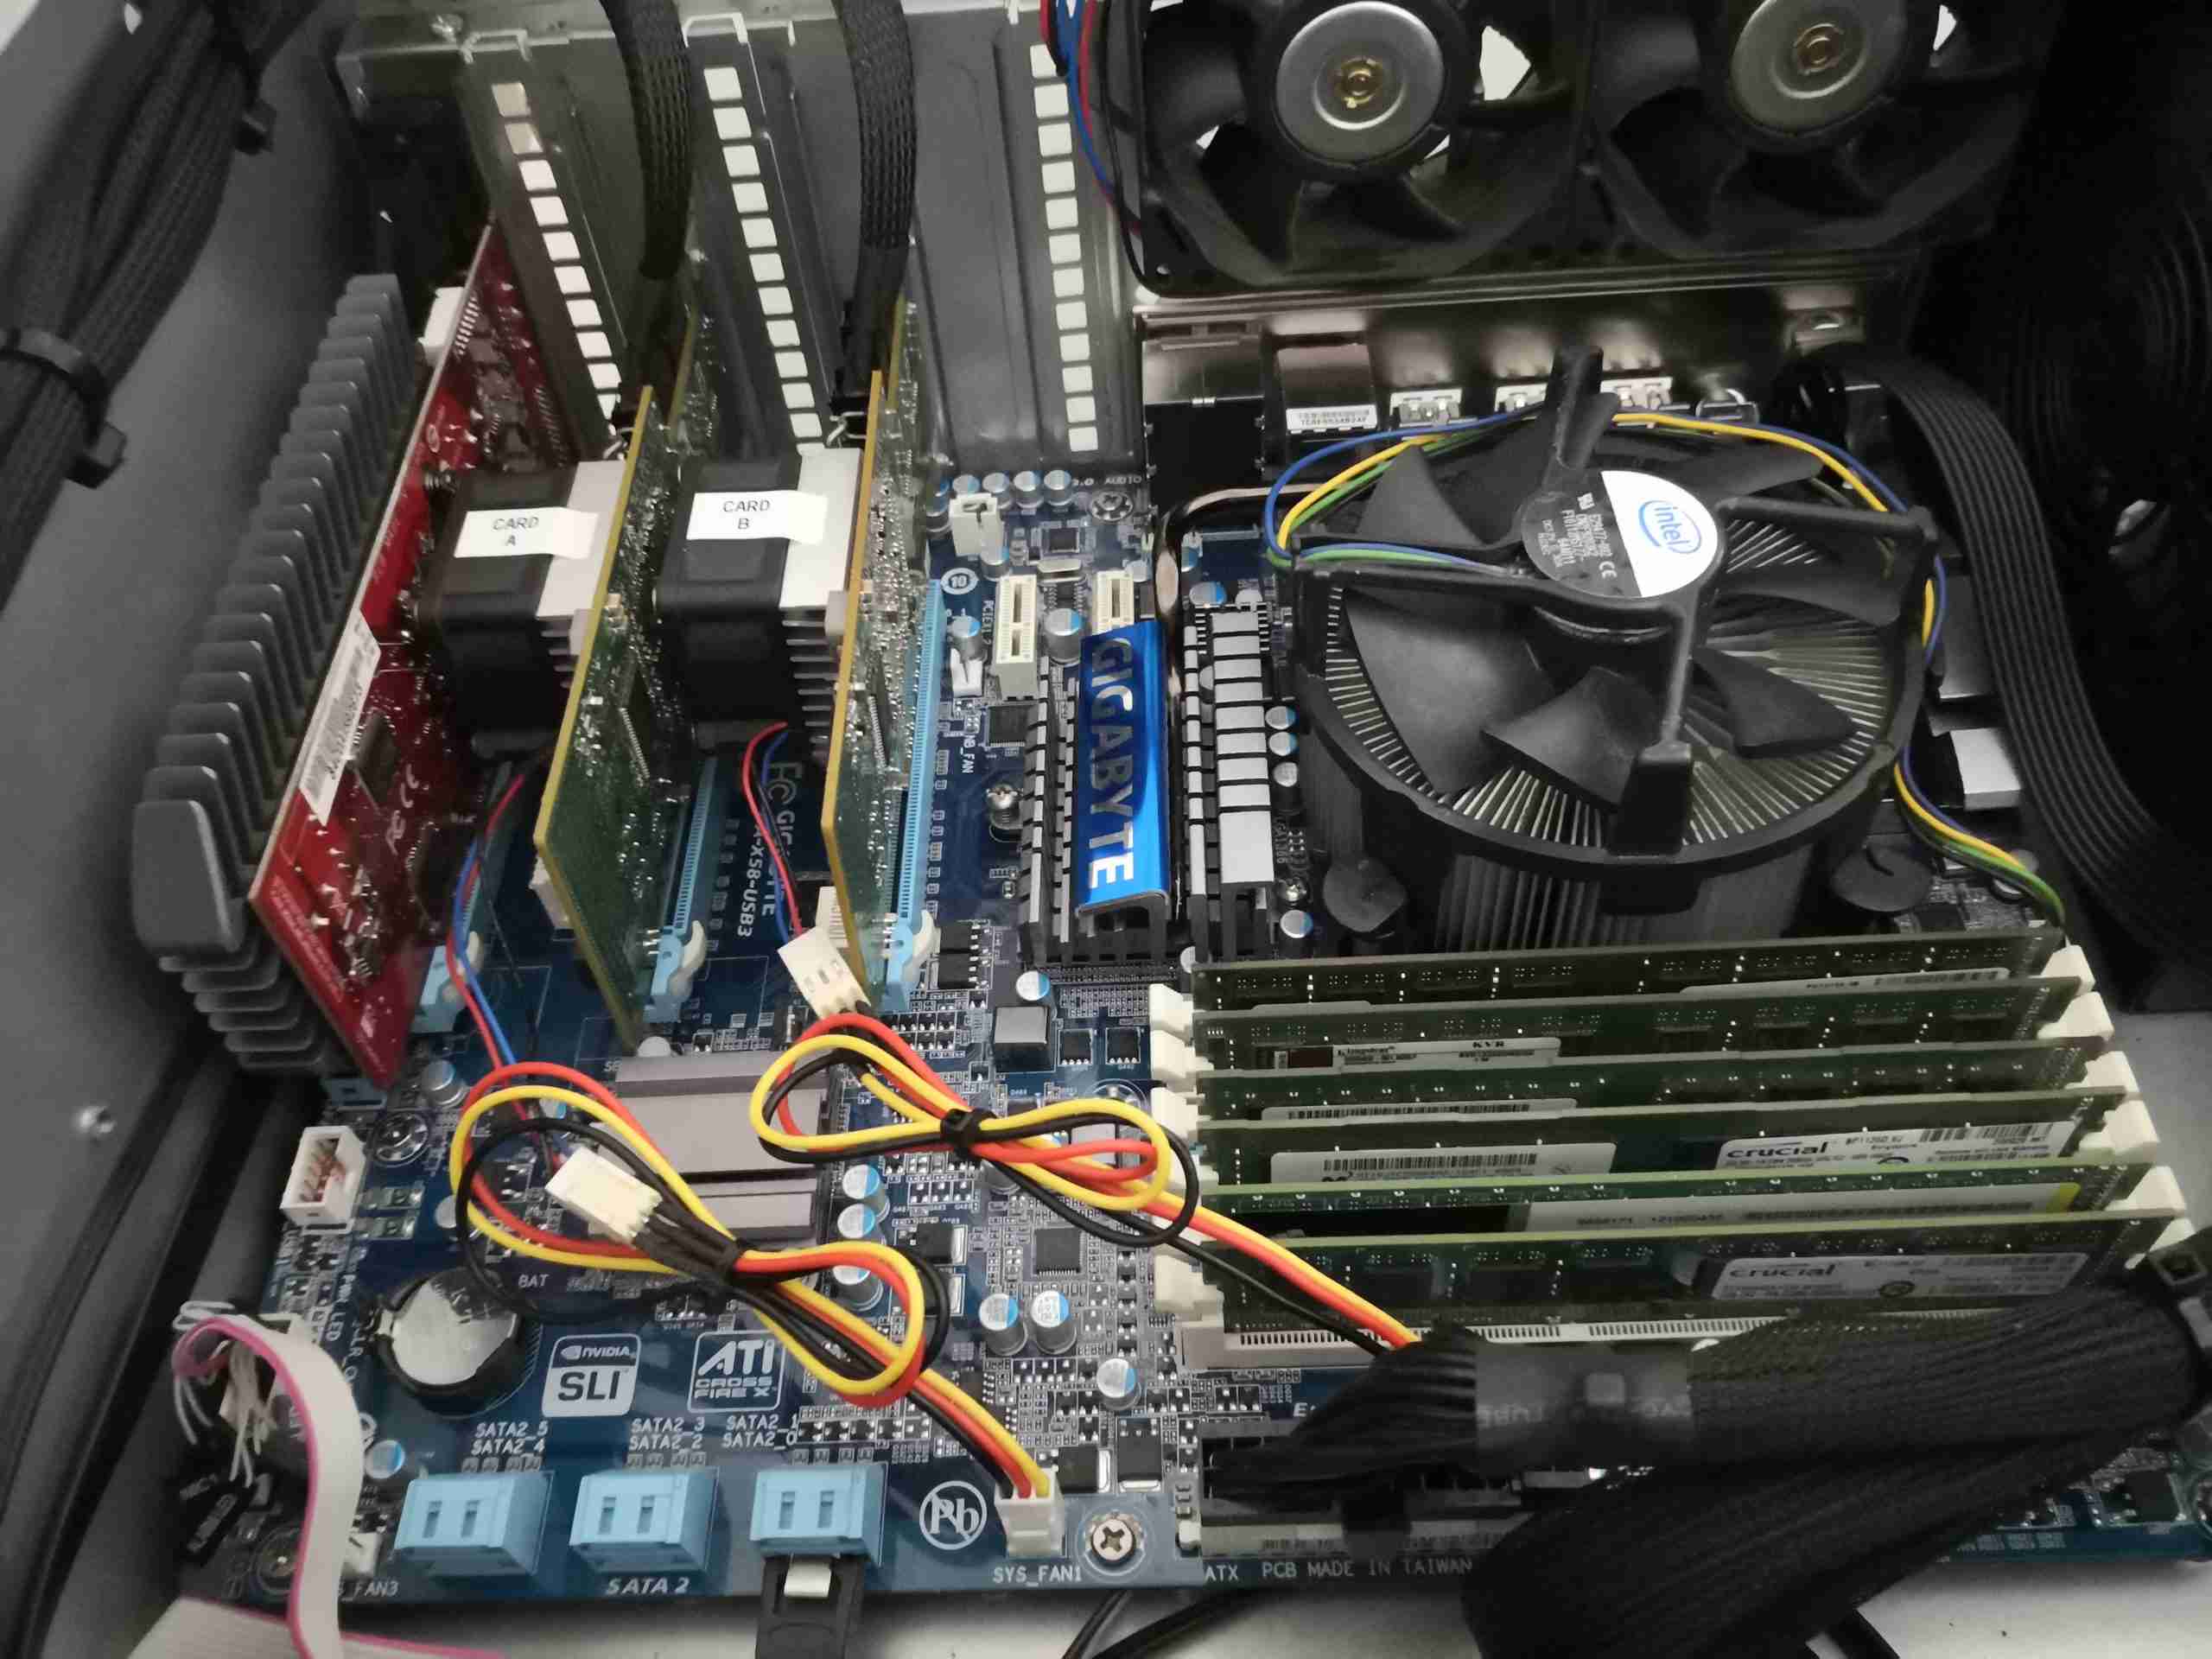
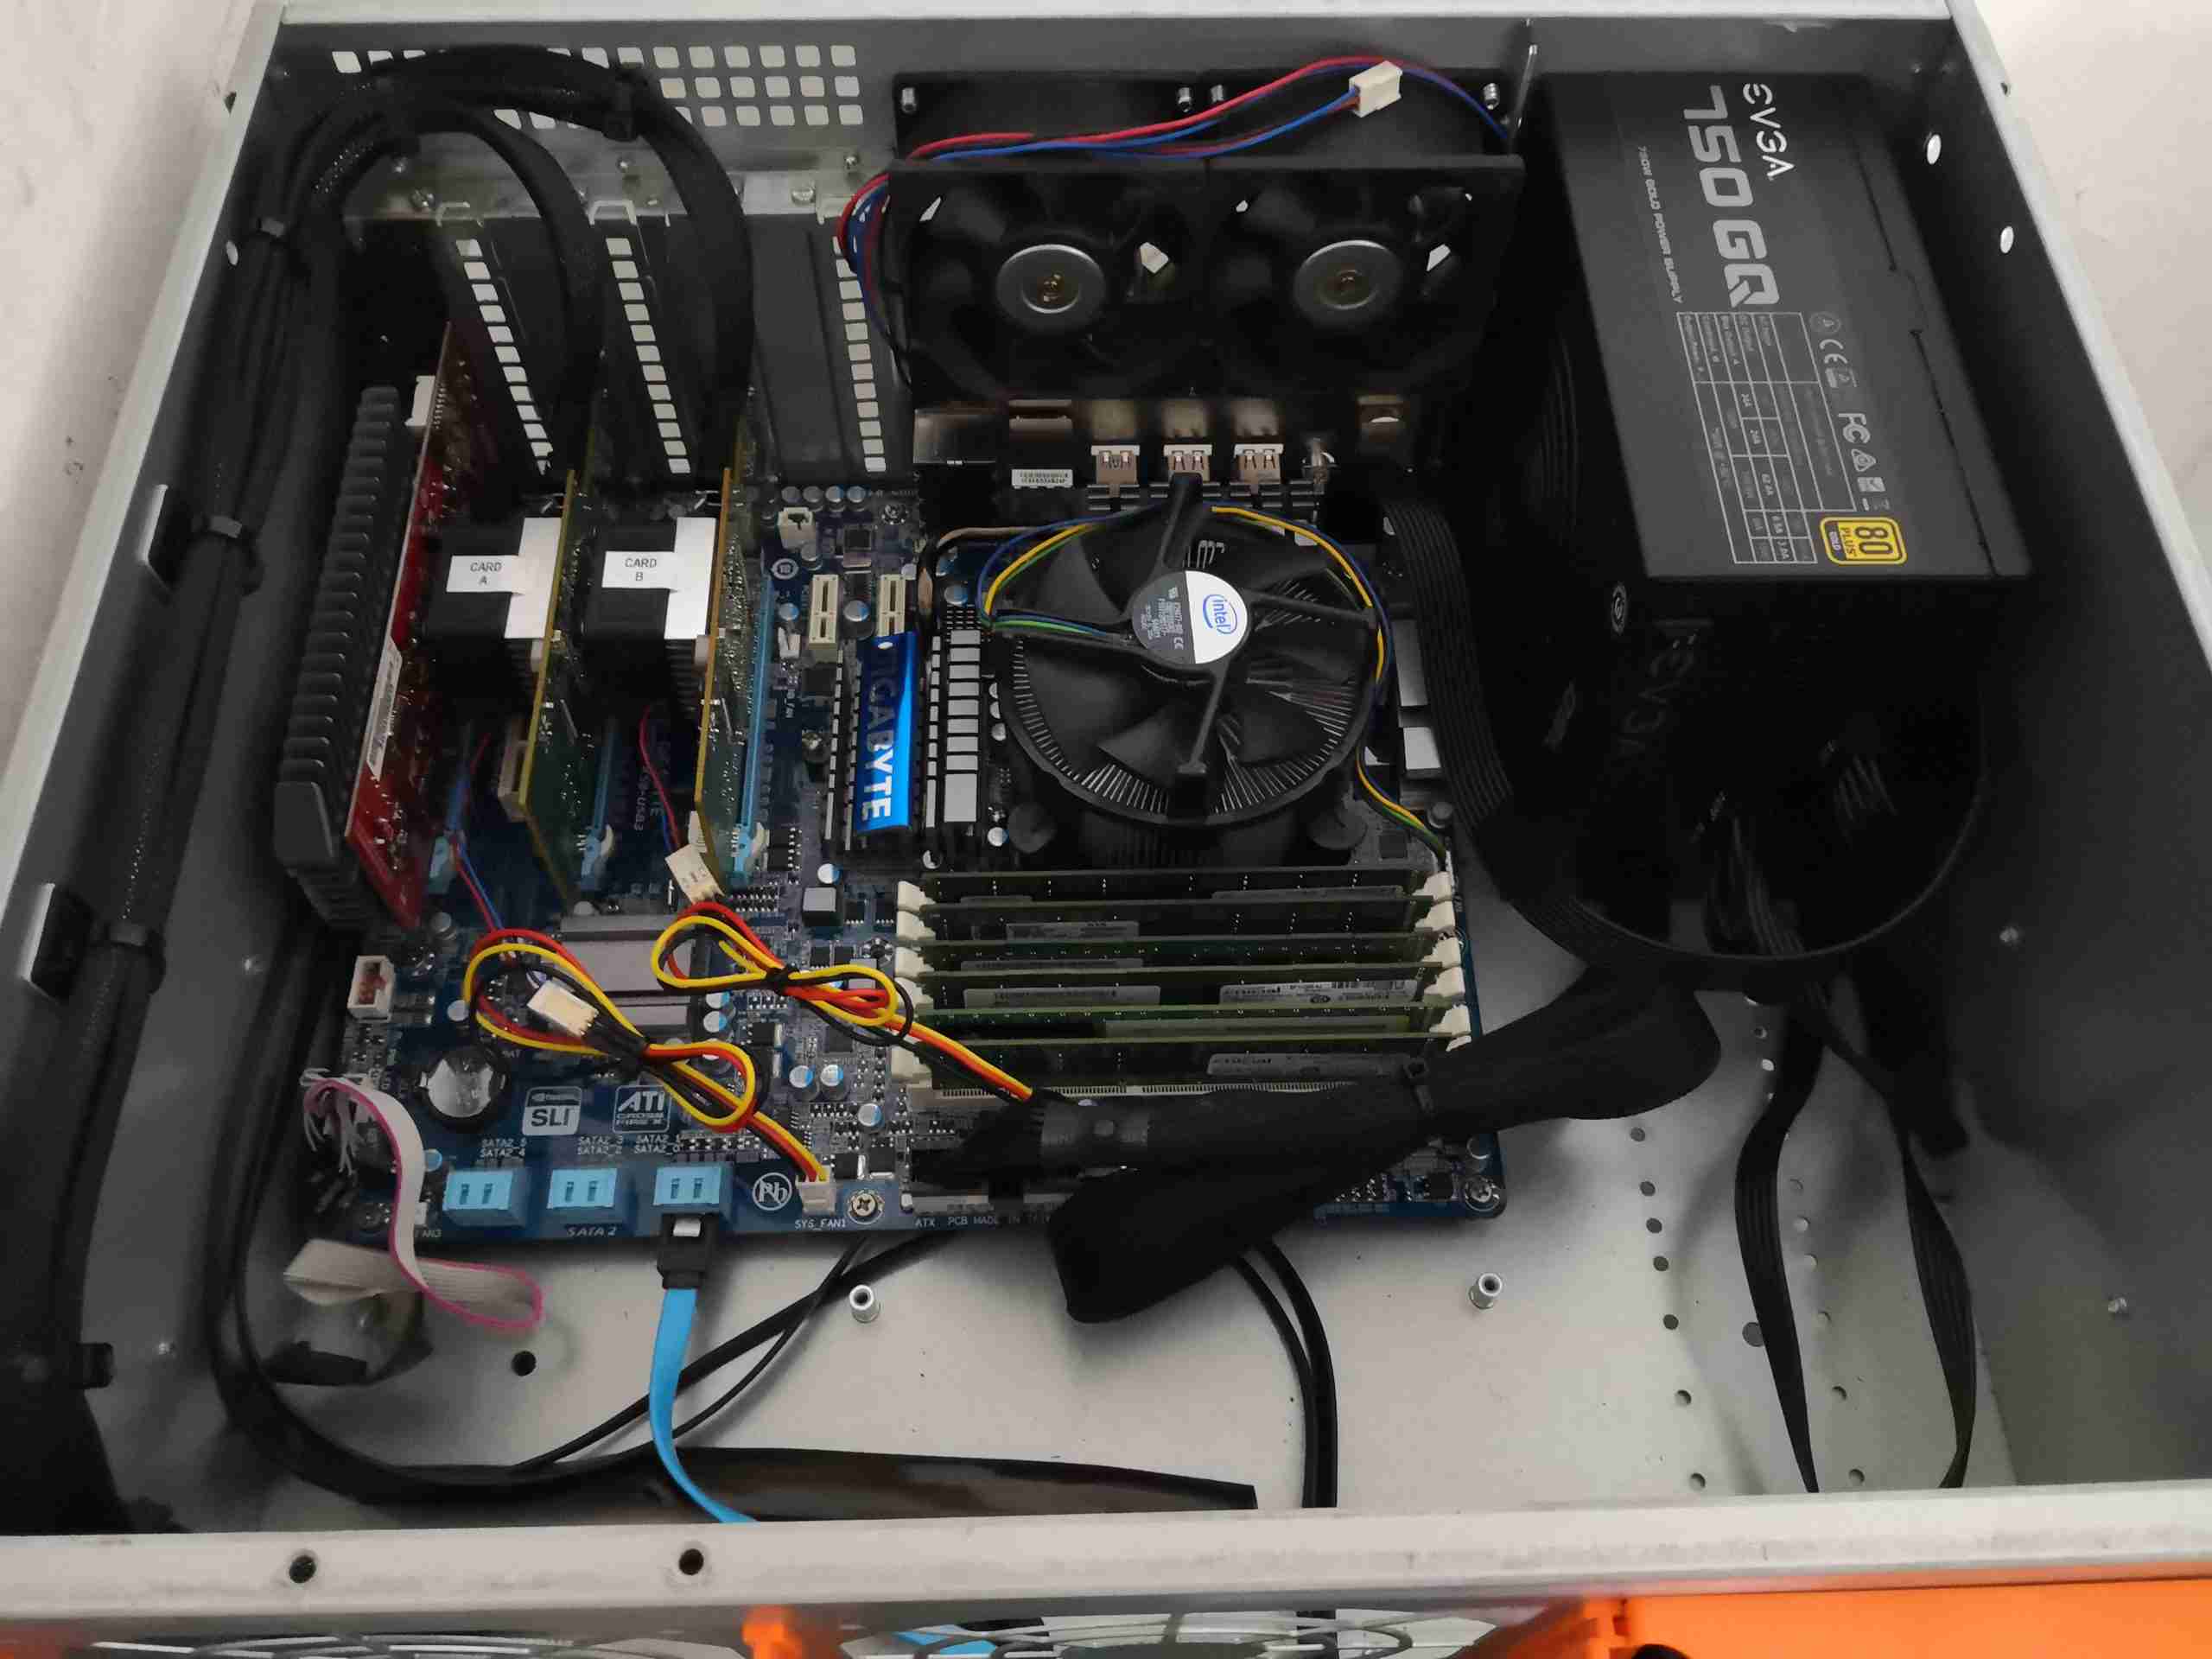
Server Overview
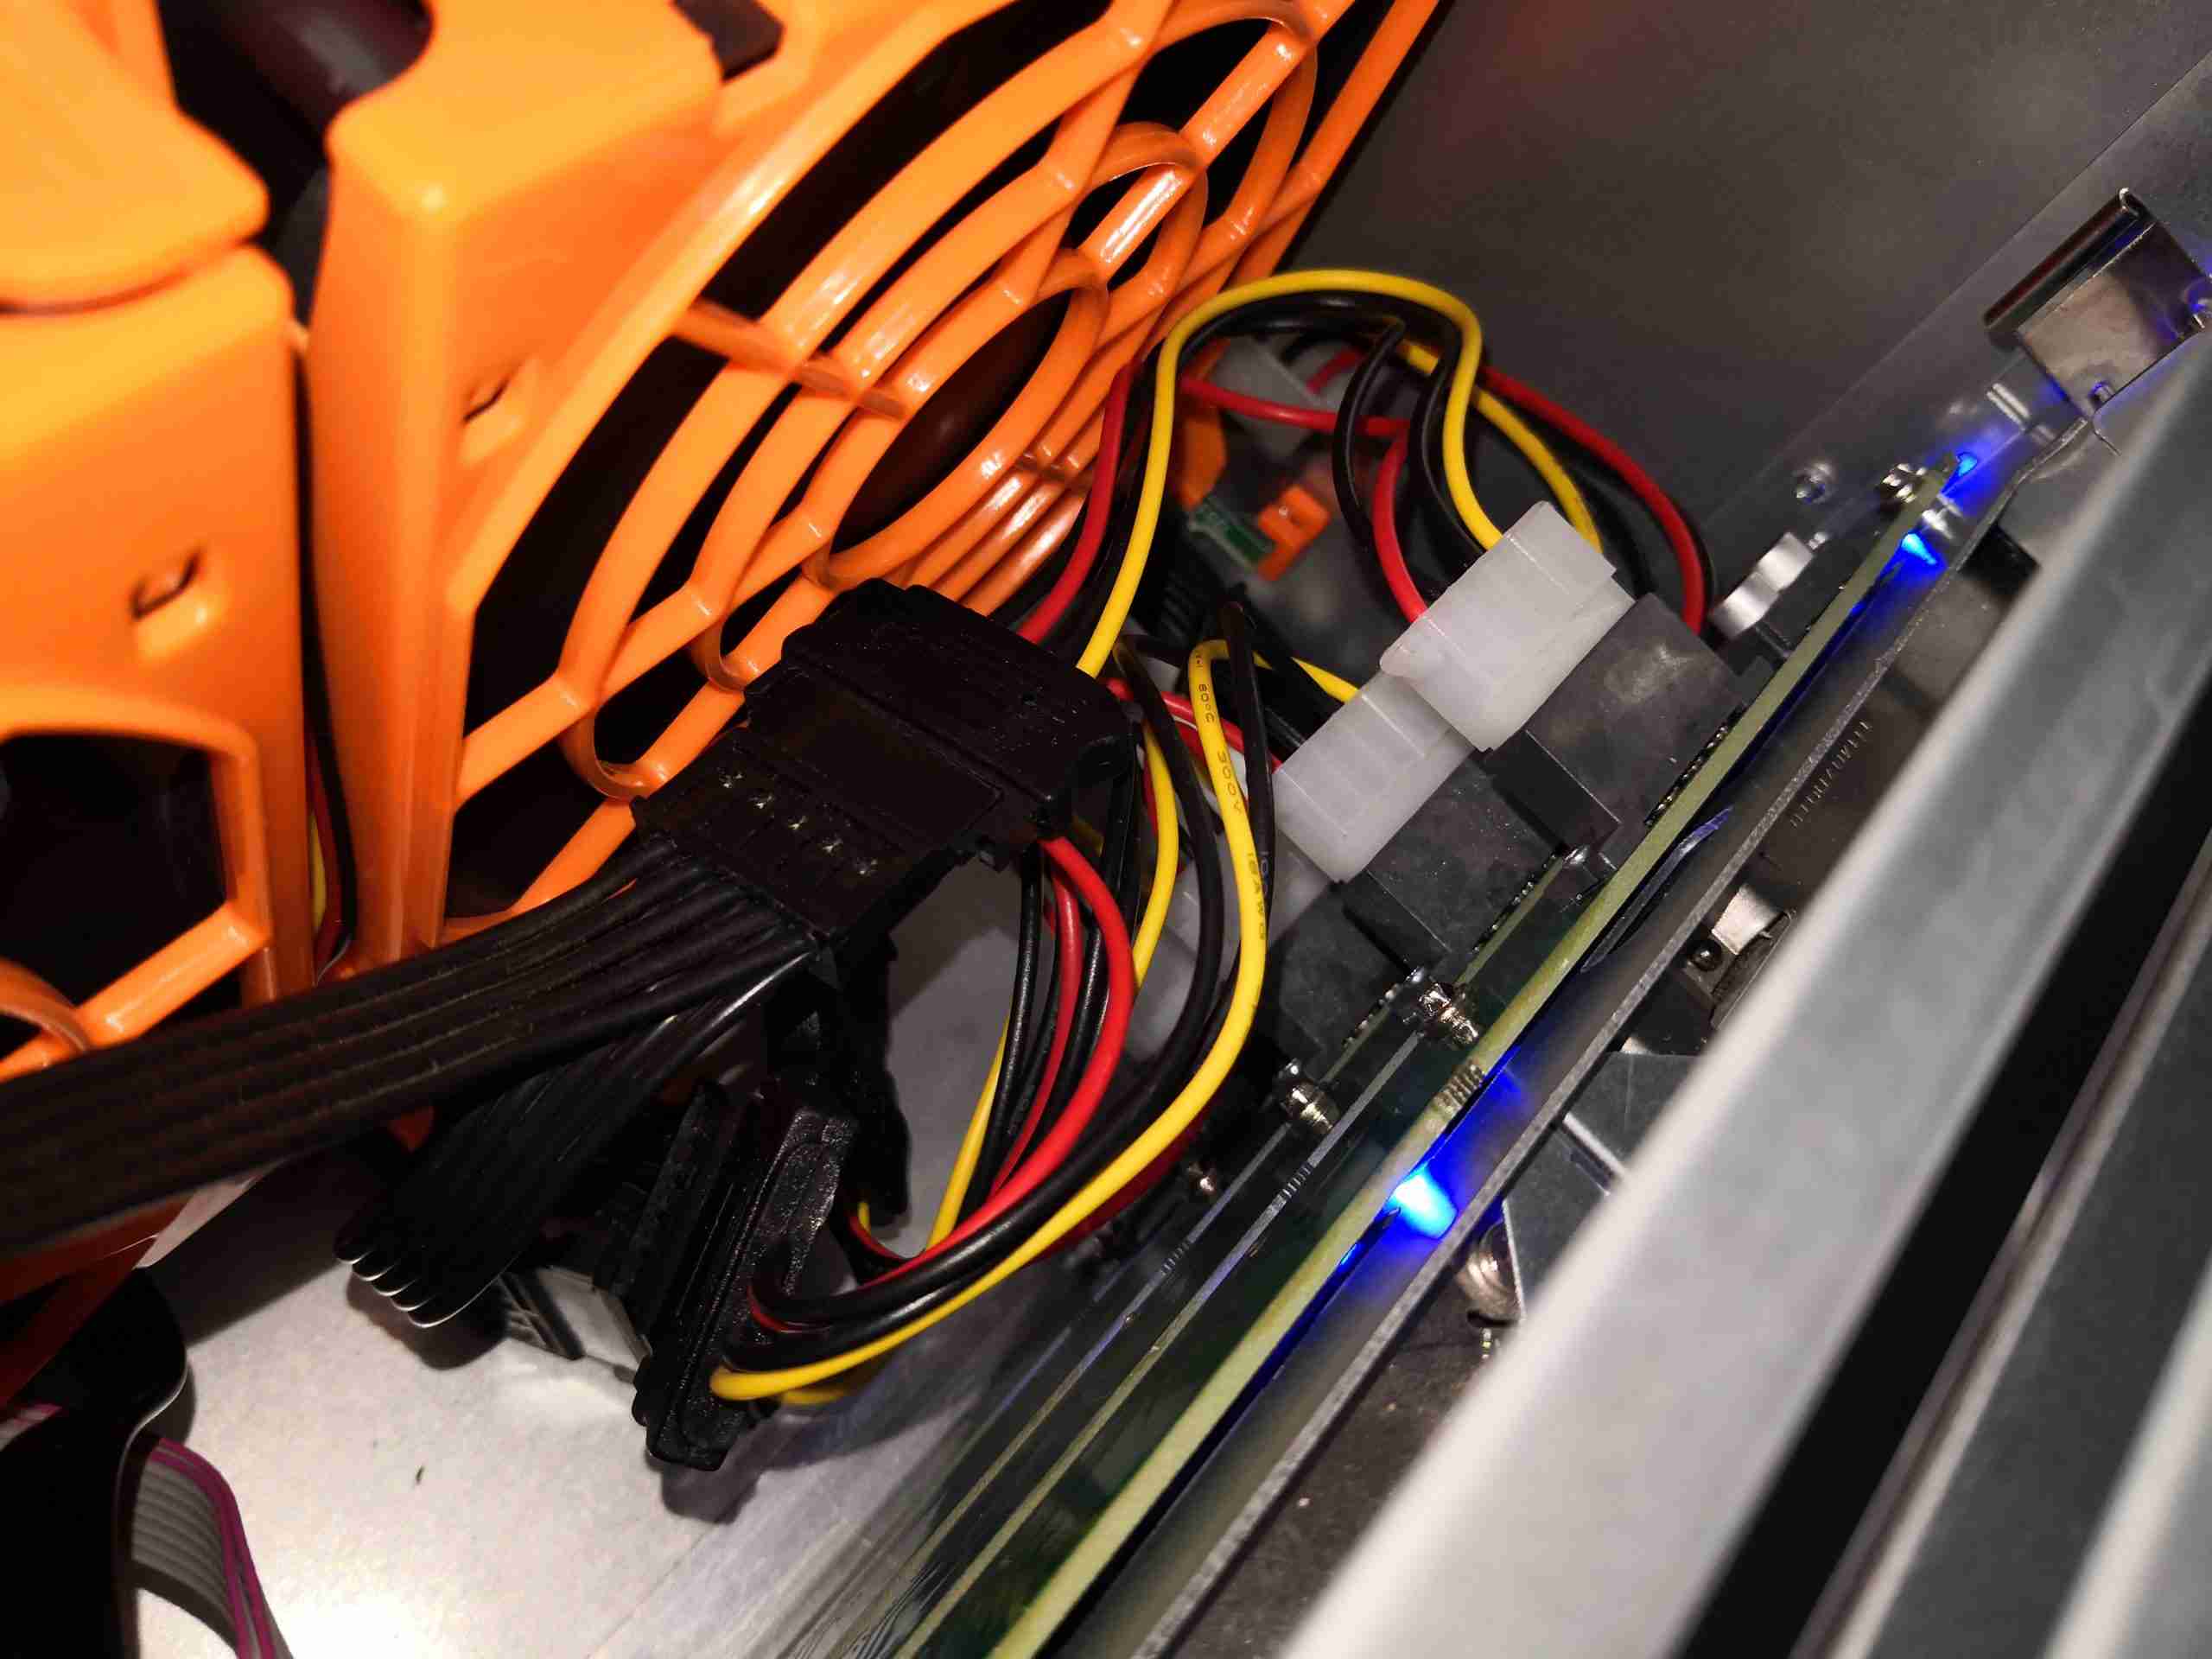
With the new components, and the cabling tied up, things inside the chassis look much cleaner. I’ve rationalised the power cabling to the disk backplanes down to a a pair of SATA power looms.
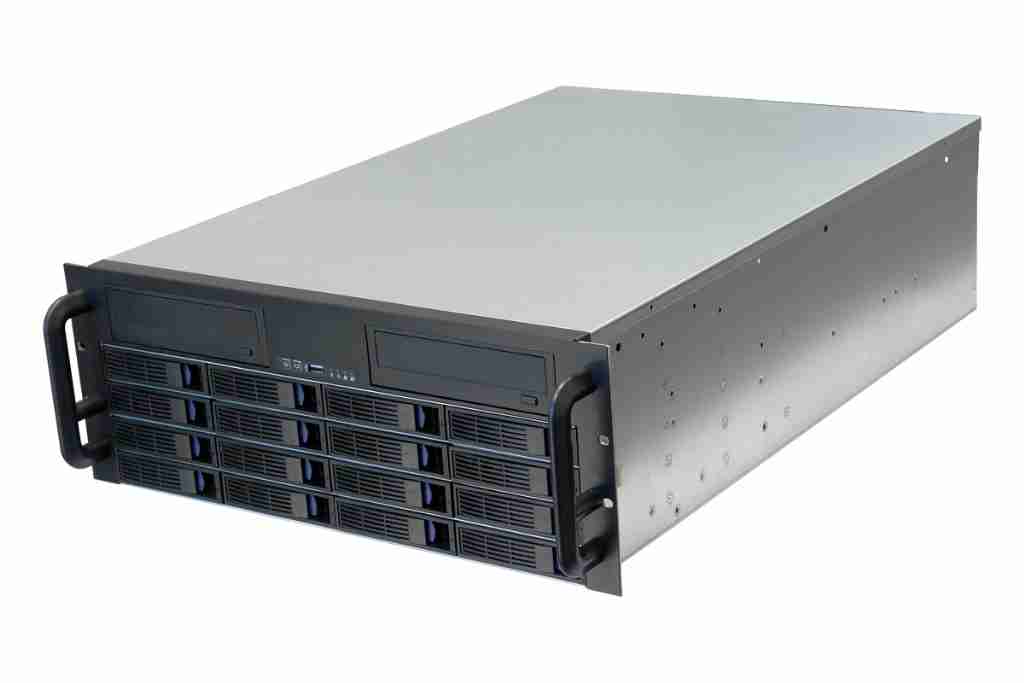
So I figured it was time to get a hardware update sorted for my network’s core storage server, which I have posted about before. The way I had the drives anchored to steel rails really doesn’t make moving or replacing disks easy, so a proper case needed to be sourced.
4U 16-Bay Hotswap Chassis
ServerCaseUK stocked 16-bay 4U chassis units, so one of these was ordered. These have 4 internal backplanes, with SFF-8087 Mini-SAS connections, so hooking into my existing 16-channel HBA card would be simple. In the current setup, the multi-lane cables are routed out via SFF-8088 connectors to the drive array, so this will tidy things up considerably.
SFF-8087 Connections
The main data links are via these SFF-8087 connectors, each carrying 4 lanes of SATA.
Backplane Power
Power is provided by 4x Molex connections, via SATA power adaptors (the good kind, which don’t create fire). There’s a 5th Molex hidden down the size of the last fan, which powers all 3 120mm fans.
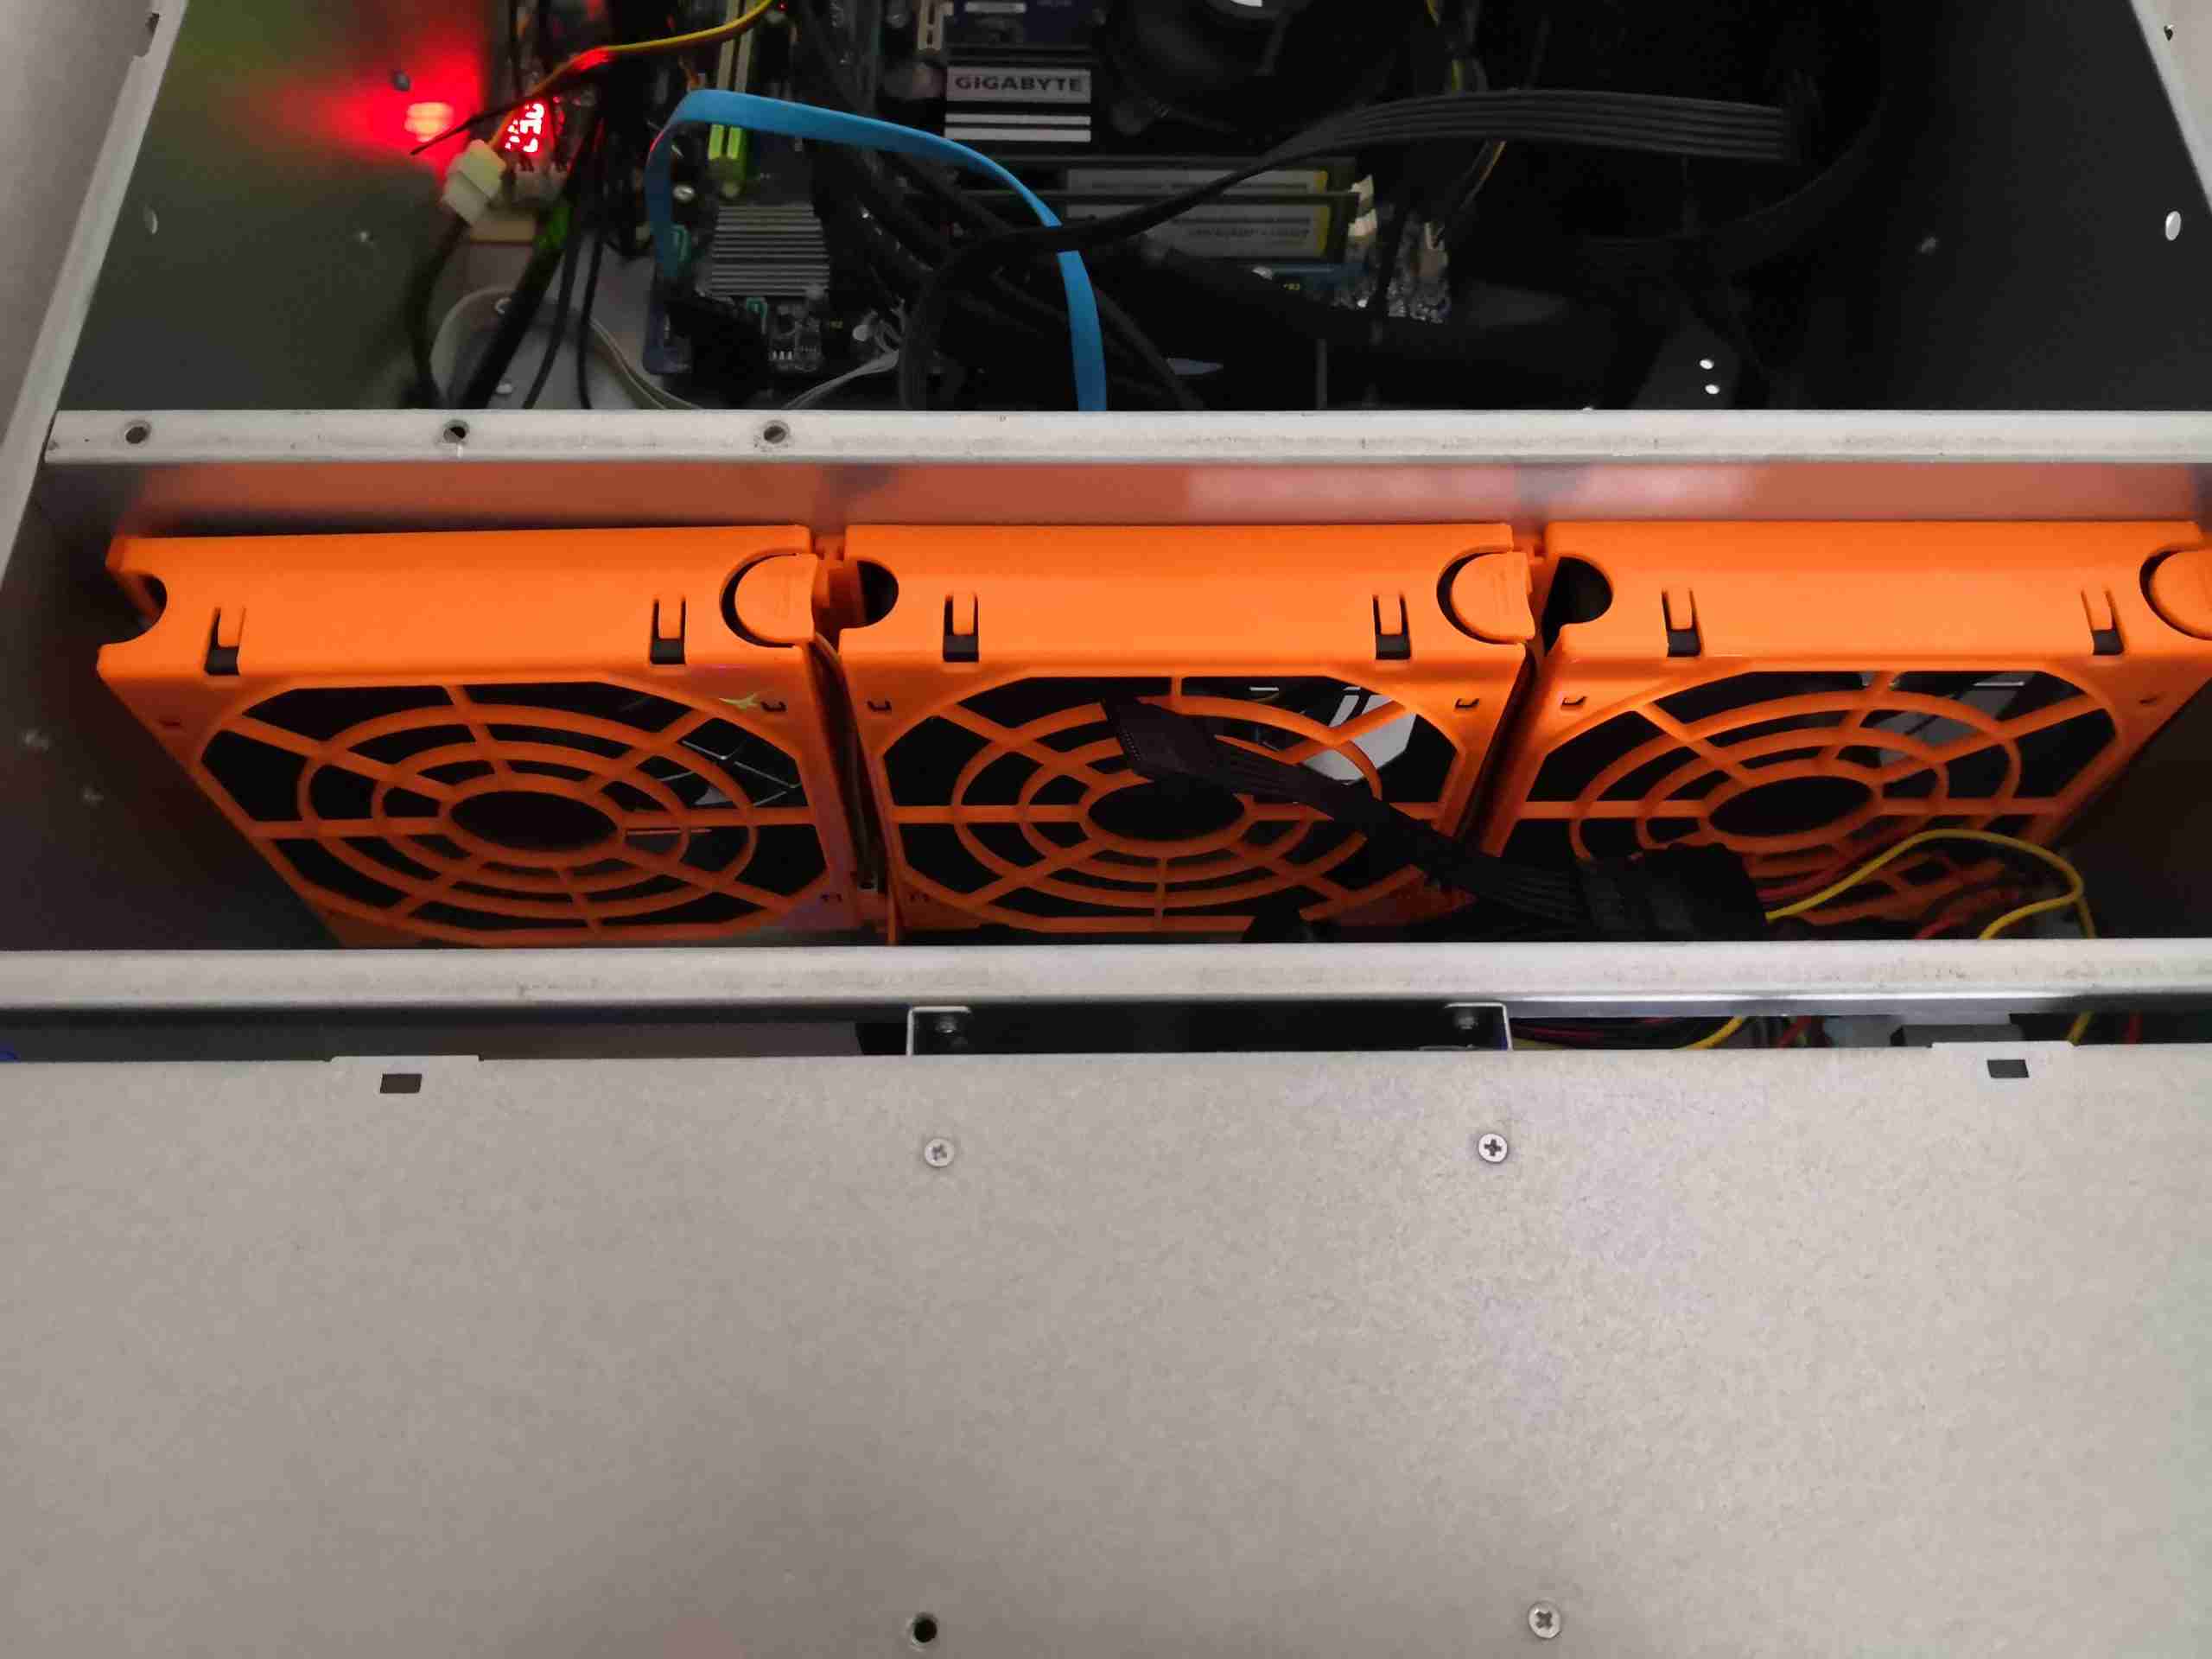
Disk Array Fan Wall
The disks are kept cool by 3x 120mm hot-swap fans on the dividing wall. These don’t create much noise, and are always at full speed.
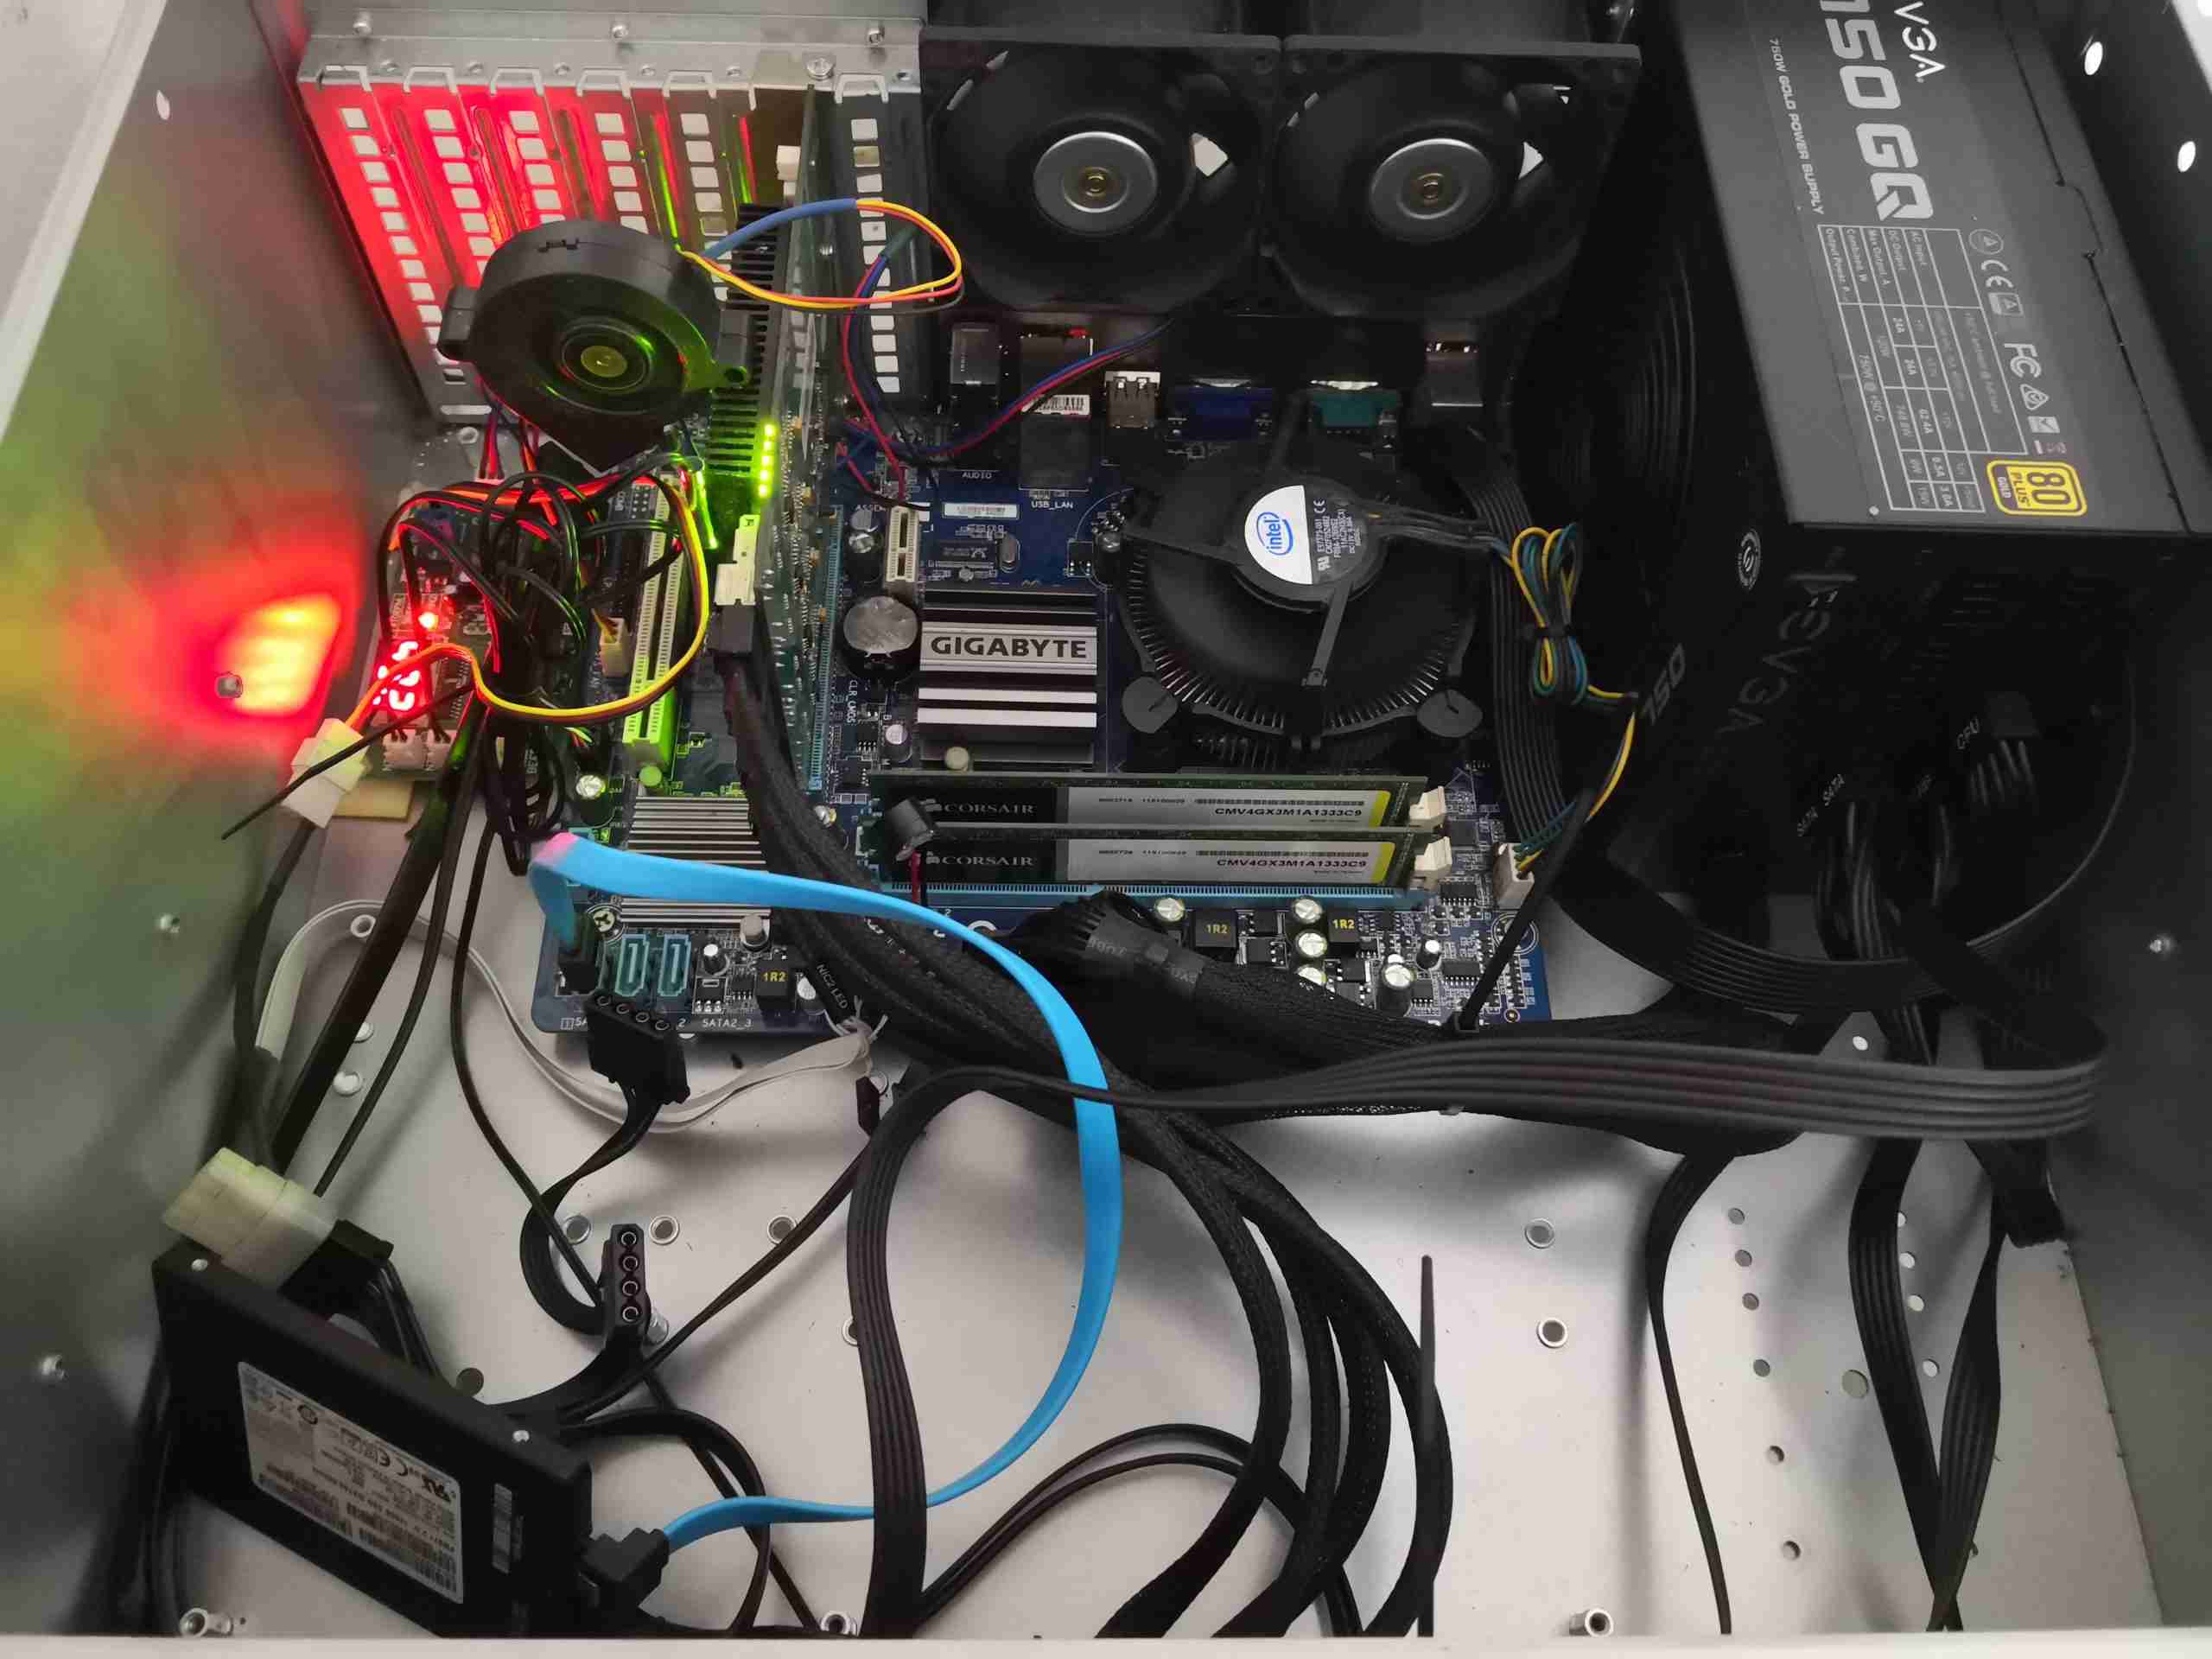
Motherboard Bay
Here’s the back of the case after transplanting the motherboard & HBA from the old chassis. There’s a new 750W EVGA modular power supply, since I’ll be expanding the disk array as well. The boot SSD is currently sat on the bottom of the case since I don’t have a data cable long enough to mount it in the proper place as yet.
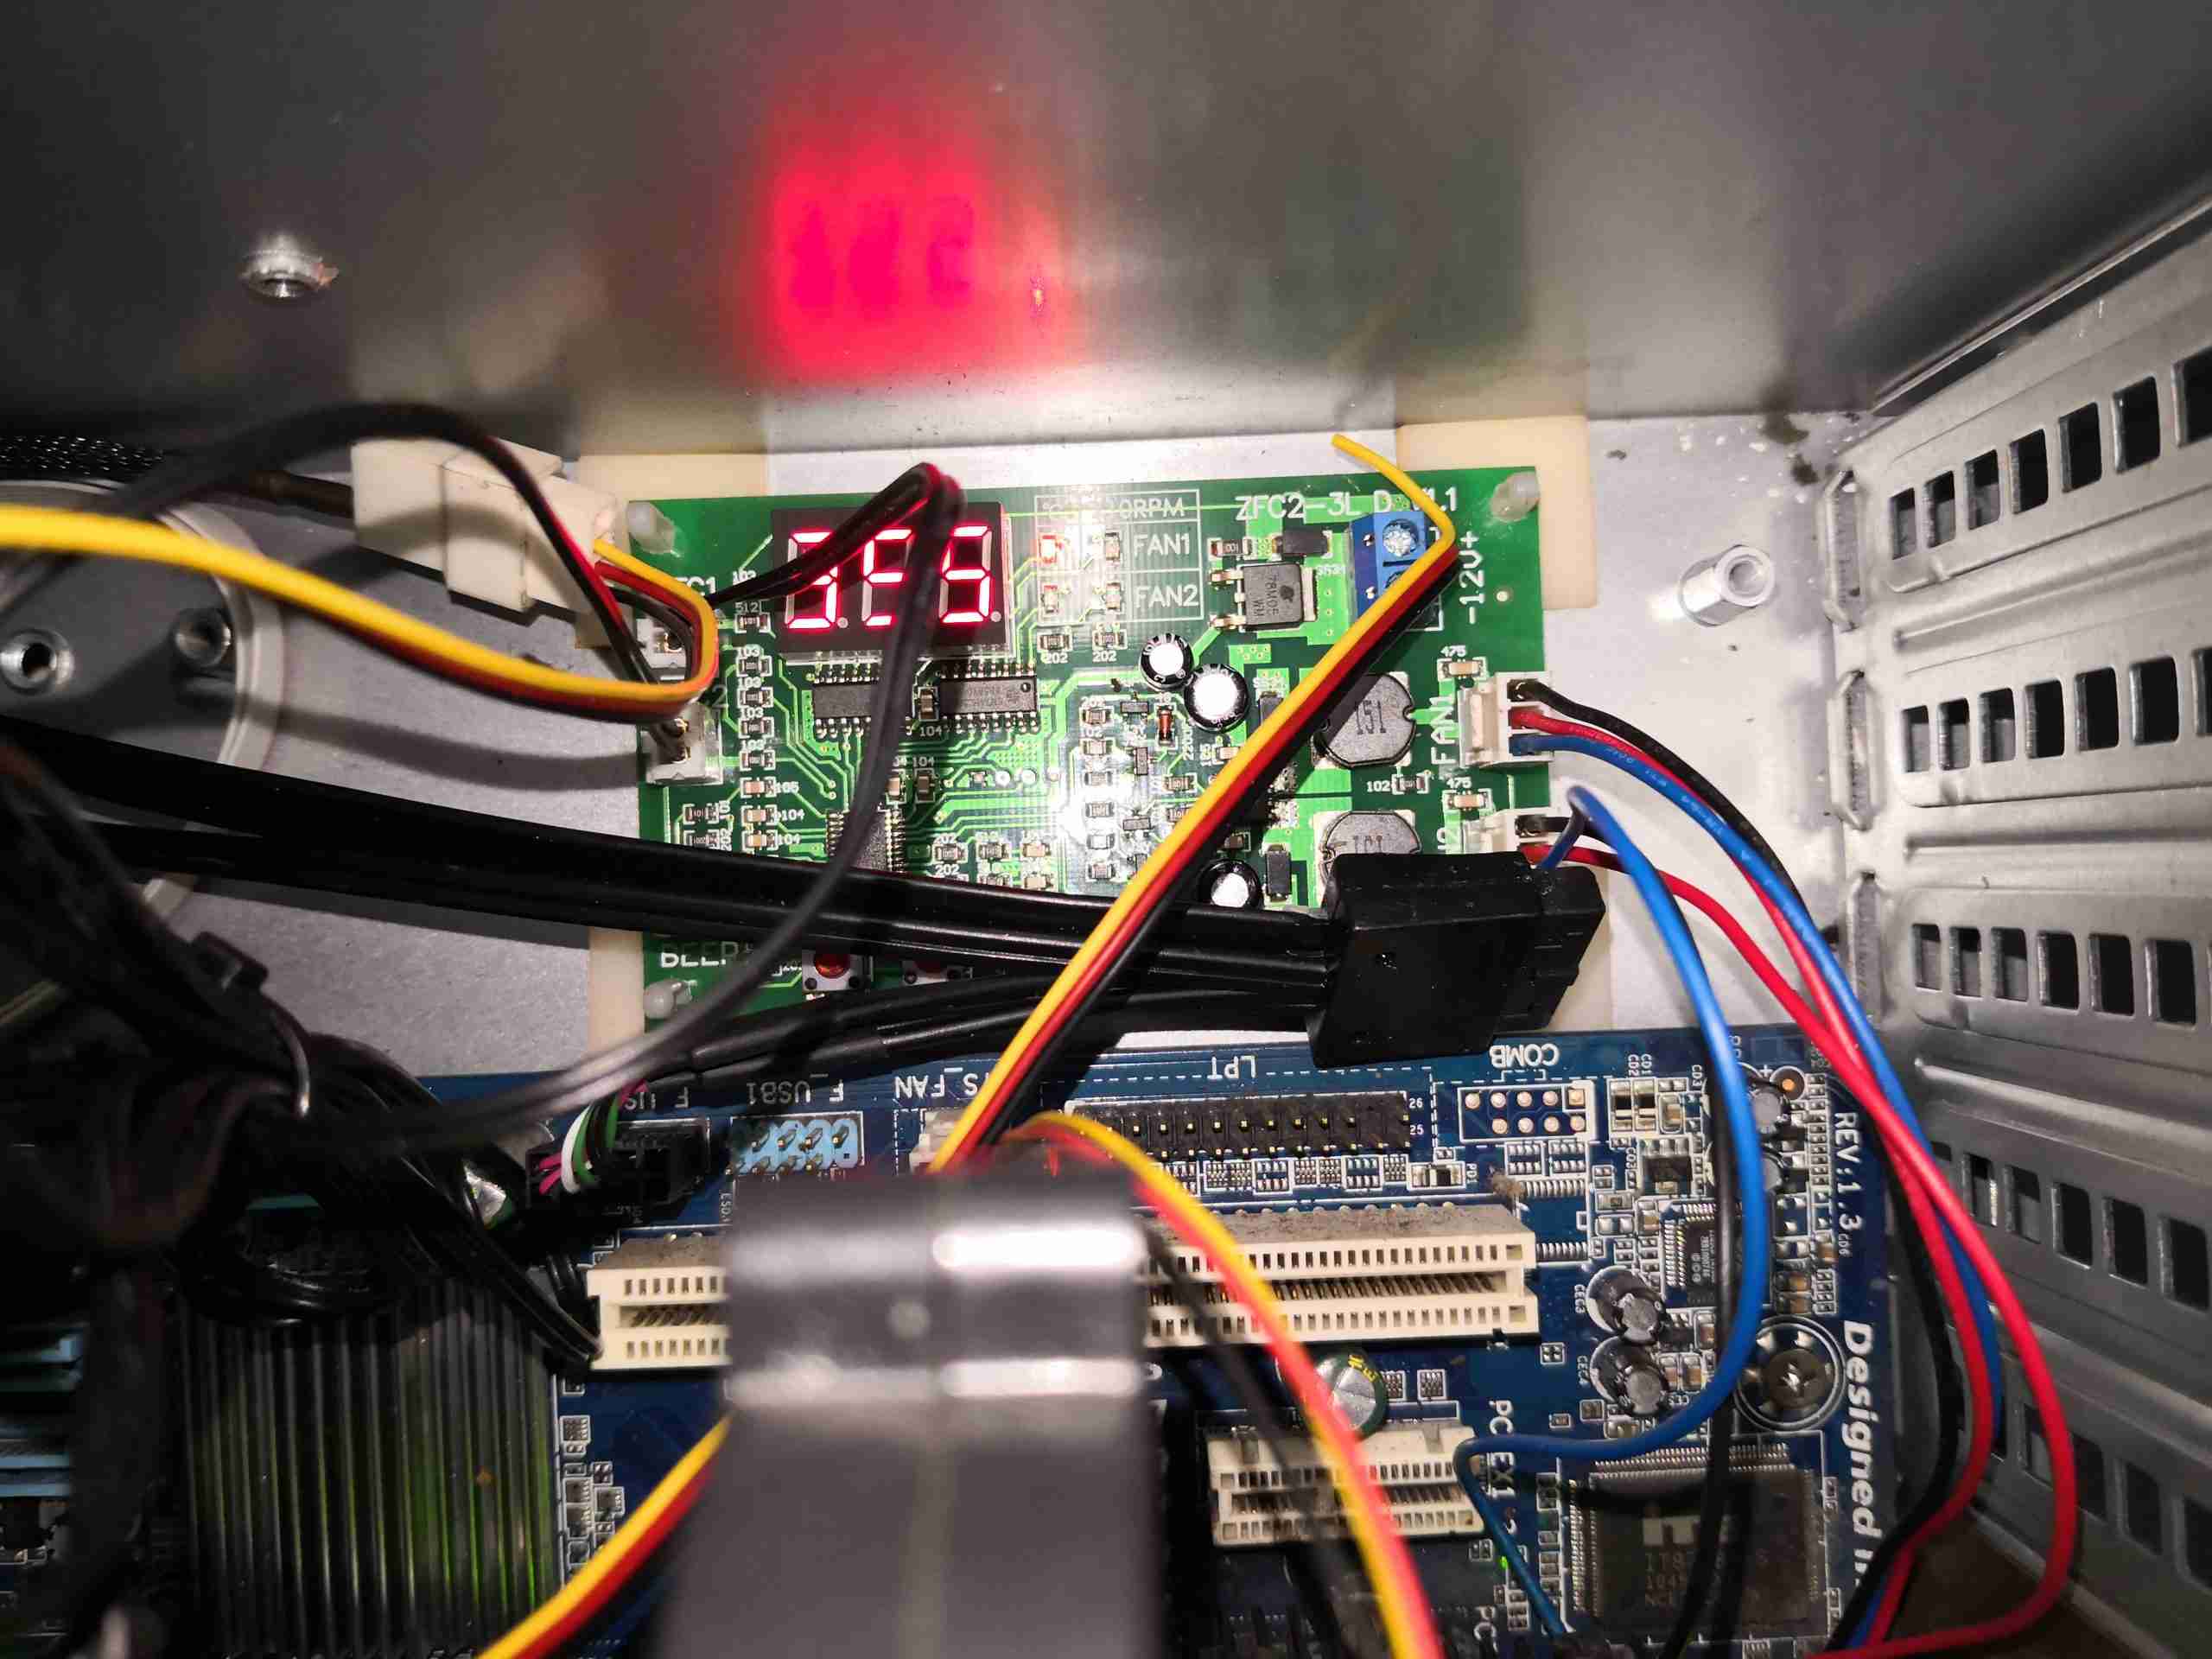
Fan Controller
Here’s the fan controller, which takes care of the dual high speed Delta fans on the back wall of the chassis. This has a pair of temperature sensors – one on the HBA card’s heatsink, and the other on the fan wall monitoring the exhaust air temp of the drive array, to control the speed of the two fans. Temperatures are kept at around 30°C at all times.
16-Port SATA HBA
Since the HBA card’s fan failed a while back, it’s had a couple of fans attached. The centrifugal one here works a little better than a massive 80mm axial fan, and is a little quieter. This is always run at full speed from a spare motherboard header. The temperature sensor feeding the fan controller can be seen here bonded to the heatsink. The 4 SFF-8087 cables are going off to the disk backplanes.
Cooling
As mentioned before, there are a pair of 80mm Delta high-speed fans on the back wall of the case, to provide some extra cooling air flow just in case overheating manages to set in. These are usually spooled down to low RPM to keep them quiet.
Since space was getting a little tight, and having some slots spare on the HBA, I decided to add some more disks to bring the active members up to 12, from 9 – increasing available disk space from 28TB to 40TB.
/dev/md0:
        Version : 1.2
  Creation Time : Wed Mar 11 16:01:01 2015
     Raid Level : raid6
     Array Size : 39068874880 (37258.98 GiB 40006.53 GB)
  Used Dev Size : 3906887488 (3725.90 GiB 4000.65 GB)
   Raid Devices : 12
  Total Devices : 13
    Persistence : Superblock is persistent

  Intent Bitmap : Internal

    Update Time : Mon Nov 18 14:13:35 2019
          State : active
 Active Devices : 12
Working Devices : 13
 Failed Devices : 0
  Spare Devices : 1

         Layout : left-symmetric
     Chunk Size : 64K

           Name : Main-PC:0
           UUID : 266632b8:2a8a3dd3:33ce0366:0b35fad9
         Events : 1653174

    Number   Major   Minor   RaidDevice State
      16       8      144        0      active sync   /dev/sdj
      11       8      160        1      active sync   /dev/sdk
       9       8      176        2      active sync   /dev/sdl
      10       8      208        3      active sync   /dev/sdn
      15       8      192        4      active sync   /dev/sdm
       5       8      112        5      active sync   /dev/sdh
       6       8       80        6      active sync   /dev/sdf
      13       8       96        7      active sync   /dev/sdg
       8       8       64        8      active sync   /dev/sde
      19       8        0        9      active sync   /dev/sda
      18       8       48       10      active sync   /dev/sdd
      17       8      128       11      active sync   /dev/sdi

      12       8       16        -      spare   /dev/sdb
The space expansion improves things there, I will be adding a couple more spare disks to bring the number up to the full 16, just in case of any failures.
There are still a couple of issues with this setup:
The motherboard & CPU are ancient. Currently an Intel Core 2 Quad, running 8GB of RAM, limits data throughput, and critically, the speed of mdadm data checks & rebuilds. The Core 2 Quad also runs at roughly the same temperature as the Sun’s core when under high load.
The SATA HBA is running 4 controllers on an expander, through a PCIe x4 link, which is a little slow due to congestion on the expander itself. RAID6 does have some write-speed penalties though.
These are issues I will address shortly, with a replacement motherboard on the way!
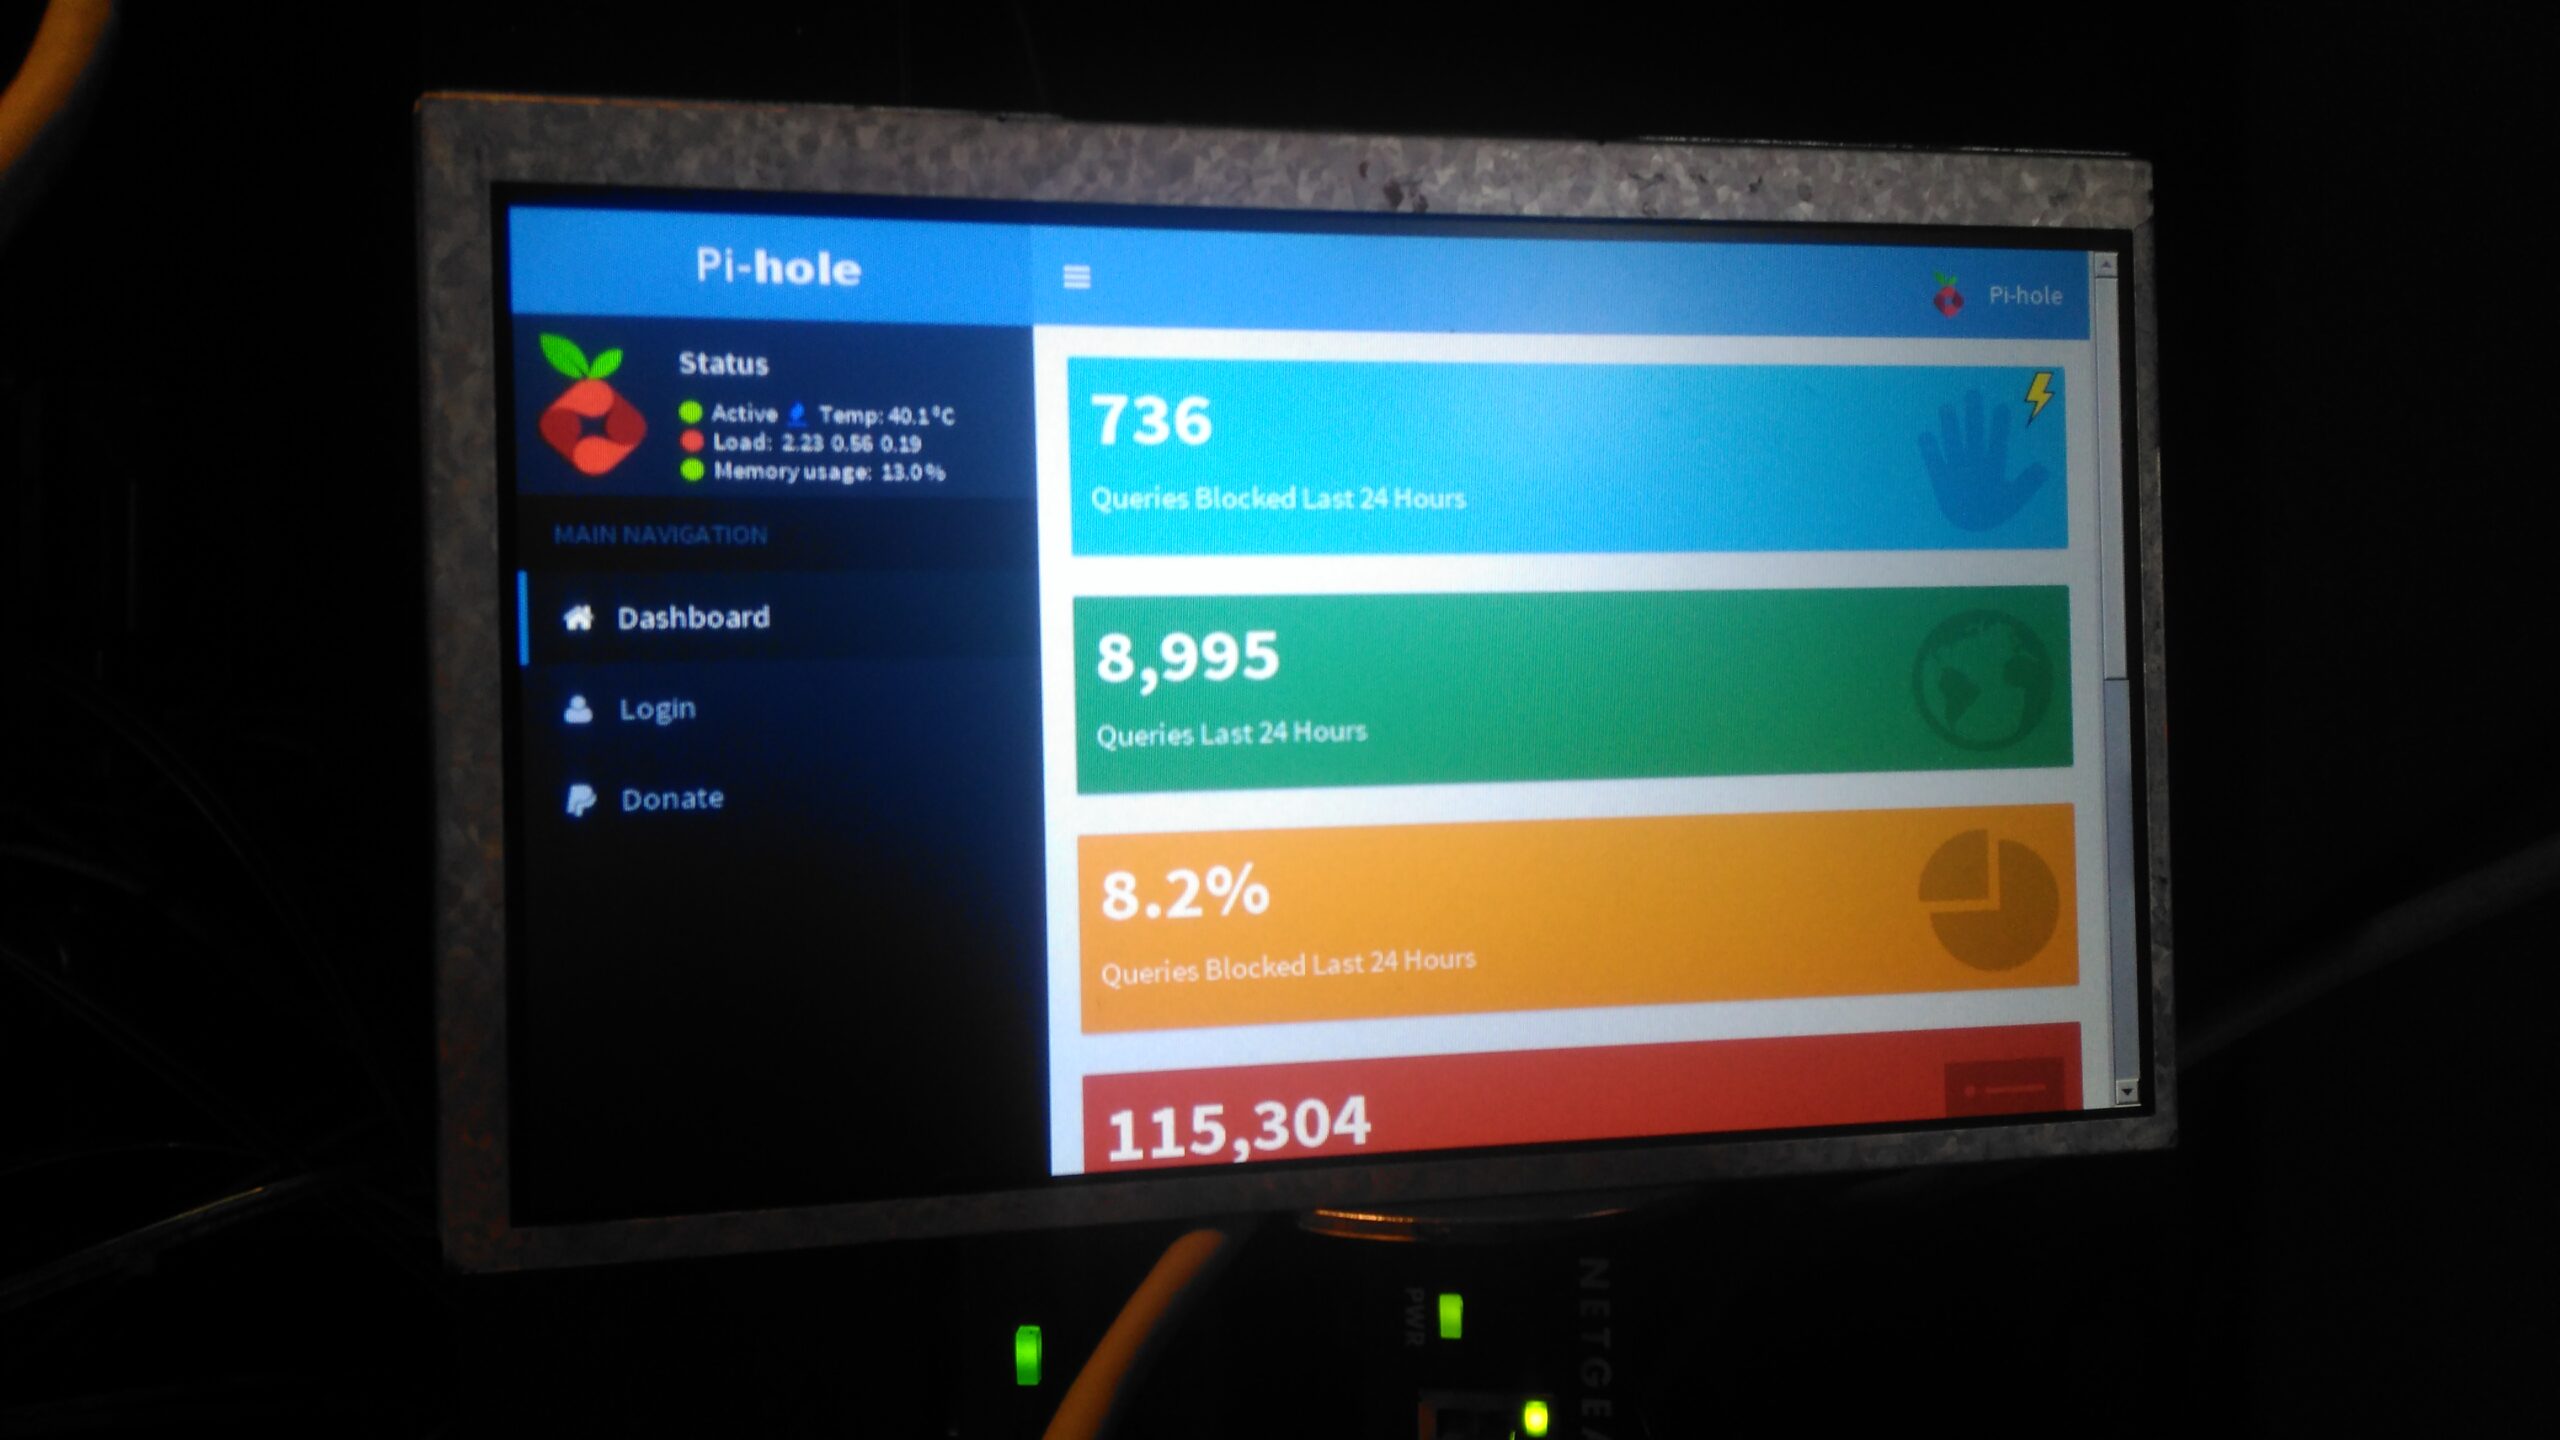
On my home network I have a system running PiHole – a DNS server that blocks all unwanted traffic, such as ads. Since I have an official Pi LCD with a broken touch panel, I decided to use the bare LCD as a status display for PiHole.
This requires some extra packages installing onto the base system after PiHole is installed & configured, and the interface automatically starts on bootup. I used the latest Raspbian Jessie Minimal image for this system, and ran everything over a SSH connection.
First thing, get the required packages installed onto the Pi:
Once these are installed, it’s time to configure the startup script for Midori to display the status page. Create StartMidori.sh in /home/pi and fill with the following:
#!/bin/sh export DISPLAY=:0
xset -dpms
xset s off
xset s noblank
unclutter &
matchbox-window-manager &
midori -e Fullscreen -a http://127.0.0.1/admin/
This script disables all power management on the system to keep the LCD on, starts unclutter to hide the mouse pointer and finally starts the Matchbox Window Manager to run Midori, which itself is set to fullscreen mode, and the URL of the admin panel is provided.
The next step is to test, give the script executable permissions, and run the script:
Once this is run, the LCD should come to life after a short delay with the PiHole stats screen. Close the test & return to the terminal by hitting CTRL+C.
Now the Pi can be configured to autorun this script on boot, the first thing to do here is to enable autologin on the console. This can be done with raspi-config, select Option 3 (Boot Options), then Option B1 (Desktop/CLI), then Option B2 (Console Autologin). When prompted to reboot, select No, as we’ll be finishing off the config before we reboot the system.
The next file to edit is /etc/rc.local, add the command to start the status browser up:
#!/bin/sh -e
#
# rc.local
#
# This script is executed at the end of each multiuser runlevel.
# Make sure that the script will "exit 0" on success or any other
# value on error.
#
# In order to enable or disable this script just change the execution
# bits.
#
# By default this script does nothing.

# Print the IP address
_IP=$(hostname -I) || true
if [ "$_IP" ]; then
  printf "My IP address is %s\n" "$_IP"
fi
sudo xinit /home/pi/StartMidori.sh &
exit 0
Here I’ve added in the command just above “exit 0”. This will start the browser as the last thing on bootup. The Pi can now be rebooted, and the status display should start on boot!
For years now I’ve used Virtualmin for my hosting requirements, and have made use of Procmail to filter my mail into folders (it’s the default, and rather tightly integrated). The only issue with this system is having to login to two different things for mail: I use Rainloop Webmail for general mail viewing, but the Procmail filters are only editable through the Usermin section of Virtualmin. This is awkward to say the least, so being able to use Sieve which is already supported by Rainloop is a better option. (Sieve is also supported via plugin in Roundcube).
Since we’re going to still need Procmail for the Virtualmin-managed Spam & Virus scanning functions, we will add Sieve at the end of Procmail. There are some
First thing, get Sieve installed via Dovecot, with the following:
yum install dovecot-pigeonhole
Some configuration changes are required to Dovecot to get the Sieve server running, /etc/dovecot/conf.d/15-lda.conf should have this section:
protocol lda {
 # Space separated list of plugins to load (default is global mail_plugins).
 mail_plugins = sieve
}
Finally, in /etc/dovecot/conf.d/20-managesieve.conf, uncomment this section to enable the managesieve server:
service managesieve-login {
 inet_listener sieve {
 port = 4190
 }
}
After these changes are made, restart Dovecot to get the configs reloaded. It’s easy to check if the Sieve server is listening by running the following command:
Since I’ve been working on the backend servers a lot over the past few days, I’ve decided it was time to get some broken things on the blog fixed.
Firstly, the radiation monitor graphs. Originally I was using a Raspberry Pi to grab the data from the local monitor, and that was connecting via FTP to the server over in the datacentre to push it’s graph images. Since the server is now on the same local network as the monitor, there’s no need to faff about with FTP servers, so I’ve rejigged things with some perl scripts from cristianst85 over on GitHub, running on the web server itself.
I deviated from the suggested place to put the scripts on the server & opted to store everything within the Experimental Engineering hosting space, so it gets backed up at the same time as everything else on a nightly basis.
powered by Advanced iFrame
This is also accessible from the menu at top left, the script pulls data from the monitor & updates the images every 60 seconds via a cron job.
I’ve removed a couple of dead pages from the blog system, along with some backend tidying of the filesystem. Over the years things have gotten quite messy behind the scenes. This blog is actually getting quite large on disk, I’ve hit the 15GB mark, not including the database!
Caching is enabled for all posts on the blog now, this should help speed things up for repeat visitors, but as most of my content is (large) image based, this might be of limited help. I’m currently tuning the MySQL server for the load conditions, but this takes time, as every time I change some configuration settings I have to watch how things go for a few days, before tweaking some more.
Server Control Panels – More Of The Same
Sorry Sentora. I tried, and failed to convert over to using it as my new server control panel. Unfortunately it just doesn’t give me the same level of control over my systems, so I’ll be sticking with Virtualmin for the foreseeable future. Sentora stores everything in, (to me at least), very odd places under /var/ and gave me some odd results with “www.” versions of websites – some www. hosts would work fine, others wouldn’t at all & just redirect to the Sentora login interface instead. This wasn’t consistient between hosting accounts either, and since I didn’t have much time to get the migration underway, this problem was the main nail in the coffin.
Just storing everything under the sun in /var/ makes life a bit more awkward with the base CentOS install, as it allocates very little space to / by default, (no separate /var partition in default CentOS), giving most of the disk space to /home. Virtualmin on the other hand, stores website public files & Maildirs under /home, saving /var for MySQL databases & misc stuff.
The backup system provided is also utterly useless, there’s no restore function at all, and just piles everything in the account into a single archive. By comparison, Virtualmin has a very comprehensive backup system built in, that supports total automation of the process, along with full automatic restore functionality for when it’s needed.
Sentora did have some good points though:
It handled E-Mail logins & mail filters much more gracefully than Virtualmin does, and comes with Roundcube already built into the interface ready to use. With Virtualmin the options are to use the Usermin side of the system for E-Mail, which I find utterly awful to use, or install a webmail client under one of the hosted domains (my personal choice).
Mail filtering is taken care of with Sieve under Sentora, while Procmail does the job under Virtualmin.
Sentora does have a nicer, simpler, more friendly interface, but it hides most of the low-level system stuff away, while under Virtualmin *everything* on the system is accessible, and it provides control interfaces for all the common server daemons.
This was originally going to be part of another post, but it ended up getting more complex than I originally intended so it’s been given it’s own. I go into into many of my personal security practices, on both my public facing servers & personal machines. Since the intertubes are so central to life these days, good security is a must, especially since most people use the ‘net to do very sensitive operations, such as banking, it’s becoming even more essential to have strong security.
Since bringing the new server online & exposing it to the world, it’s been discovered in record time by the scum of the internet, SSH was under constant attack within 24 hours, and within that time there were over 20,000 failed login attempts in the logs.
This isn’t much of an issue, as I’ve got a strong Fail2Ban configuration running which at the moment is keeping track of some 30 IP addresses that are constantly trying to hammer their way in. No doubt these will be replaced with another string of attacks once they realise that those IPs are being dropped. I also prevent SSH login with passwords – RSA keys only here.
MySQL is the other main target to be concerned about – this is taken care of by disabling root login remotely, and dropping all MySQL traffic at the firewall that hasn’t come from 127.0.0.1.
Keeping the SSH keys on an external device & still keeping things simple just requires some tweaking to the .bashrc file in Linux:
alias ssh='ssh -i <Path To Keys>'
This little snippet makes the ssh client look somewhere else for the keys themselves, while keeping typing to a minimum in the Terminal. This assumes the external storage with the keys always mounts to the same location.
Everything else that can’t be totally blocked from outside access (IMAP, SMTP, FTP, etc), along with Fail2Ban protection, gets very strong passwords, unique to each account, (password reuse in any situation is a big no-no) and where possible TOTP-based two factor authentication is used for front end stuff, all the SSH keys, master passwords & backup codes are themselves kept offline, on encrypted storage, except for when they’re needed. General password management is taken care of by LastPass, and while they’ve been subject to a couple of rather seriousvulnerabilities recently, these have been patched & it’s still probably one of the best options out there for a password vault.
There’s more information about those vulnerabilities on the LastPass blog here & here.
This level of security paranoia ensures that unauthorized access is made extremely difficult – an attacker would have to gain physical access to one of my mobile devices with the TOTP application, and have physical access to the storage where all the master keys are kept (along with it’s encryption key, which is safely stored in Meatware), to gain access to anything.
No security can ever be 100% perfect, there’s always going to be an attack surface somewhere, but I’ll certainly go as far as is reasonable, while not making my access a total pain, to keep that attack surface as small as possible,and therefore keeping the internet scum out of my systems.
The last layer of security is a personal VPN server, which keeps all traffic totally encrypted while it’s in transit across my ISP’s network, until it hits the end point server somewhere else in the world. Again, this isn’t perfect, as the data has to be decrypted *somewhere* along the chain.
Since Sentora is still stuck on an old version of PHP, this script will update the system to the newer v5.6, via the Remi repository, as most things are deprecating support for older PHP versions at this point. Suhosin will also be recompiled for the new PHP version.
#!/bin/bash

echo "Upgrading PHP to version 5.6. Please Wait..."

wget http://rpms.famillecollet.com/enterprise/remi-release-7.rpm
sudo rpm -Uvh remi-release-7*.rpm

yum update

yum --enablerepo=remi,remi-php56 update
yum --enablerepo=remi,remi-php56 upgrade

echo "Recompiling Suhosin for PHP 5.7..."

cd /tmp
wget -nv -O suhosin.zip https://github.com/stefanesser/suhosin/archive/suhosin-0.9.37.zip
unzip -q suhosin.zip
rm -f suhosin.zip
cd suhosin-suhosin-0.9.37
phpize &> /dev/null
./configure &> /dev/null
make &> /dev/null
make install
cd ..
rm -rf suhosin-suhosin-0.9.37

echo "Restarting Web Server Services..."

systemctl restart httpd
The Remi repo will give some package authentication warnings, these can be safely dismissed during the install. I’ve tested this on a fresh install of Sentora under CentOS 7, however this process isn’t without risk! Your PHP install could be damaged!
I’m making some changes to my hosting services, I’ve been testing Sentora, as it’s much more user friendly, if a little more limited in what it’s capable of doing, vs my go-to admin panel over the past 6+ years, Virtualmin.
I noticed that SpamAssassin isn’t set up on a Sentora server by default, so here’s a script that will get things working under a fresh Sentora install in CentOS 7:
After this script has run, some mail server settings will be changed, and the master.cf configuration file for Postfix will be backed up just in case it craps out.
Make sure the SpamAssassin daemon is running on port 783 with this command:
ss -tnlp | grep spamd
Testing is easy, send an email to an address hosted by Sentora with the following in the subject line:
If SpamAssassin is working correctly, this will be tagged with a spam score of 999.
A useful script is below, this trains SpamAssassin on the mail in the current server mailboxes. I’ve been using a version of this for a long time, this one is slightly modified to operate with Sentora’s vmail system. All mail for all domains & users will be fed into SpamAssassin in this script. I set this to run nightly in cron.
#!/bin/bash

#specify one or more users, space padded [user=(user1 user2 user3)] or empty [user=()] to include all users. All users is considered uid ≥ 1000.
user=(vmail)

#After how many days should Spam be deleted?
cleanafter=30

#backup path, comment out to disable backups
bk=/home/backup/sa-learn_bayes_`date +%F`.backup

log=/var/log/train-mail.log
#log=/dev/stdout

echo -e "\n`date +%c`"  >> $log 2>&1

if [ -z ${user[@]} ]; then
echo user is empty, using all users from system
user=(`awk -F':' '$3 >= 1000 && $3 < 65534' /etc/passwd |awk -F':' '{print $1}'`)
fi

for u in ${user[@]}; do
if [ ! -d /var/sentora/vmail/*/* ]; then
echo "No such Maildir for $u" >> $log 2>&1
else
echo "Proceeding with ham and spam training on user \"$u\""
#add all messages in "junk" directory to spamassassin
echo spam >> $log 2>&1
#change this path to match your spam directory, in this case its "Junk"
#add current and new messages in Junk directory as spam
sa-learn --no-sync --spam /var/sentora/vmail/*/*/.Junk/{cur,new} >> $log 2>&1
echo ham >> $log 2>&1
#only add current mail to ham, not new. This gives user a chance to move it to spam dir.
sa-learn --no-sync --ham /var/sentora/vmail/*/*/{cur} >> $log 2>&1
fi
done

#sync the journal created above with the database
echo sync >> $log 2>&1
sa-learn --sync >> $log 2>&1
if [ $? -eq 0 ]; then
for u in ${user[@]}; do
echo "deleting spam for $u older than 30 days" >> $log 2>&1
find /var/sentora/vmail/*/*/.Junk/cur/ -type f -mtime +$cleanafter -exec rm {} \;
done
else
echo "sa-learn wasn't able to sync. Something is broken. Skipping spam cleanup"
fi

echo "Statistics:" >> $log 2>&1
sa-learn --dump magic >> $log 2>&1
echo ============================== >> $log 2>&1

if [ -n $bk ]; then
echo "backup writing to $bk" >> $log 2>&1
sa-learn --backup > $bk
fi
I posted a while back a teardown of the VM Superhub 2 router, as VM has “upgraded” to a rebranded Arris TG2492S/CE CM. Alas Virgin Media in their wisdom have decided that simple router features like being able to change the LAN subnet & DHCP server range are far too complex to trust to the Great Unwashed, so they’ve removed them entirely from the firmware, and locked the local LAN onto the 192.168.0.0/24 range.
As my network is already numbered in the 10.0.0.0/16 range, with several statically addressed devices present and other systems relying on these static assignments, using this router would have meant renumbering everything.
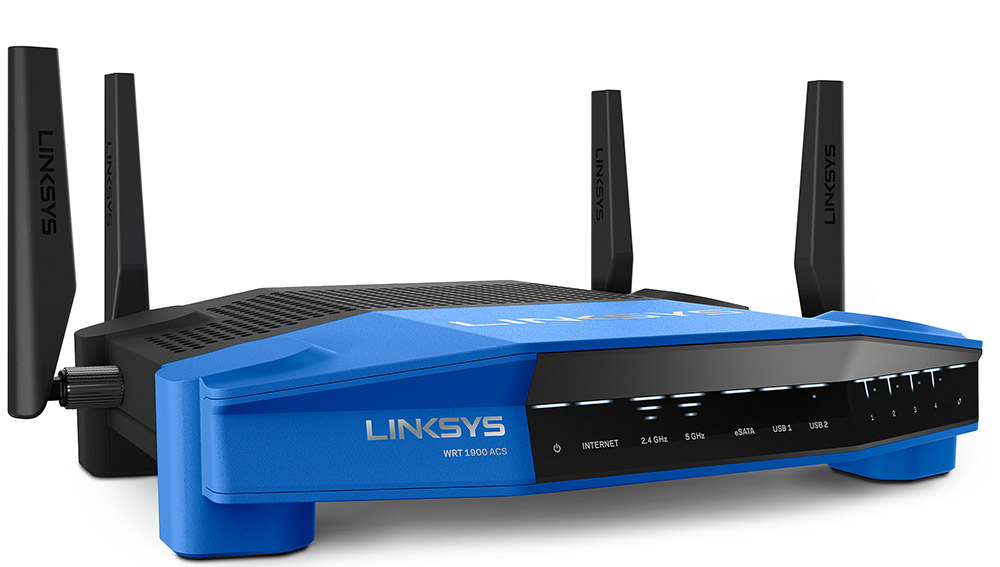
Luckily Virgin had the decency to leave the “modem mode” option in the firmware, effectively disabling the WiFi & routing functions & allowing the connection of a third-party router. Some searching for a suitable replacement for the core of my network turned up the Linksys WRT1900ACS. While I waited for this to arrive, some temporary workarounds were needed to make everything function well enough with VM’s crap router.
WRT1900ACS
These routers have been designed as a modern replacement for the venerable WRT54G series of routers from some time ago, with full support for OpenWRT/DD-WRT firmware, and with a beefy 1.6GHz dual core CPU & 512MB of RAM I doubt I’ll be able to knock this one over with too much network traffic! This was pretty much the most powerful router I could afford, and should mean I don’t need to upgrade for a long time. (No teardown of this yet, as it’s taking care of the network at present. Maybe some point in the future I’ll take the plunge).
The stock firmware isn’t totally awful, and has some nice features, but I decided it needed to be replaced with DD-WRT for more security & future flexibility. I’ll leave the firmware flashing stuff for another post 😉
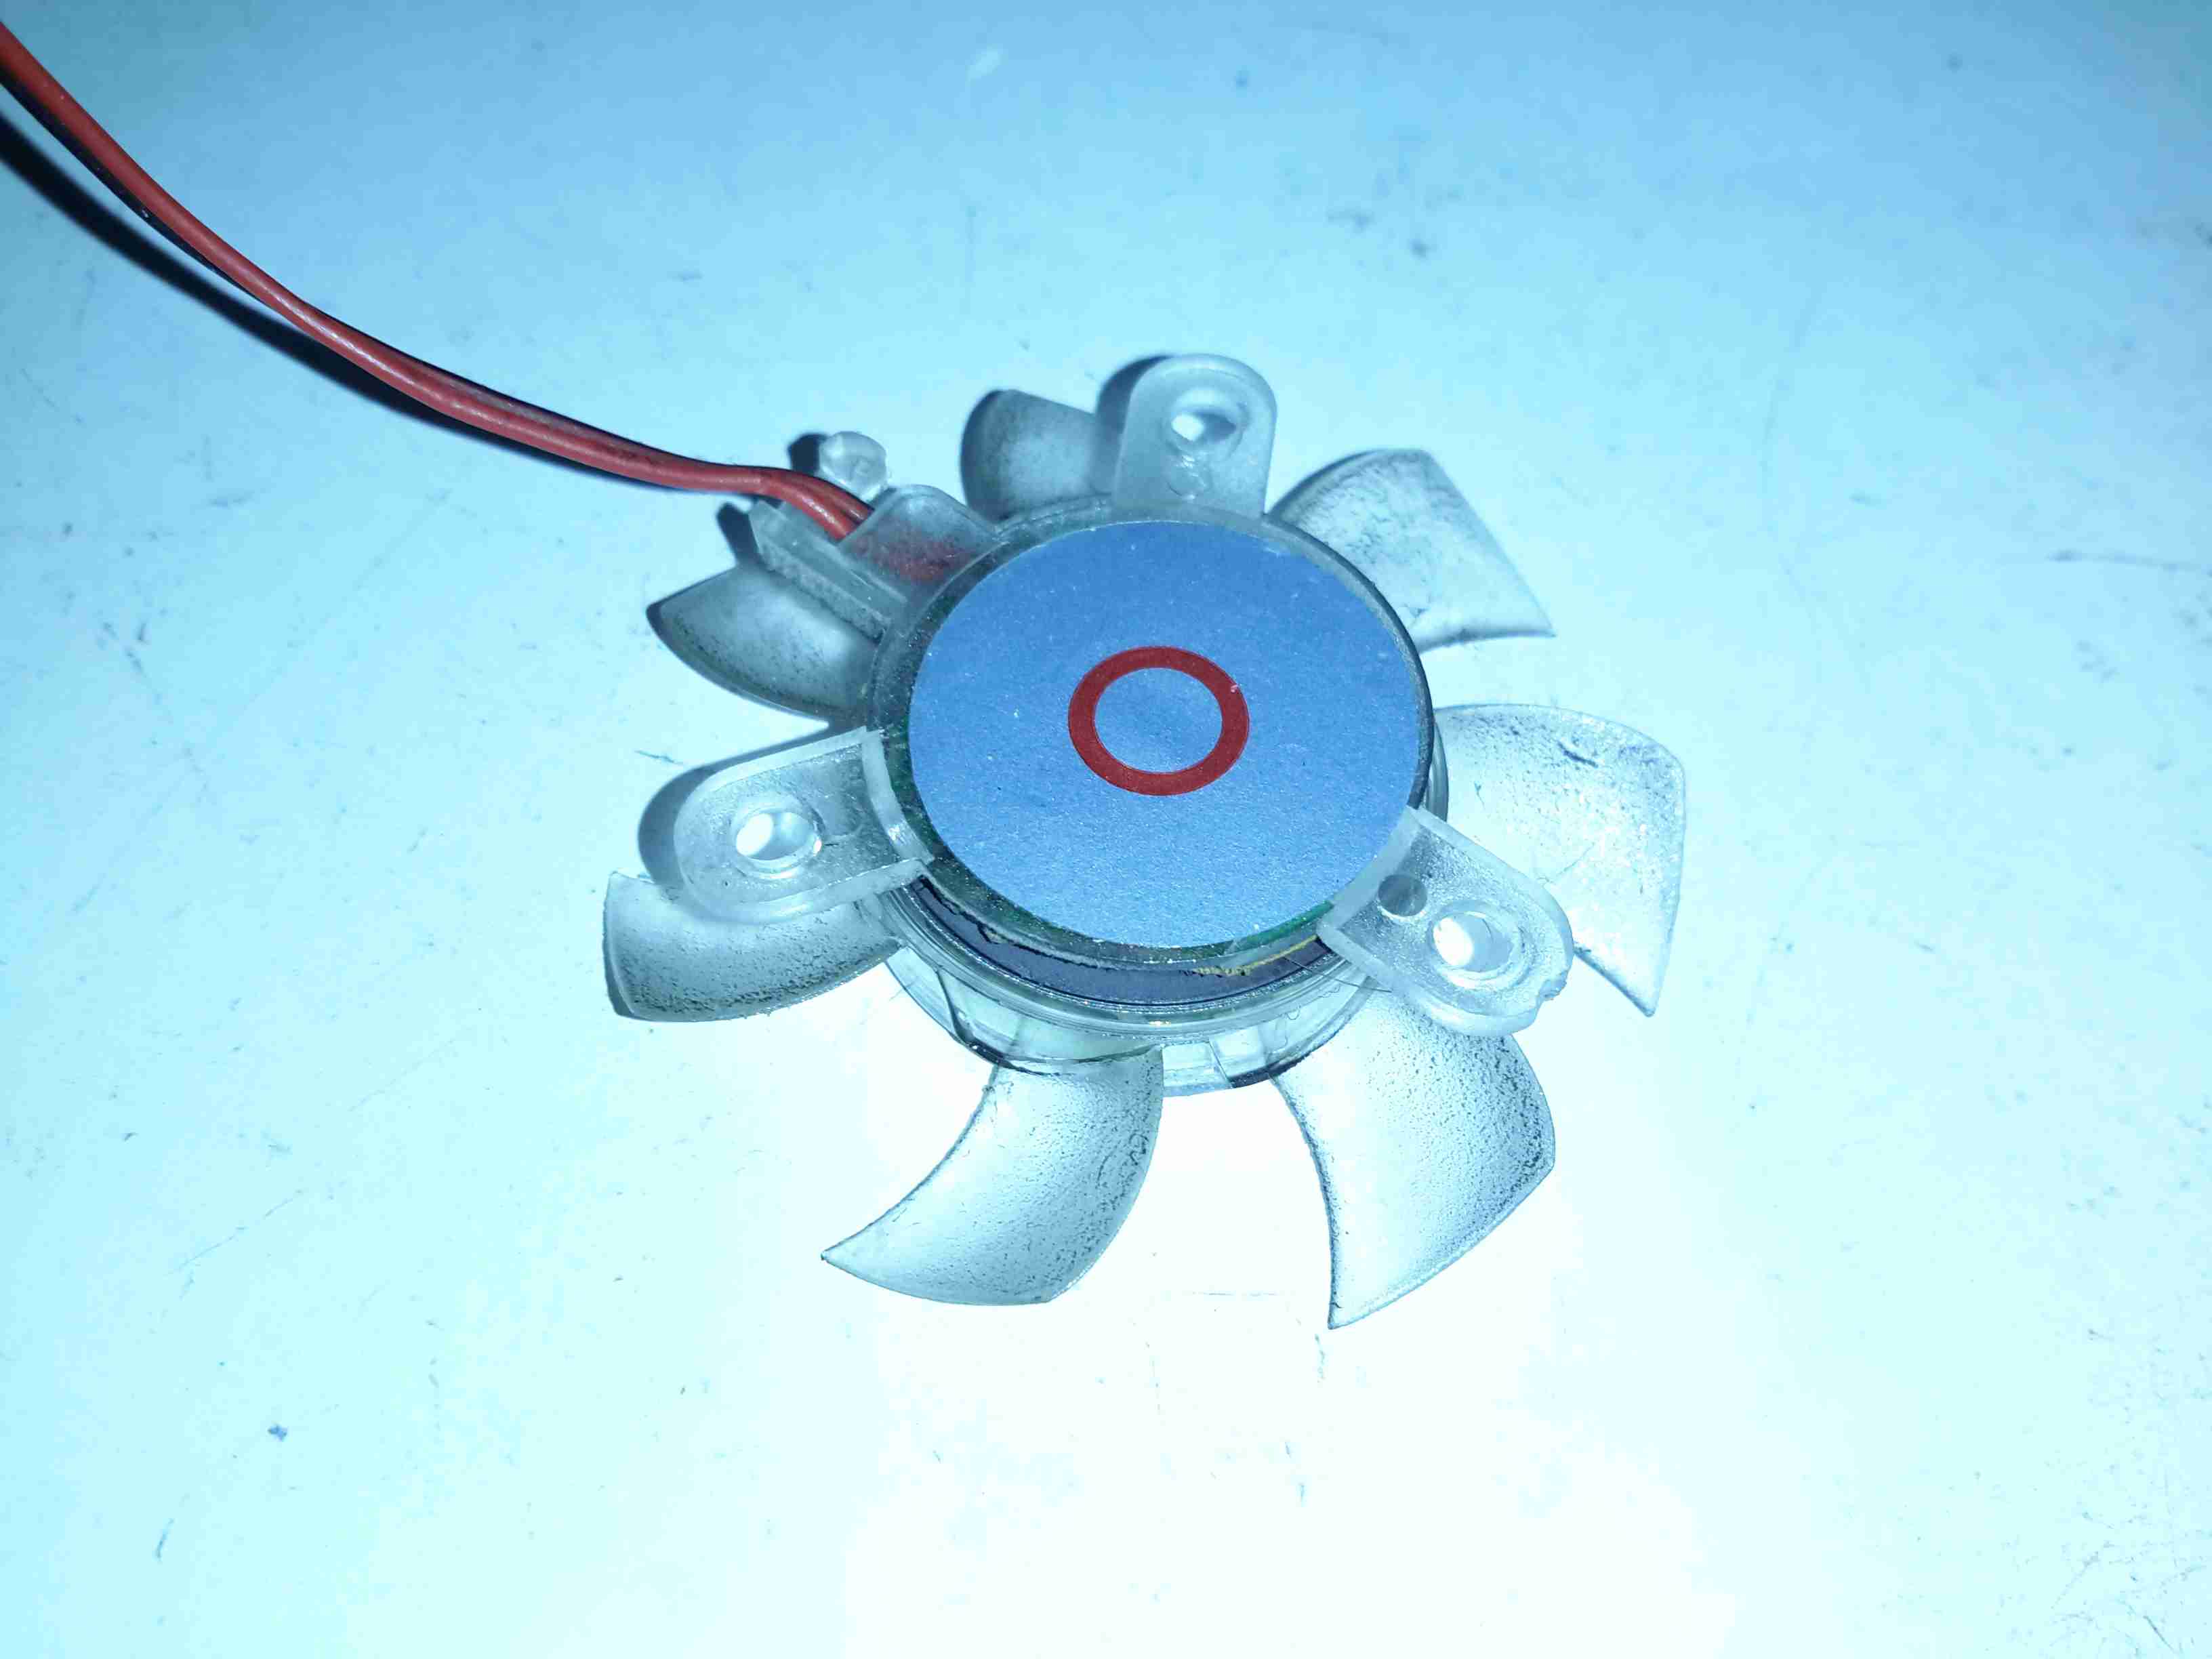
It’s been 4 months since I did a rejig of my storage server, installing a new 16-port SATA HBA to support the disk drives. I mentioned the factory fan the card came with in my previous post, and I didn’t have many hopes of it surviving long.
Heatsink
The heatsink card has barely had enough time to accumulate any grime from the air & the fan has already failed!
There’s no temperature sensing or fan speed sensing on this card, so a failure here could go unnoticed, and under load without a fan the heatsink becomes hot enough to cause burns. (There are a total of 5 large ICs underneath it). This would probably cause the HBA to overheat & fail rather quickly, especially when under a high I/O load, with no warning. In my case, the bearings in the fan failed, so the familiar noise of a knackered sleeve bearing fan alerted me to problems.
Replacement Fan
A replacement 80mm Delta fan has been attached to the heatsink in place of the dead fan, and this is plugged into a motherboard fan header, allowing sensing of the fan speed. The much greater airflow over the heatsink has dramatically reduced running temperatures. The original fan probably had it’s bearings cooked by the heat from the card as it’s airflow capability was minimal.
Fan Rear
Here’s the old fan removed from the heatsink. The back label, usally the place where I’d expect to find some specifications has nothing but a red circle. This really is the cheapest crap that the manufacturer could have fitted, and considering this HBA isn’t exactly cheap, I’d expect better.
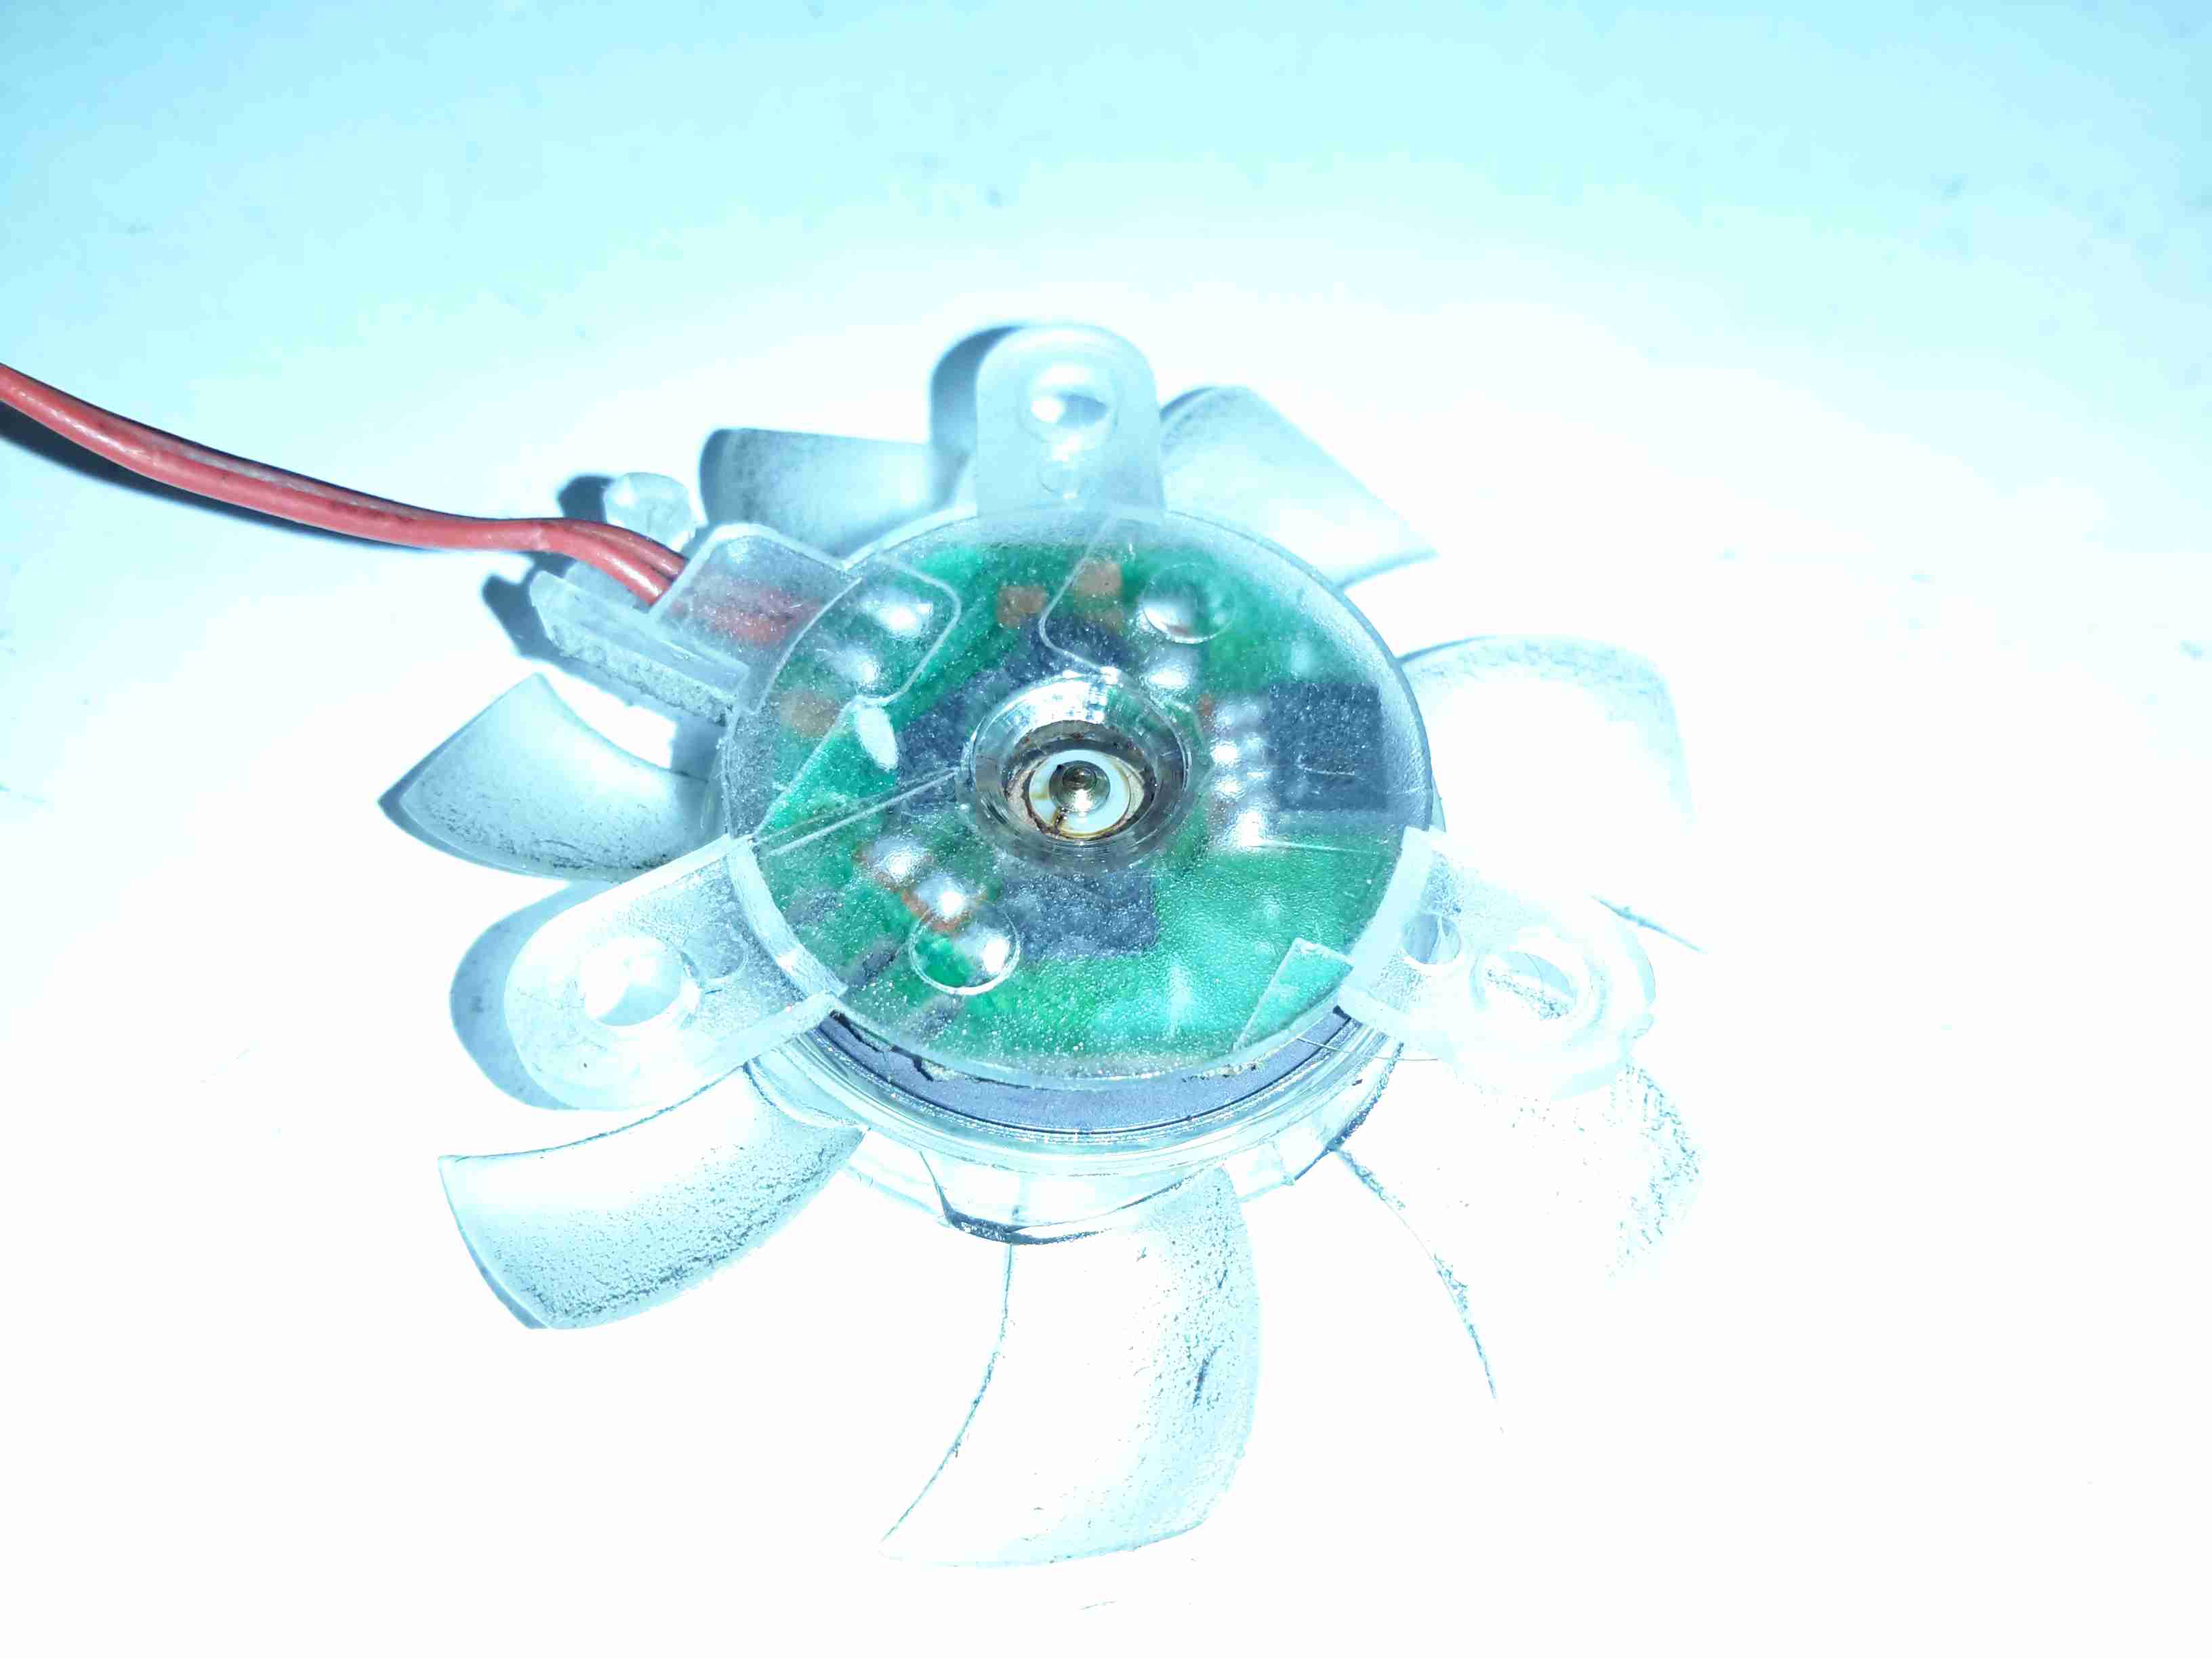
Bearings
Peeling off the back label reveals the back of the bearing housing, with the plastic retaining clip. There’s some sign of heat damage here, the oil has turned into gum, all the lighter fractions having evaporated off.
Rotor
The shaft doesn’t show any significant damage, but since the phosphor bronze bearing is softer, there is some dirt in here which is probably a mix of degraded oil & bearing material.
Stator & Bearing
There’s more gunge around the other end of the bearing & it’s been worn enough that side play can be felt with the shaft. In ~3000 hours running this fan is totally useless.
I’ve been running my own VPN so I can access my home-based servers from anywhere with an internet connection (not to mention, in this day & age of Government snooping – personal privacy & increased security).
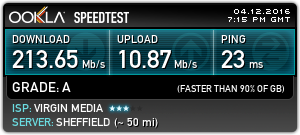
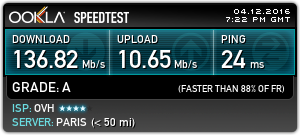
I’m on a pretty quick connection from Virgin Media here in the UK, currently the fastest they offer:
Virgin Media
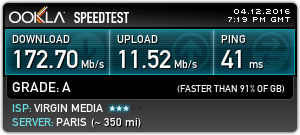
To do these tests, I used the closest test server to my VPN host machine, in this case Paris. This keeps the variables to a minimum. Testing without the VPN connection gave me this:
Paris Server Speed
I did expect a lower general speed to a server further away, this will have much to do with my ISP’s traffic management, network congestion, etc. So I now have a baseline to test my VPN throughput against.
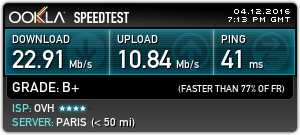
The problem I’ve noticed with OpenVPN stock configs are that the connections are painfully slow – running over UDP on the usual port of 1194 the throughput was pretty pathetic:
Stock Config Speed
I did some reading on the subject, the first possible solution being to change the send/receive buffers so they’re set to a specific value, rather than letting the system handle them. I also added options to get the server to push these values to the clients, this saving me the trouble of having to reissue all the client configurations.
Unfortunately just this option didn’t work as well as I’d like, downstream speeds jumped to 25Mb/s. In the stock config, the tunnel MTU & MSSFIX settings aren’t bothered with, some adjustment to set the tunnel MTU to lower than the host link MTU (in my case the standard 1500) prevents packet fragmentation, MSSFIX let’s the client TCP sessions know to limit the packet sizes it sends so that after OpenVPN has done the encryption & encapsulation, the packets do not exceed the set size. This also helps prevent packet fragmentation.
tun-mtu 1400
mssfix 1360
VPN Tweaked
After adjusting these settings, the download throughput over the VPN link has shot up to 136Mb/s. Upload throughput hasn’t changed as this is limited by my connection to Virgin Media. Some more tweaking is no doubt possible to increase speeds even further, but this is fine for me at the moment.
For some time now I’ve been running a large disk array to store all the essential data for my network. The current setup has 10x 4TB disks in a RAID6 array under Linux MD.
Up until now the disks have been running in external Orico 9558U3 USB3 drive bays, through a PCIe x1 USB3 controller. However in this configuration there have been a few issues:
Congestion over the USB3 link. RAID rebuild speeds were severely limited to ~20MB/s in the event of a failure. General data transfer was equally as slow.
Drive dock general reliability. The drive bays are running a USB3 – SATA controller with a port expander, a single drive failure would cause the controller to reset all disks on it’s bus. Instead of losing a single disk in the array, 5 would disappear at the same time.
Cooling. The factory fitted fans in these bays are total crap – and very difficult to get at to change. A fan failure quickly allows the disks to heat up to temperatures that would cause failure.
Upgrade options difficult. These bays are pretty expensive for what they are, and adding more disks to the USB3 bus would likely strangle the bandwidth even further.
Disk failure difficult to locate. The USB3 interface doesn’t pass on the disk serial number to the host OS, so working out which disk has actually failed is difficult.
To remedy these issues, a proper SATA controller solution was required. Proper hardware RAID controllers are incredibly expensive, so they’re out of the question, and since I’m already using Linux MD RAID, I didn’t need a hardware controller anyway.
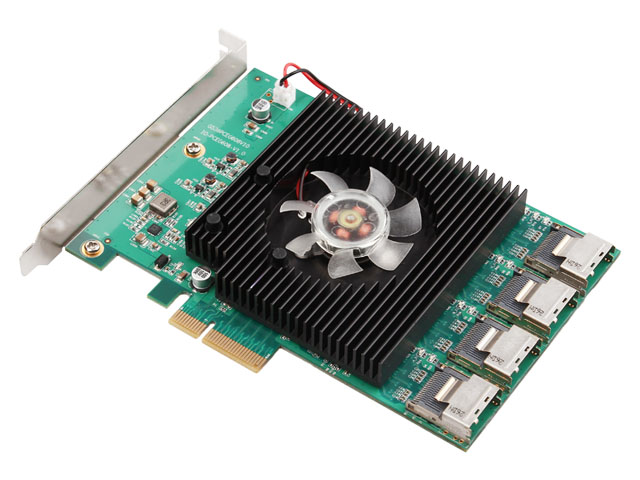
16-Port HBA
A quick search for suitable HBA cards showed me the IOCrest 16-port SATAIII controller, which is pretty low cost at £140. This card breaks out the SATA ports into standard SFF-8086 connectors, with 4 ports on each. Importantly the cables to convert from these server-grade connectors to standard SATA are supplied, as they’re pretty expensive on their own (£25 each).
This card gives me the option to expand the array to 16 disks eventually, although the active array will probably be kept at 14 disks with 2 hot spares, this will give a total capacity of 48TB.
SATA HBA
Here’s the card installed in the host machine, with the array running. One thing I didn’t expect was the card to be crusted with activity LEDs. There appears to be one LED for each pair of disks, plus a couple others which I would expect are activity on the backhaul link to PCIe. (I can’t be certain, as there isn’t any proper documentation anywhere for this card. It certainly didn’t come with any ;)).
I’m not too impressed with the fan that’s on the card – it’s a crap sleeve bearing type, so I’ll be keeping a close eye on this for failure & will replace with a high quality ball-bearing fan when it finally croaks. The heatsink is definitely oversized for the job, with nothing installed above the card barely gets warm, which is definitely a good thing for life expectancy.
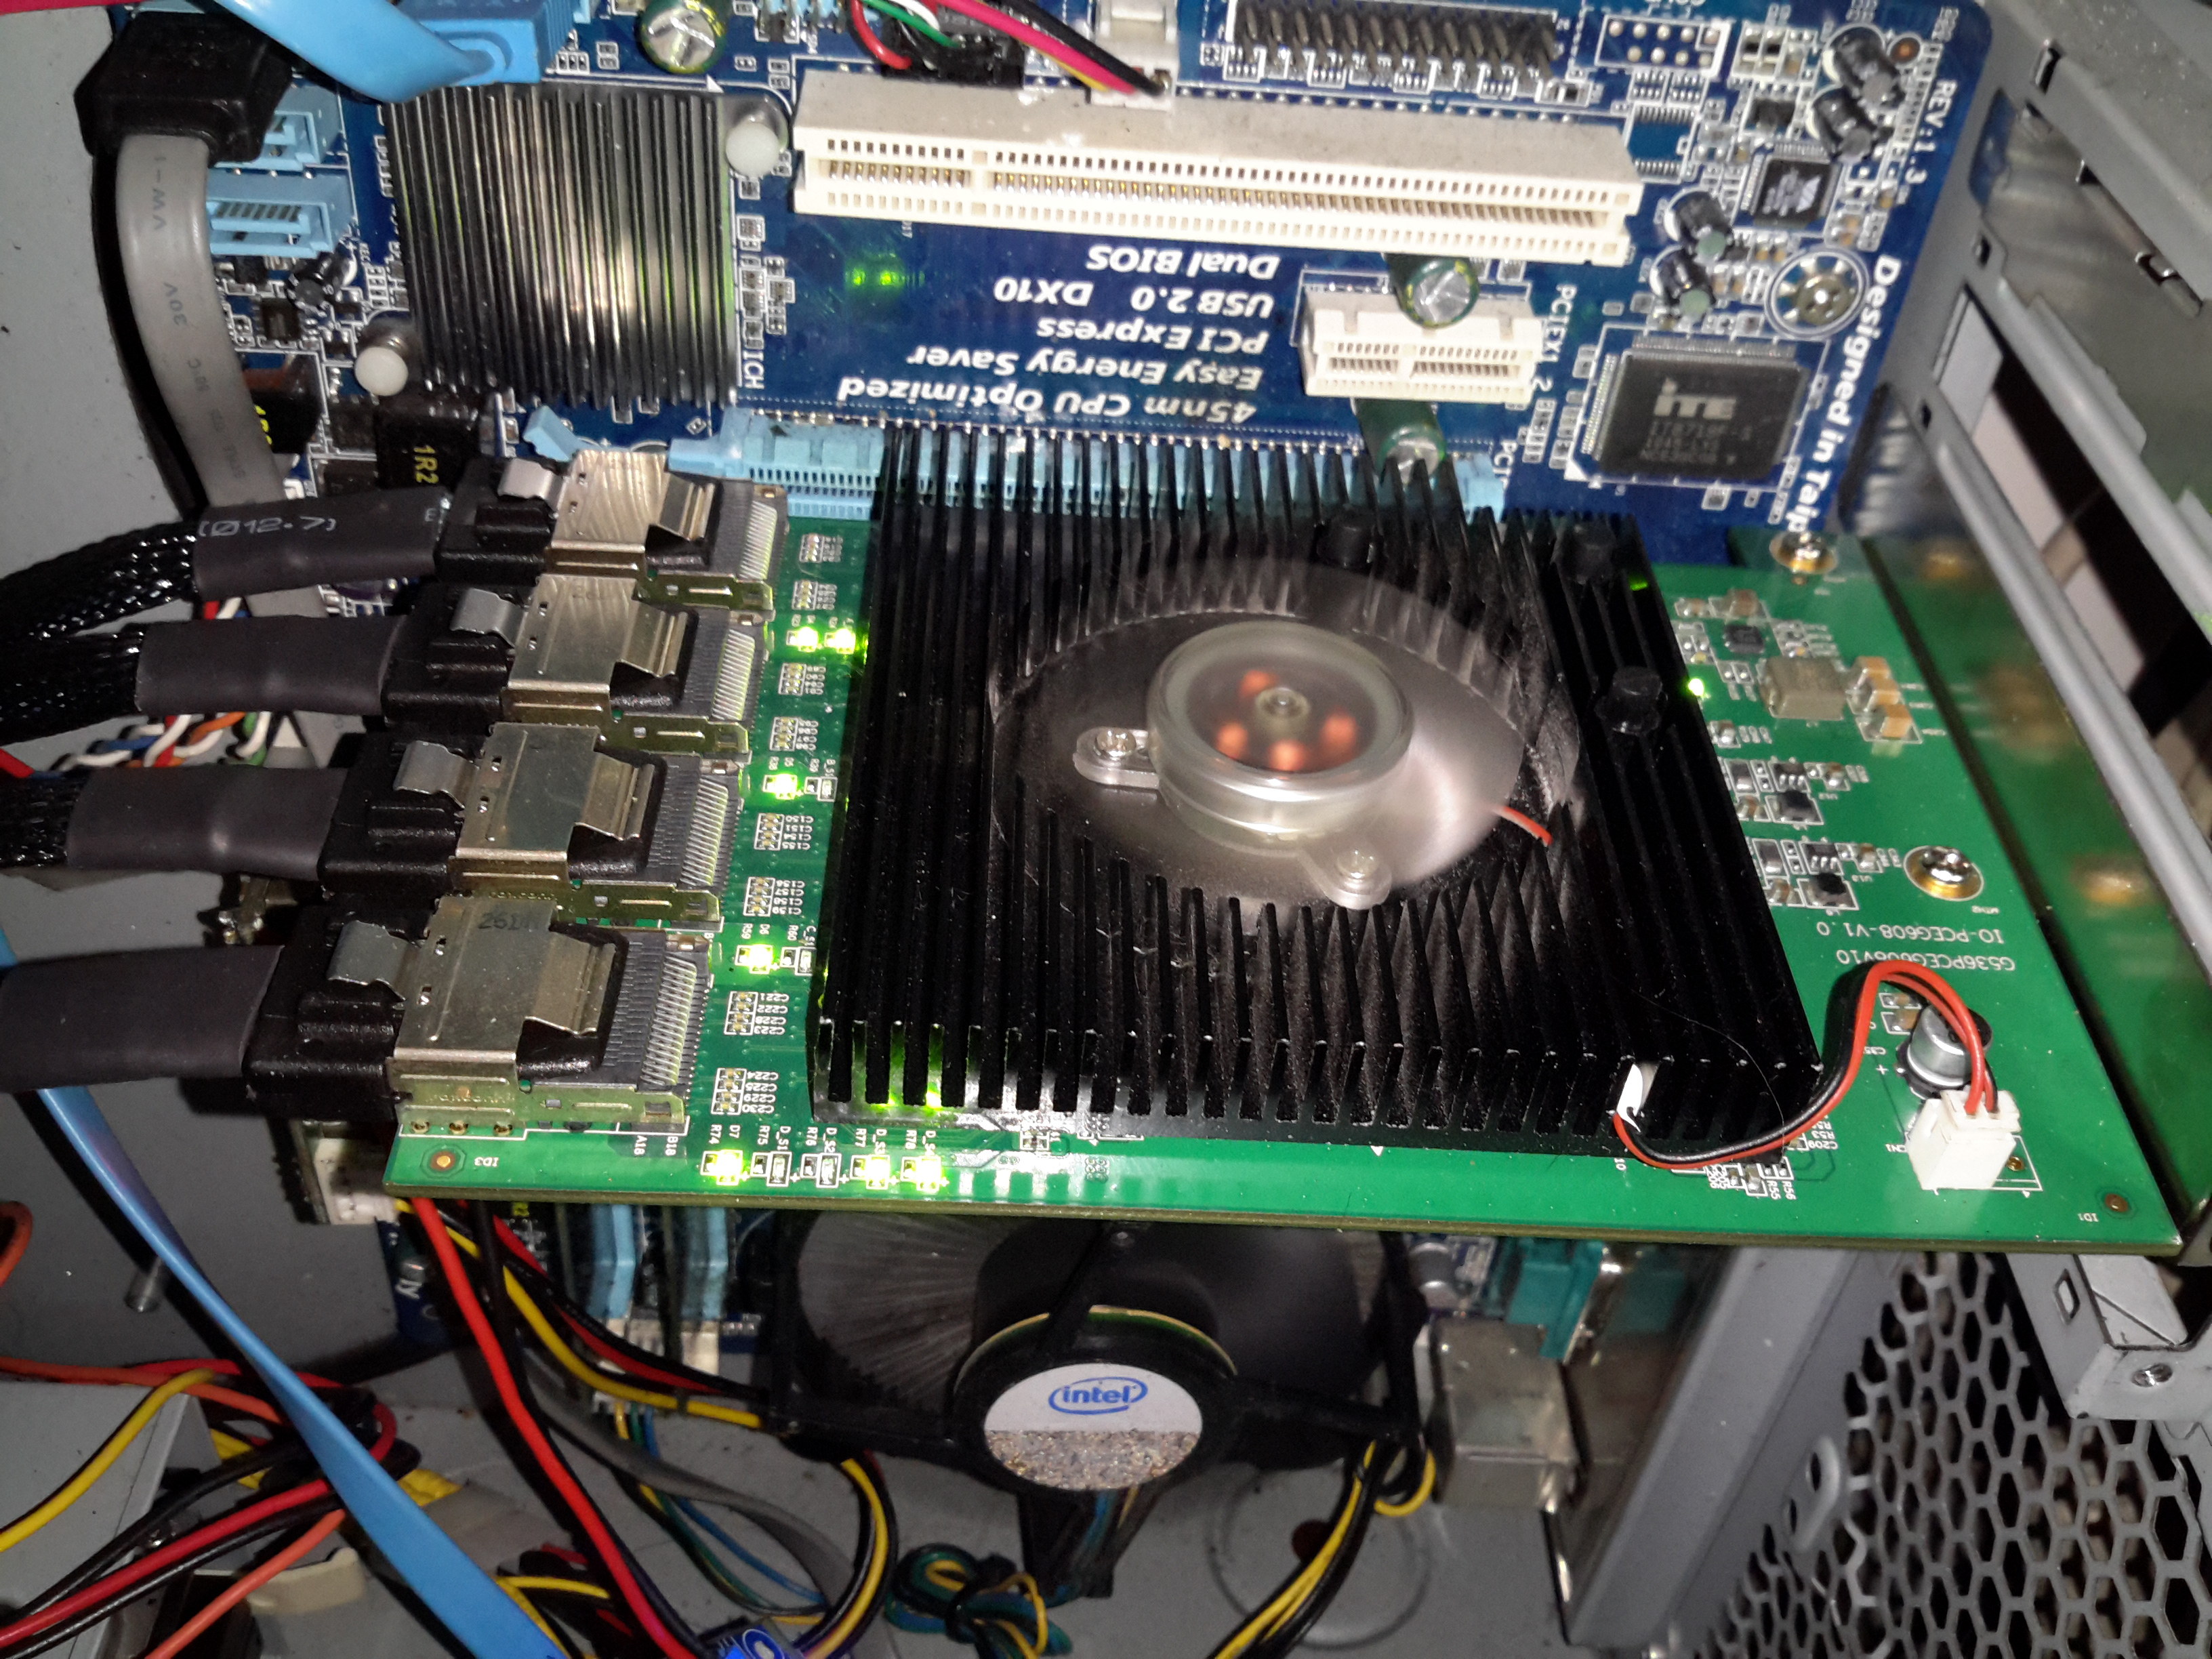
Update 10/02/17 – The stock fan is now dead as a doornail after only 4 months of continuous operation. Replaced with a high quality ball-bearing 80mm Delta fan to keep things running cool. As there is no speed sense line on the stock fan, the only way to tell it was failing was by the horrendous screeching noise of the failing bearings.
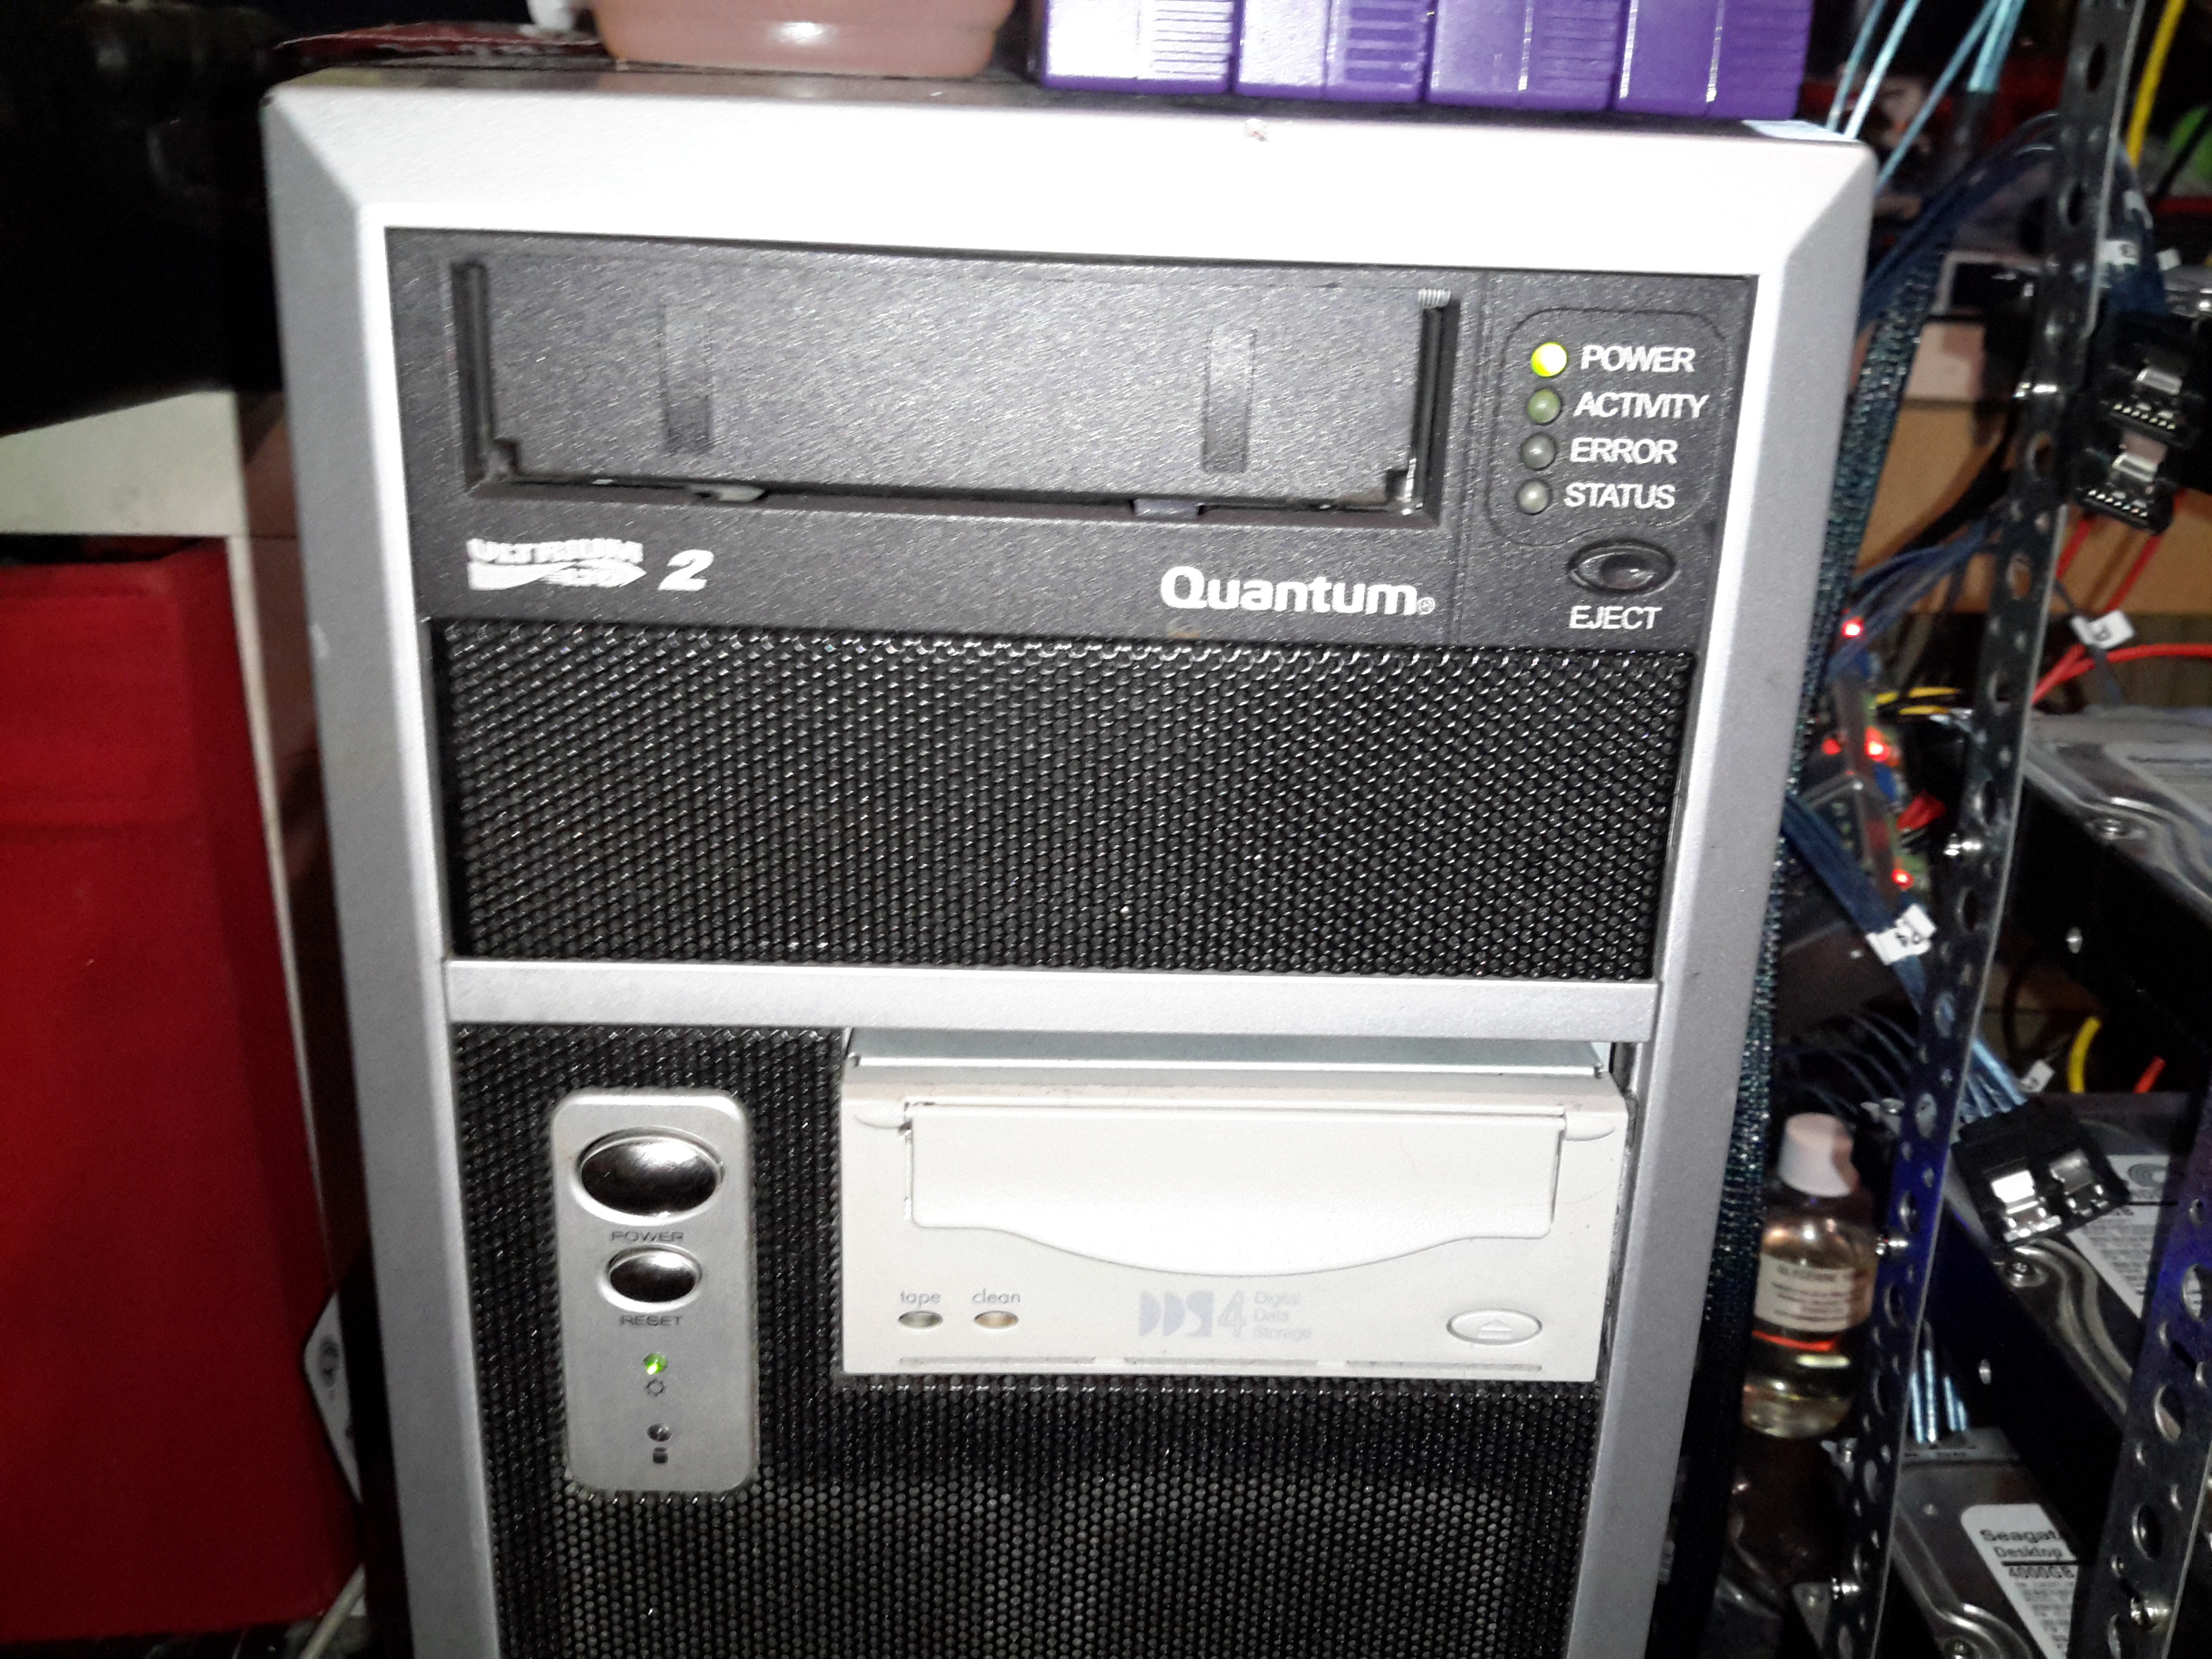
SCSI Controller
Above is the final HBA installed in the PCIe x1 slot above – a parallel SCSI U320 card that handles the tape backup drives. This card is very close to the cooling fan of the SATA card, and does make it run warmer, but not excessively warm. Unfortunately the card is too long for the other PCIe socket – it fouls on the DIMM slots.
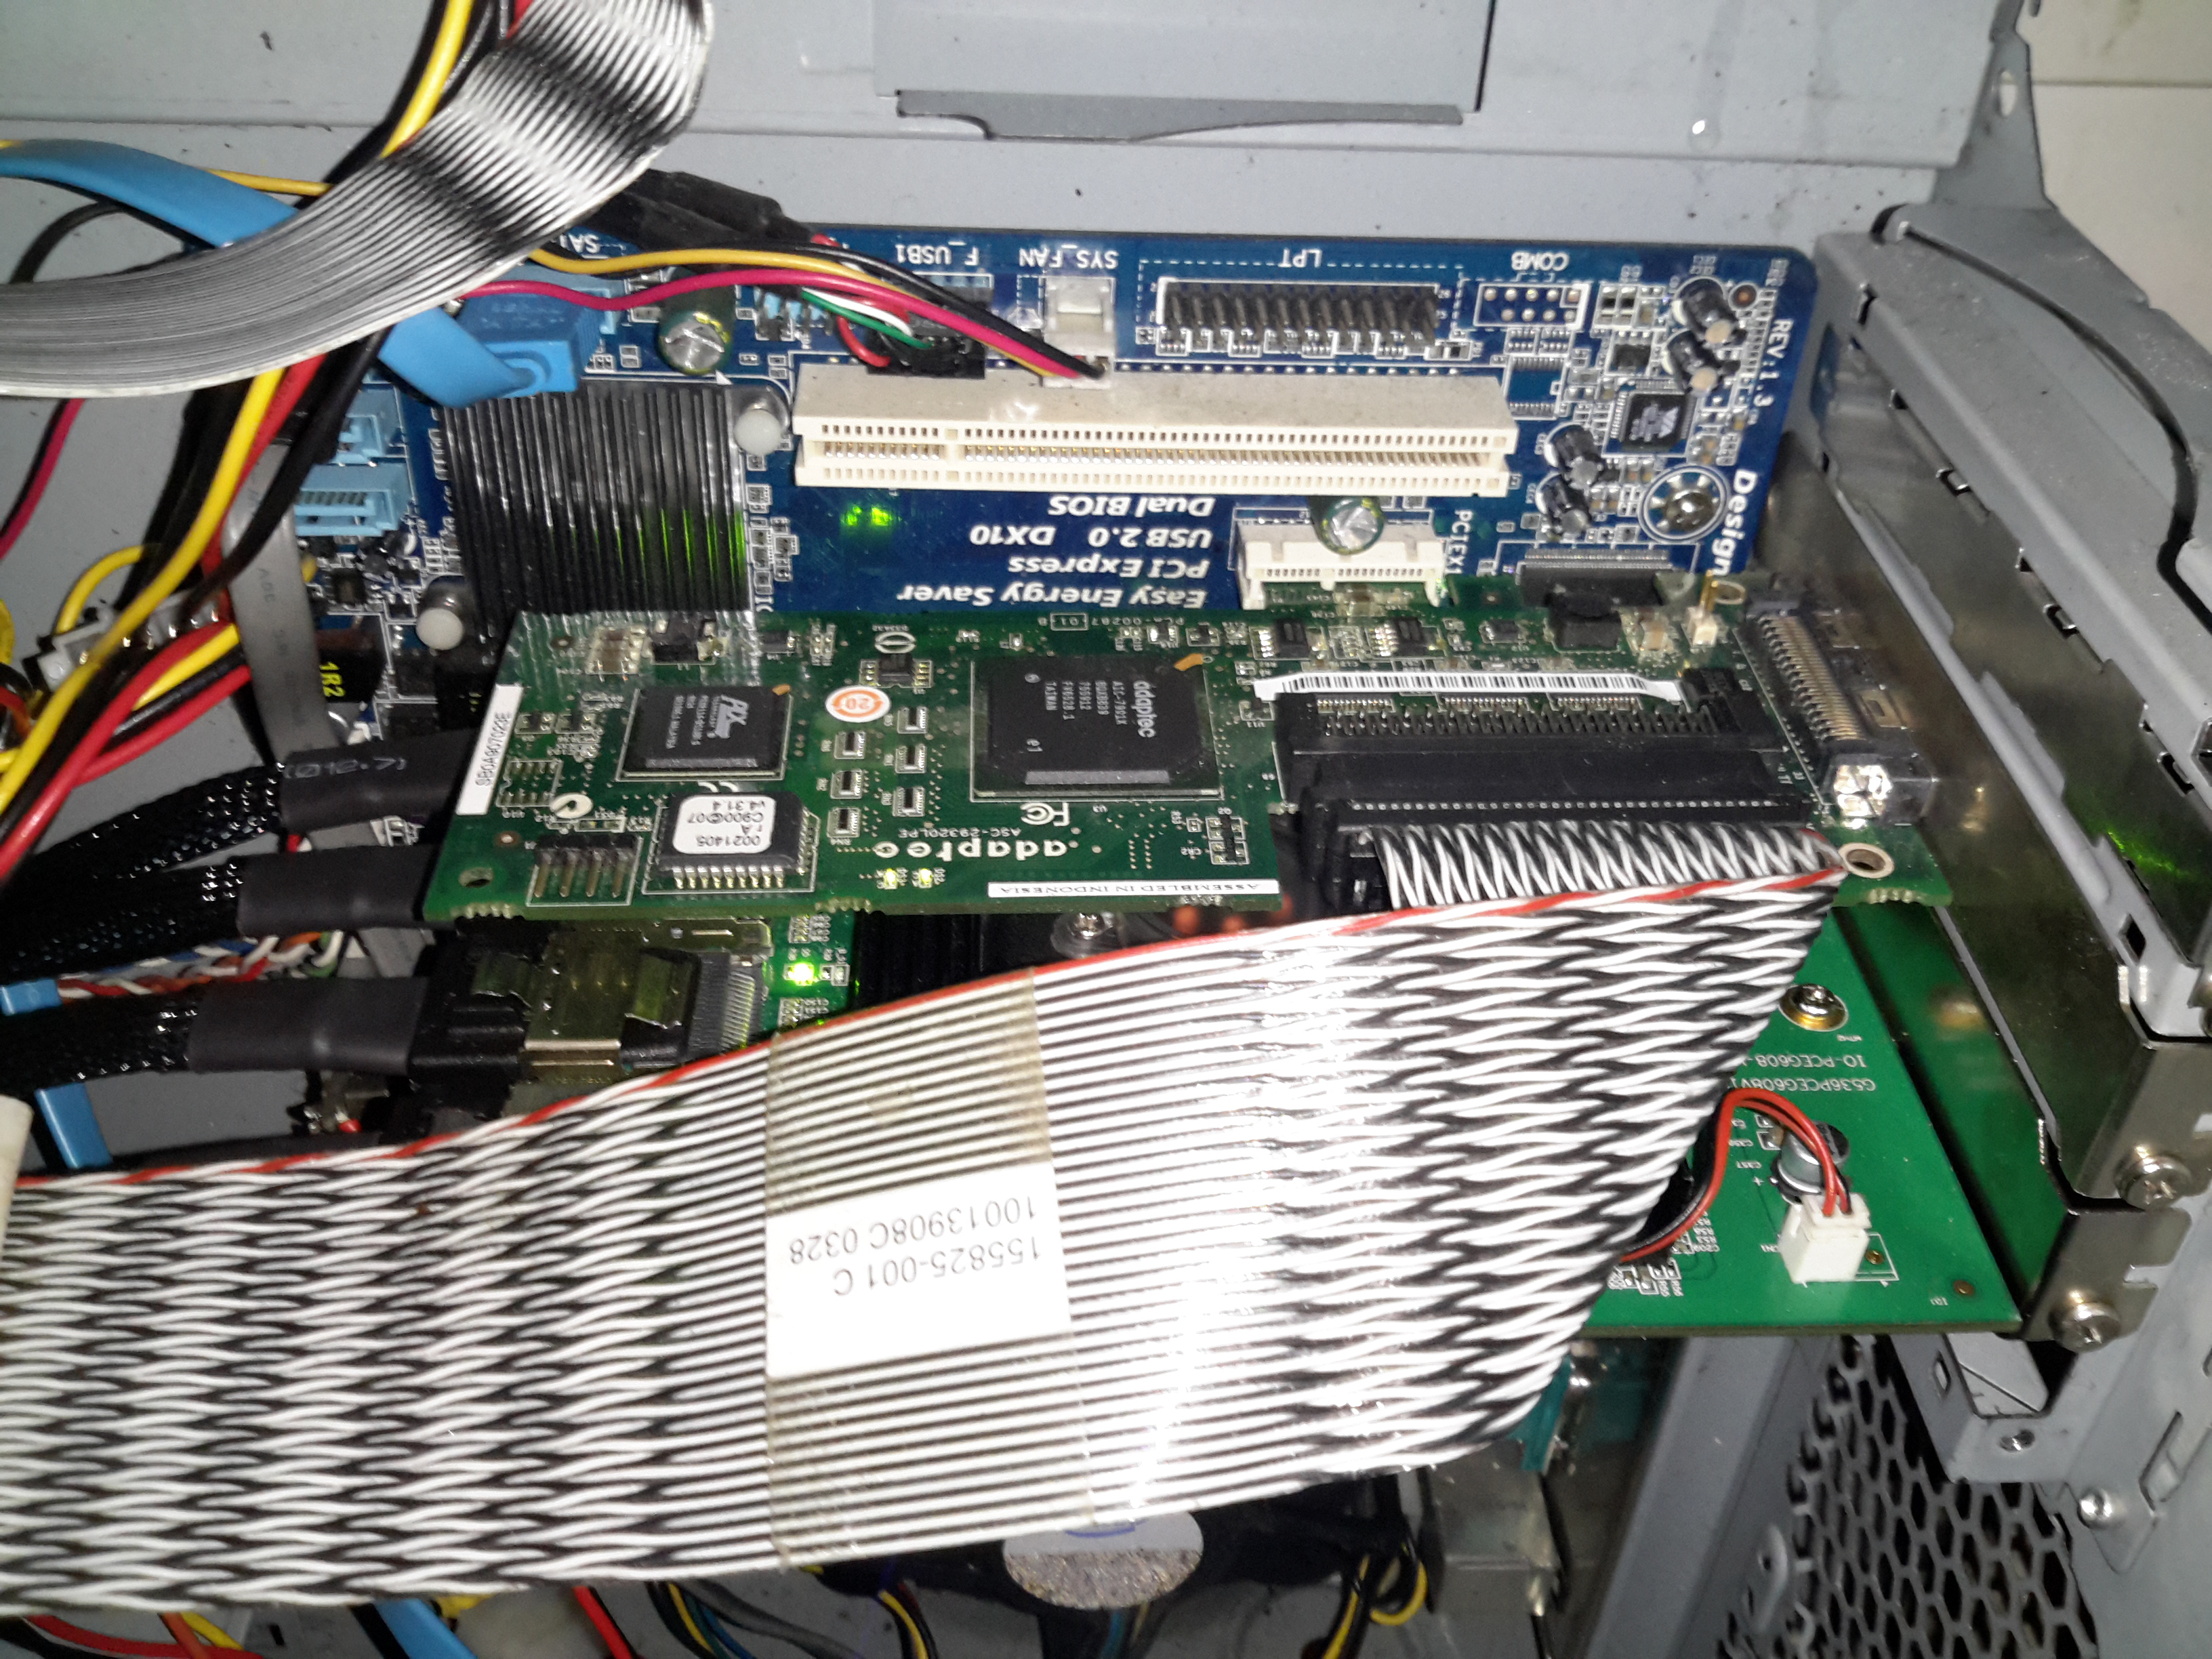
Backup Drives
The tape drives are LTO2 300/600GB for large file backup & DDS4 20/40GB DAT for smaller stuff. These were had cheap on eBay, with a load of tapes. Newer LTO drives aren’t an option due to cost.
The main disk array is currently built as 9 disks in service with a single hot spare, in case of disk failure, this gives a total size after parity of 28TB:
/dev/md0:
        Version : 1.2
  Creation Time : Wed Mar 11 16:01:01 2015
     Raid Level : raid6
     Array Size : 27348211520 (26081.29 GiB 28004.57 GB)
  Used Dev Size : 3906887360 (3725.90 GiB 4000.65 GB)
   Raid Devices : 9
  Total Devices : 10
    Persistence : Superblock is persistent

  Intent Bitmap : Internal

    Update Time : Mon Nov 14 14:28:59 2016
          State : active
 Active Devices : 9
Working Devices : 10
 Failed Devices : 0
  Spare Devices : 1

         Layout : left-symmetric
     Chunk Size : 64K

           Name : Main-PC:0
           UUID : 266632b8:2a8a3dd3:33ce0366:0b35fad9
         Events : 773938

    Number   Major   Minor   RaidDevice State
       0       8       48        0      active sync   /dev/sdd
       1       8       32        1      active sync   /dev/sdc
       9       8       96        2      active sync   /dev/sdg
      10       8      112        3      active sync   /dev/sdh
      11       8       16        4      active sync   /dev/sdb
       5       8      176        5      active sync   /dev/sdl
       6       8      144        6      active sync   /dev/sdj
       7       8      160        7      active sync   /dev/sdk
       8       8      128        8      active sync   /dev/sdi

      12       8        0        -      spare   /dev/sda
The disks used are Seagate ST4000DM000 Desktop HDDs, which at this point have ~15K hours on them, and show no signs of impending failure.
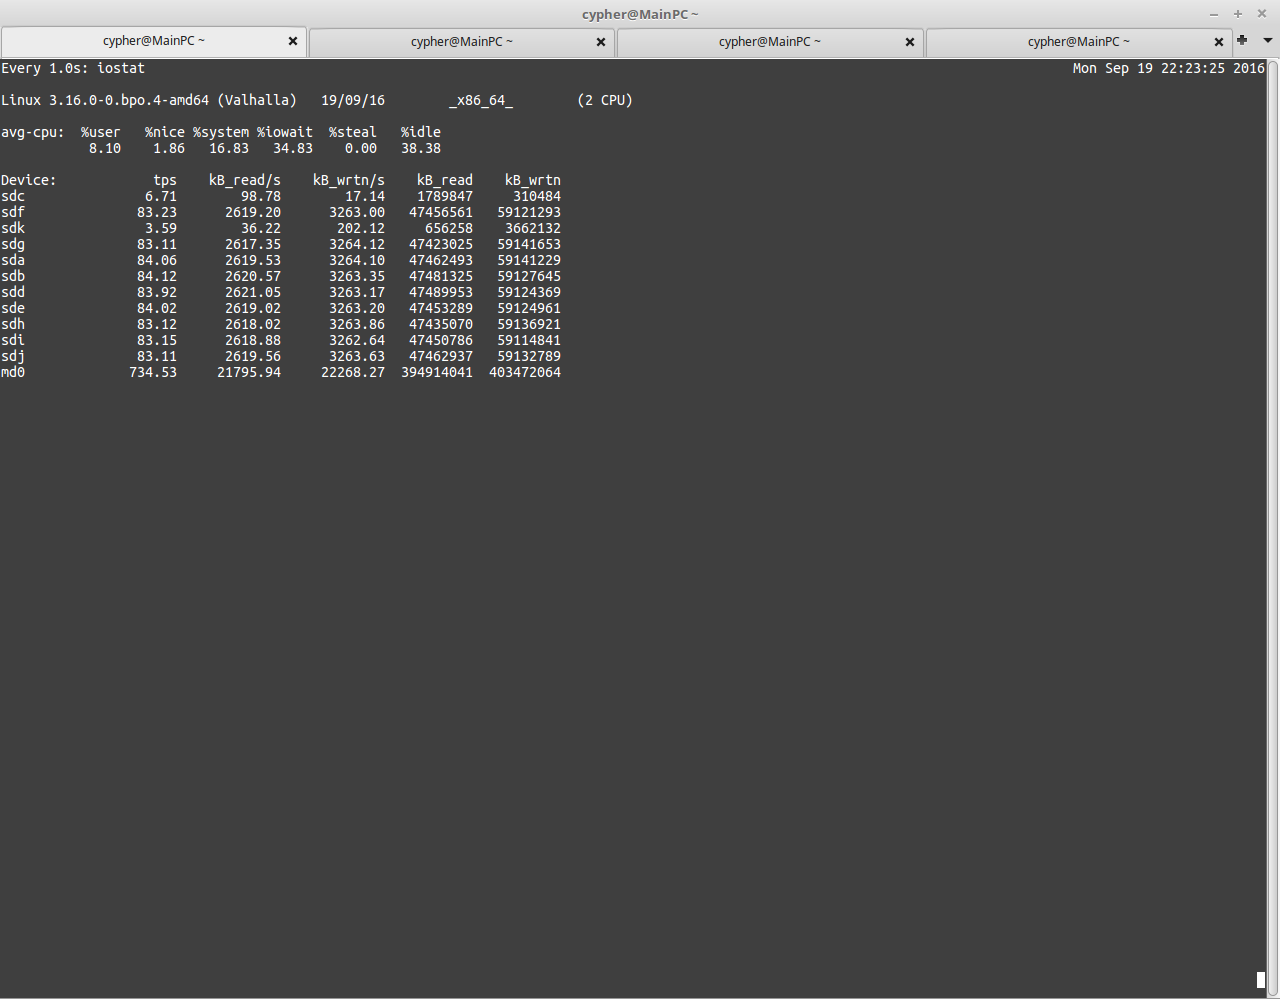
USB3 Speeds
Here’s a screenshot with the disk array fully loaded running over USB3. The aggregate speed on the md0 device is only 21795KB/s. Extremely slow indeed.
This card is structured similarly to the external USB3 bays – a PCI Express bridge glues 4 Marvell 9215 4-port SATA controllers into a single x8 card. Bus contention may become an issue with all 16 ports used, but as far with 9 active devices, the performance increase is impressive. Adding another disk to the active array would certainly give everything a workout, as rebuilding with an extra disk will hammer both read from the existing disks & will write to the new.
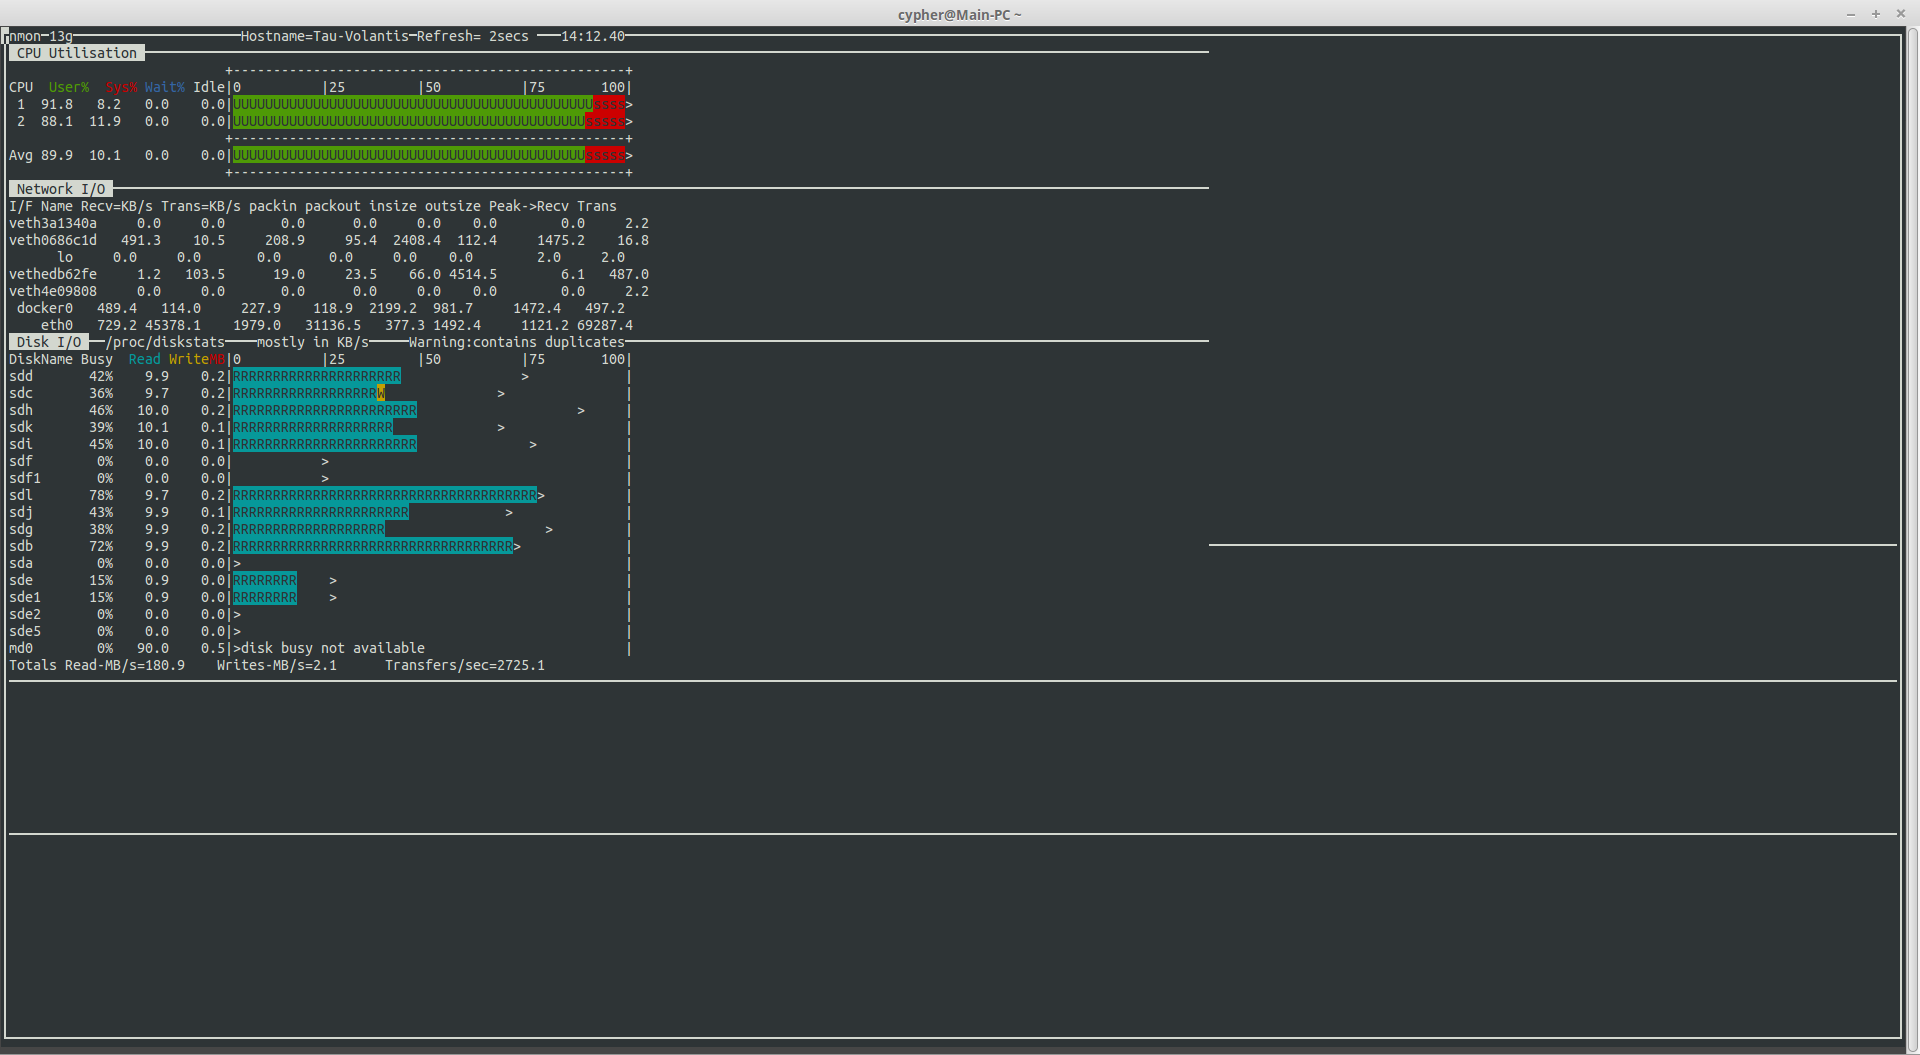
HBA Speeds
With all disks on the new controller, I’m sustaining read speeds of 180MB/s. (Pulling data off over the network). Write speeds are always going to be pretty pathetic with RAID6, as parity calculations have to be done. With Linux MD, this is done by the host CPU, which is currently a Core2Duo E7500 at 2.96GHz, with this setup, I get 40-60MB/s writes to the array with large files.
Disk Array
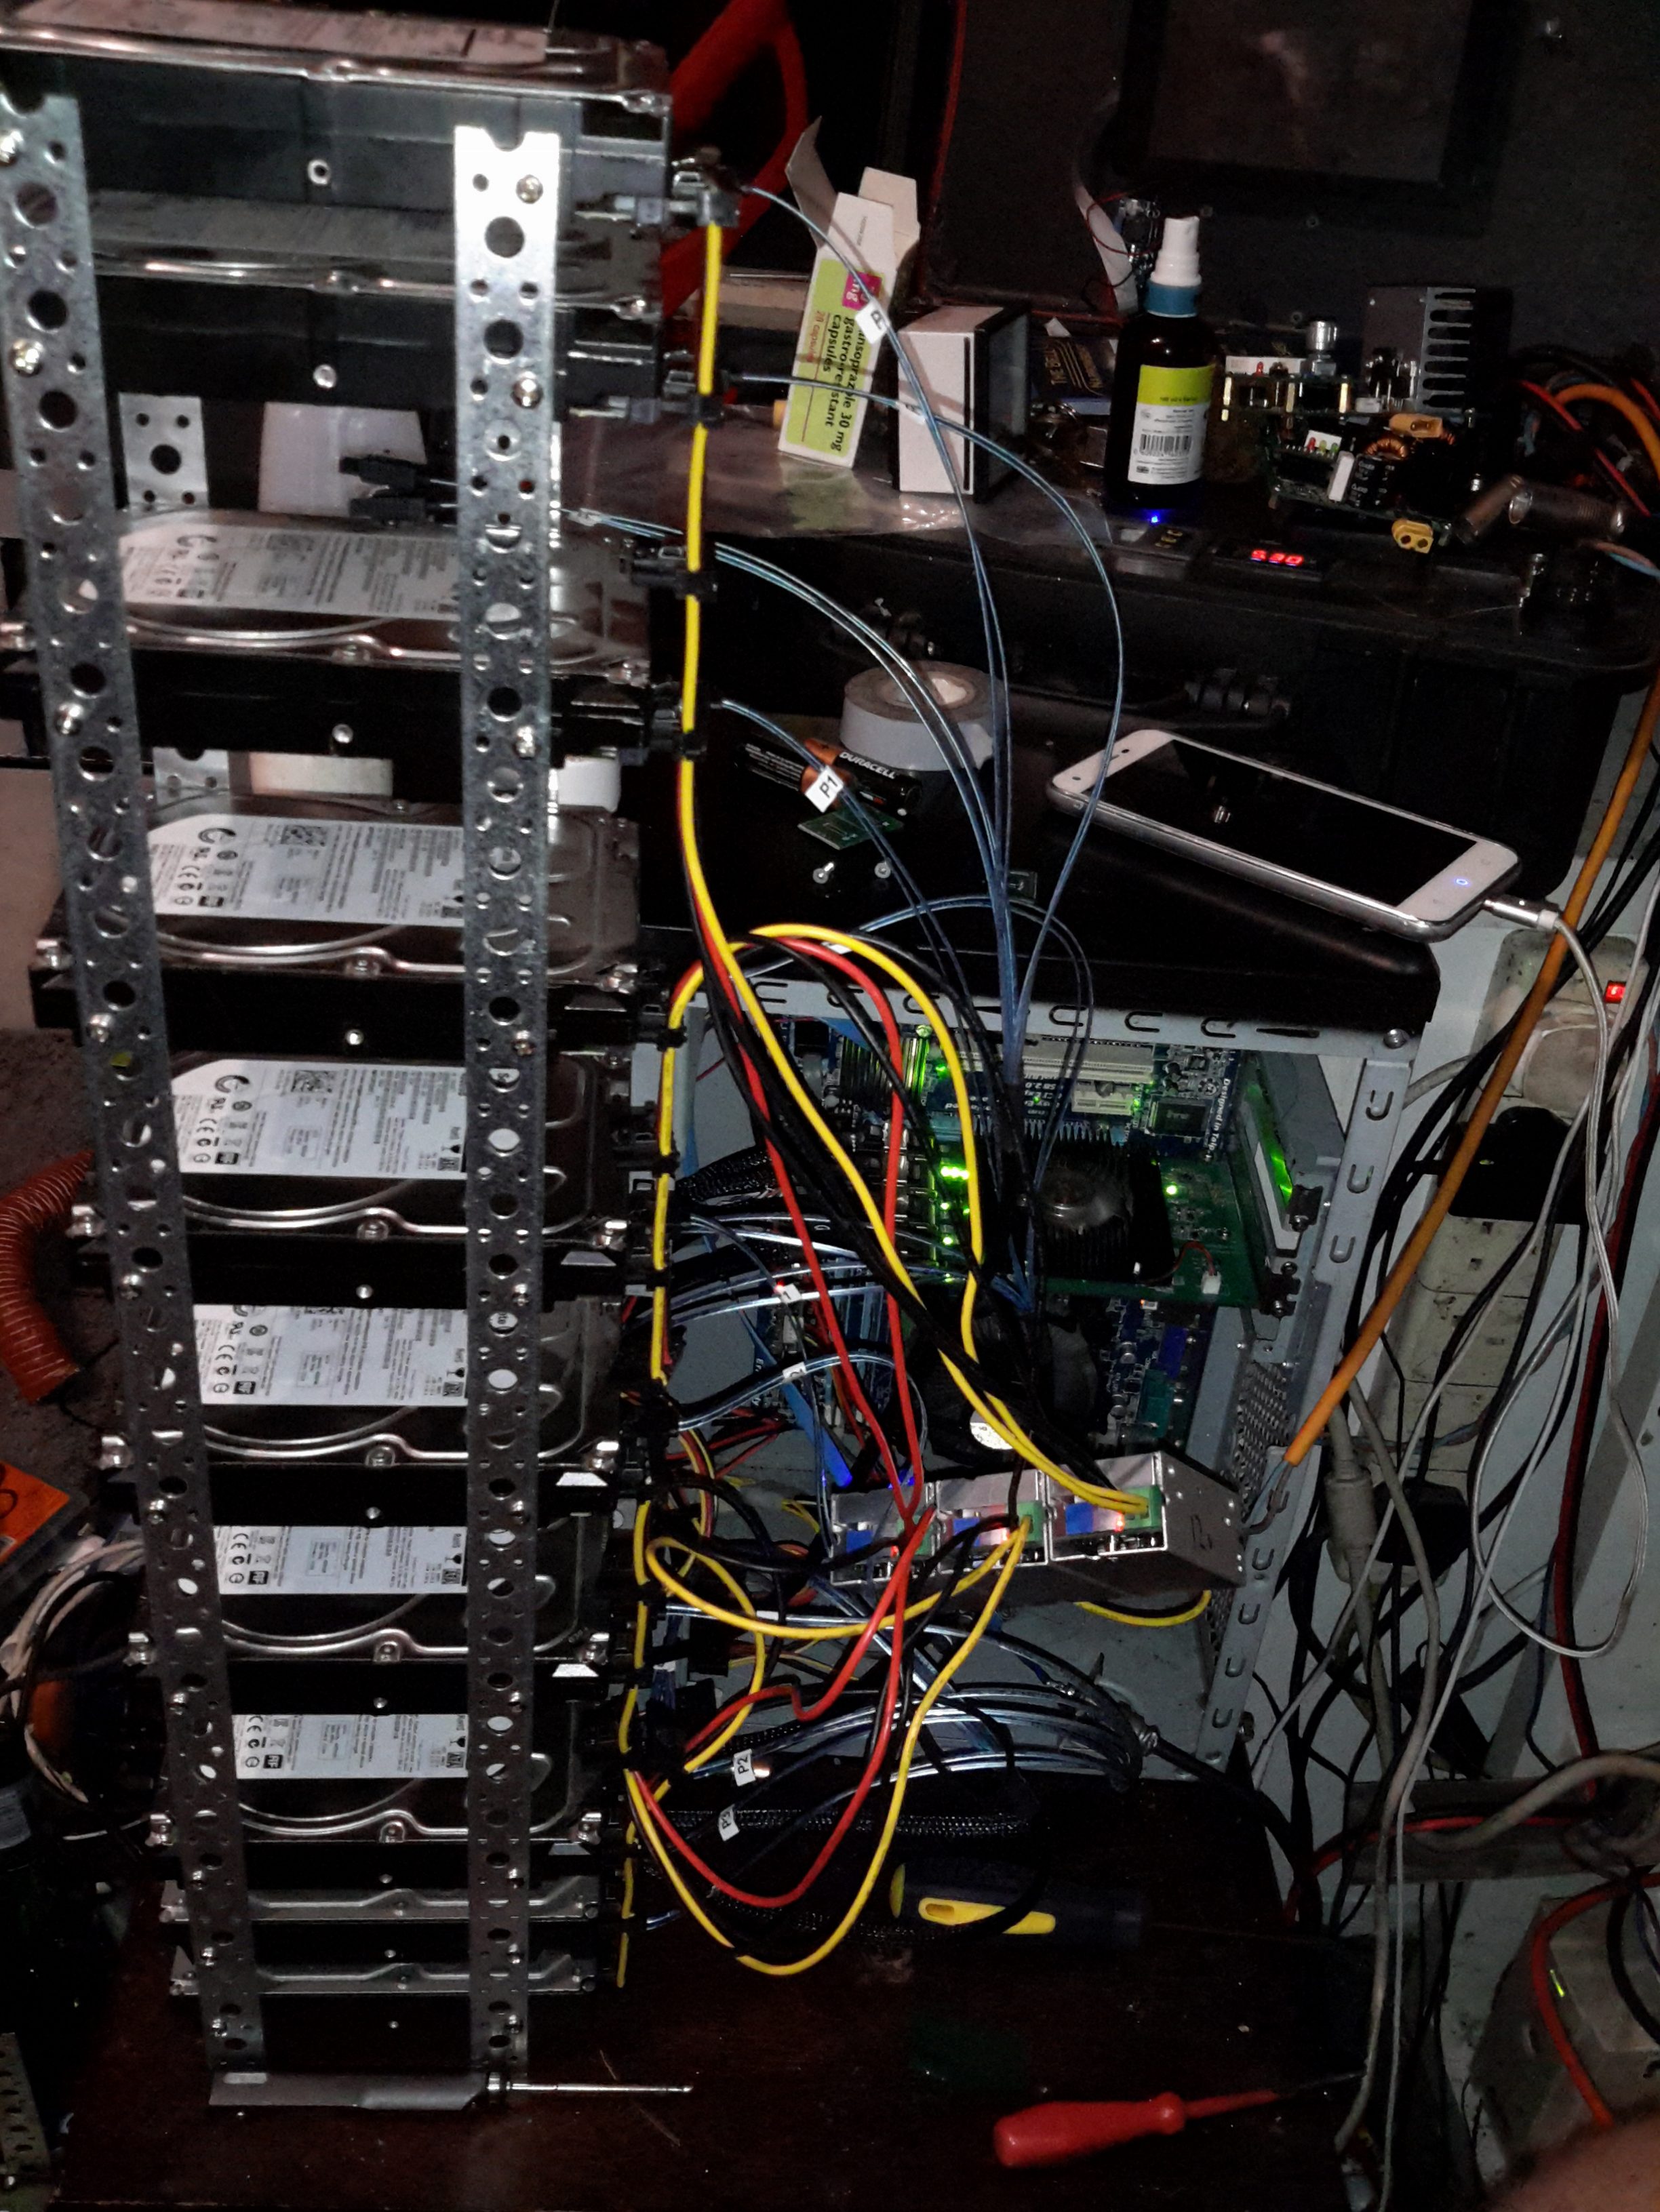
Since I don’t have a suitable case with built in drive bays, (again, they’re expensive), I’ve had to improvise with some steel strip to hold the disks in a stack. 3 DC-DC converters provides the regulated 12v & 5v for the disks from the main unregulated 12v system supply. Both the host system & the disks run from my central battery-backed 12v system, which acts like a large UPS for this.
The SATA power splitters were custom made, the connectors are Molex 67926-0001 IDC SATA power connectors, with 18AWG cable to provide the power to 4 disks in a string.
IDT Insertion Tool
These require the use of a special tool if you value your sanity, which is a bit on the expensive side at £25+VAT, but doing it without is very difficult. You get a very well made tool for the price though, the handle is anodised aluminium & the tool head itself is a 300 series stainless steel.
Just a quick note for the regular (and not so regular) readers:
My server infrastructure is currently going through some migration & upgrade processes, so for the next few days the site might be a little on the slow side, but hopefully I can get everything sorted out quickly!
During this time please bear with the slower than normal response times.
My main bulk storage for the home LAN is a bank of 4TB drives, set up in a large RAID6 array. Due to a brownout this evening on the +12v supply for one of the disk banks, I’ve had to start rebuilding two of the disks.
Core NAS
The total array size is 28TB after parity – 9 4TB disks in total. The disks are connected through USB3 to the file server.
mdadm Detail
Here’s the current status of the array. Two of the disks decided that they wouldn’t rejoin the array, so they got their superblocks cleared & readded manually. This forced the array into rebuilding.
Rebuild Progress
Rebuilding an array of this size takes a while, as can be seen from the image above, it’s going to take about 7200 minutes, or 5.2 days.
There have been quite a few updates to the hosting solution for this site, which is hosted locally in my house, from the above setup, in a small comms rack, to a new 22U half rack, with some hardware upgrades to come.
Core Switch Disconnected
Core switch here has been removed, with the rest of the core network equipment. The site was kept online by a direct connection into the gateway to the intertubes.
Switching Gear Installed
New 22U rack, with the core switch, FC switch & management & monitoring server installed.
Router Going In
As I had no rack rails to start with, the servers were placed on the top of the rack to start off, here is the Dell PowerEdge 860 pfSense core router installed, with the initial switch wiring to get the internal core network back online. This machine load balances two connections for an aggregated bandwidth of 140MB/s downstream & 15MB/s upstream.
The tower server behind is the NAS unit that runs the backups of the main & auxiliary webservers.
Almost Done
Still with no rack kits, all the servers are placed on top of the rack, before final installation. This allows running of the network before the rest of the equipment was installed.
The main server & aux server are HP ProLiant DL380 G3 servers, with redundant network connections.
Still to arrive are the final rack kits for the servers & a set of HP BL20p Blade servers, which will be running the sites in the future.
Stay tuned for more updates as they happen!
Tip Jar
If you’ve found my content useful, please consider leaving a donation by clicking the Tip Jar below!
All collected funds go towards new content & the costs of keeping the server online.