Due to widespread plagiarism of the images from this site, without giving credit, all 3,000+ images have been watermarked with the above logo. Any images with this watermark found on other sites have been stolen!
Category: Randoms
Site Hosting
There have been quite a few updates to the hosting solution for this site, which is hosted locally in my house, from the above setup, in a small comms rack, to a new 22U half rack, with some hardware upgrades to come.
Core switch here has been removed, with the rest of the core network equipment. The site was kept online by a direct connection into the gateway to the intertubes.
New 22U rack, with the core switch, FC switch & management & monitoring server installed.
As I had no rack rails to start with, the servers were placed on the top of the rack to start off, here is the Dell PowerEdge 860 pfSense core router installed, with the initial switch wiring to get the internal core network back online. This machine load balances two connections for an aggregated bandwidth of 140MB/s downstream & 15MB/s upstream.
The tower server behind is the NAS unit that runs the backups of the main & auxiliary webservers.
Still with no rack kits, all the servers are placed on top of the rack, before final installation. This allows running of the network before the rest of the equipment was installed.
The main server & aux server are HP ProLiant DL380 G3 servers, with redundant network connections.
Still to arrive are the final rack kits for the servers & a set of HP BL20p Blade servers, which will be running the sites in the future.
Stay tuned for more updates as they happen!
Brightwell Brightstar II BSL4 Dosing System
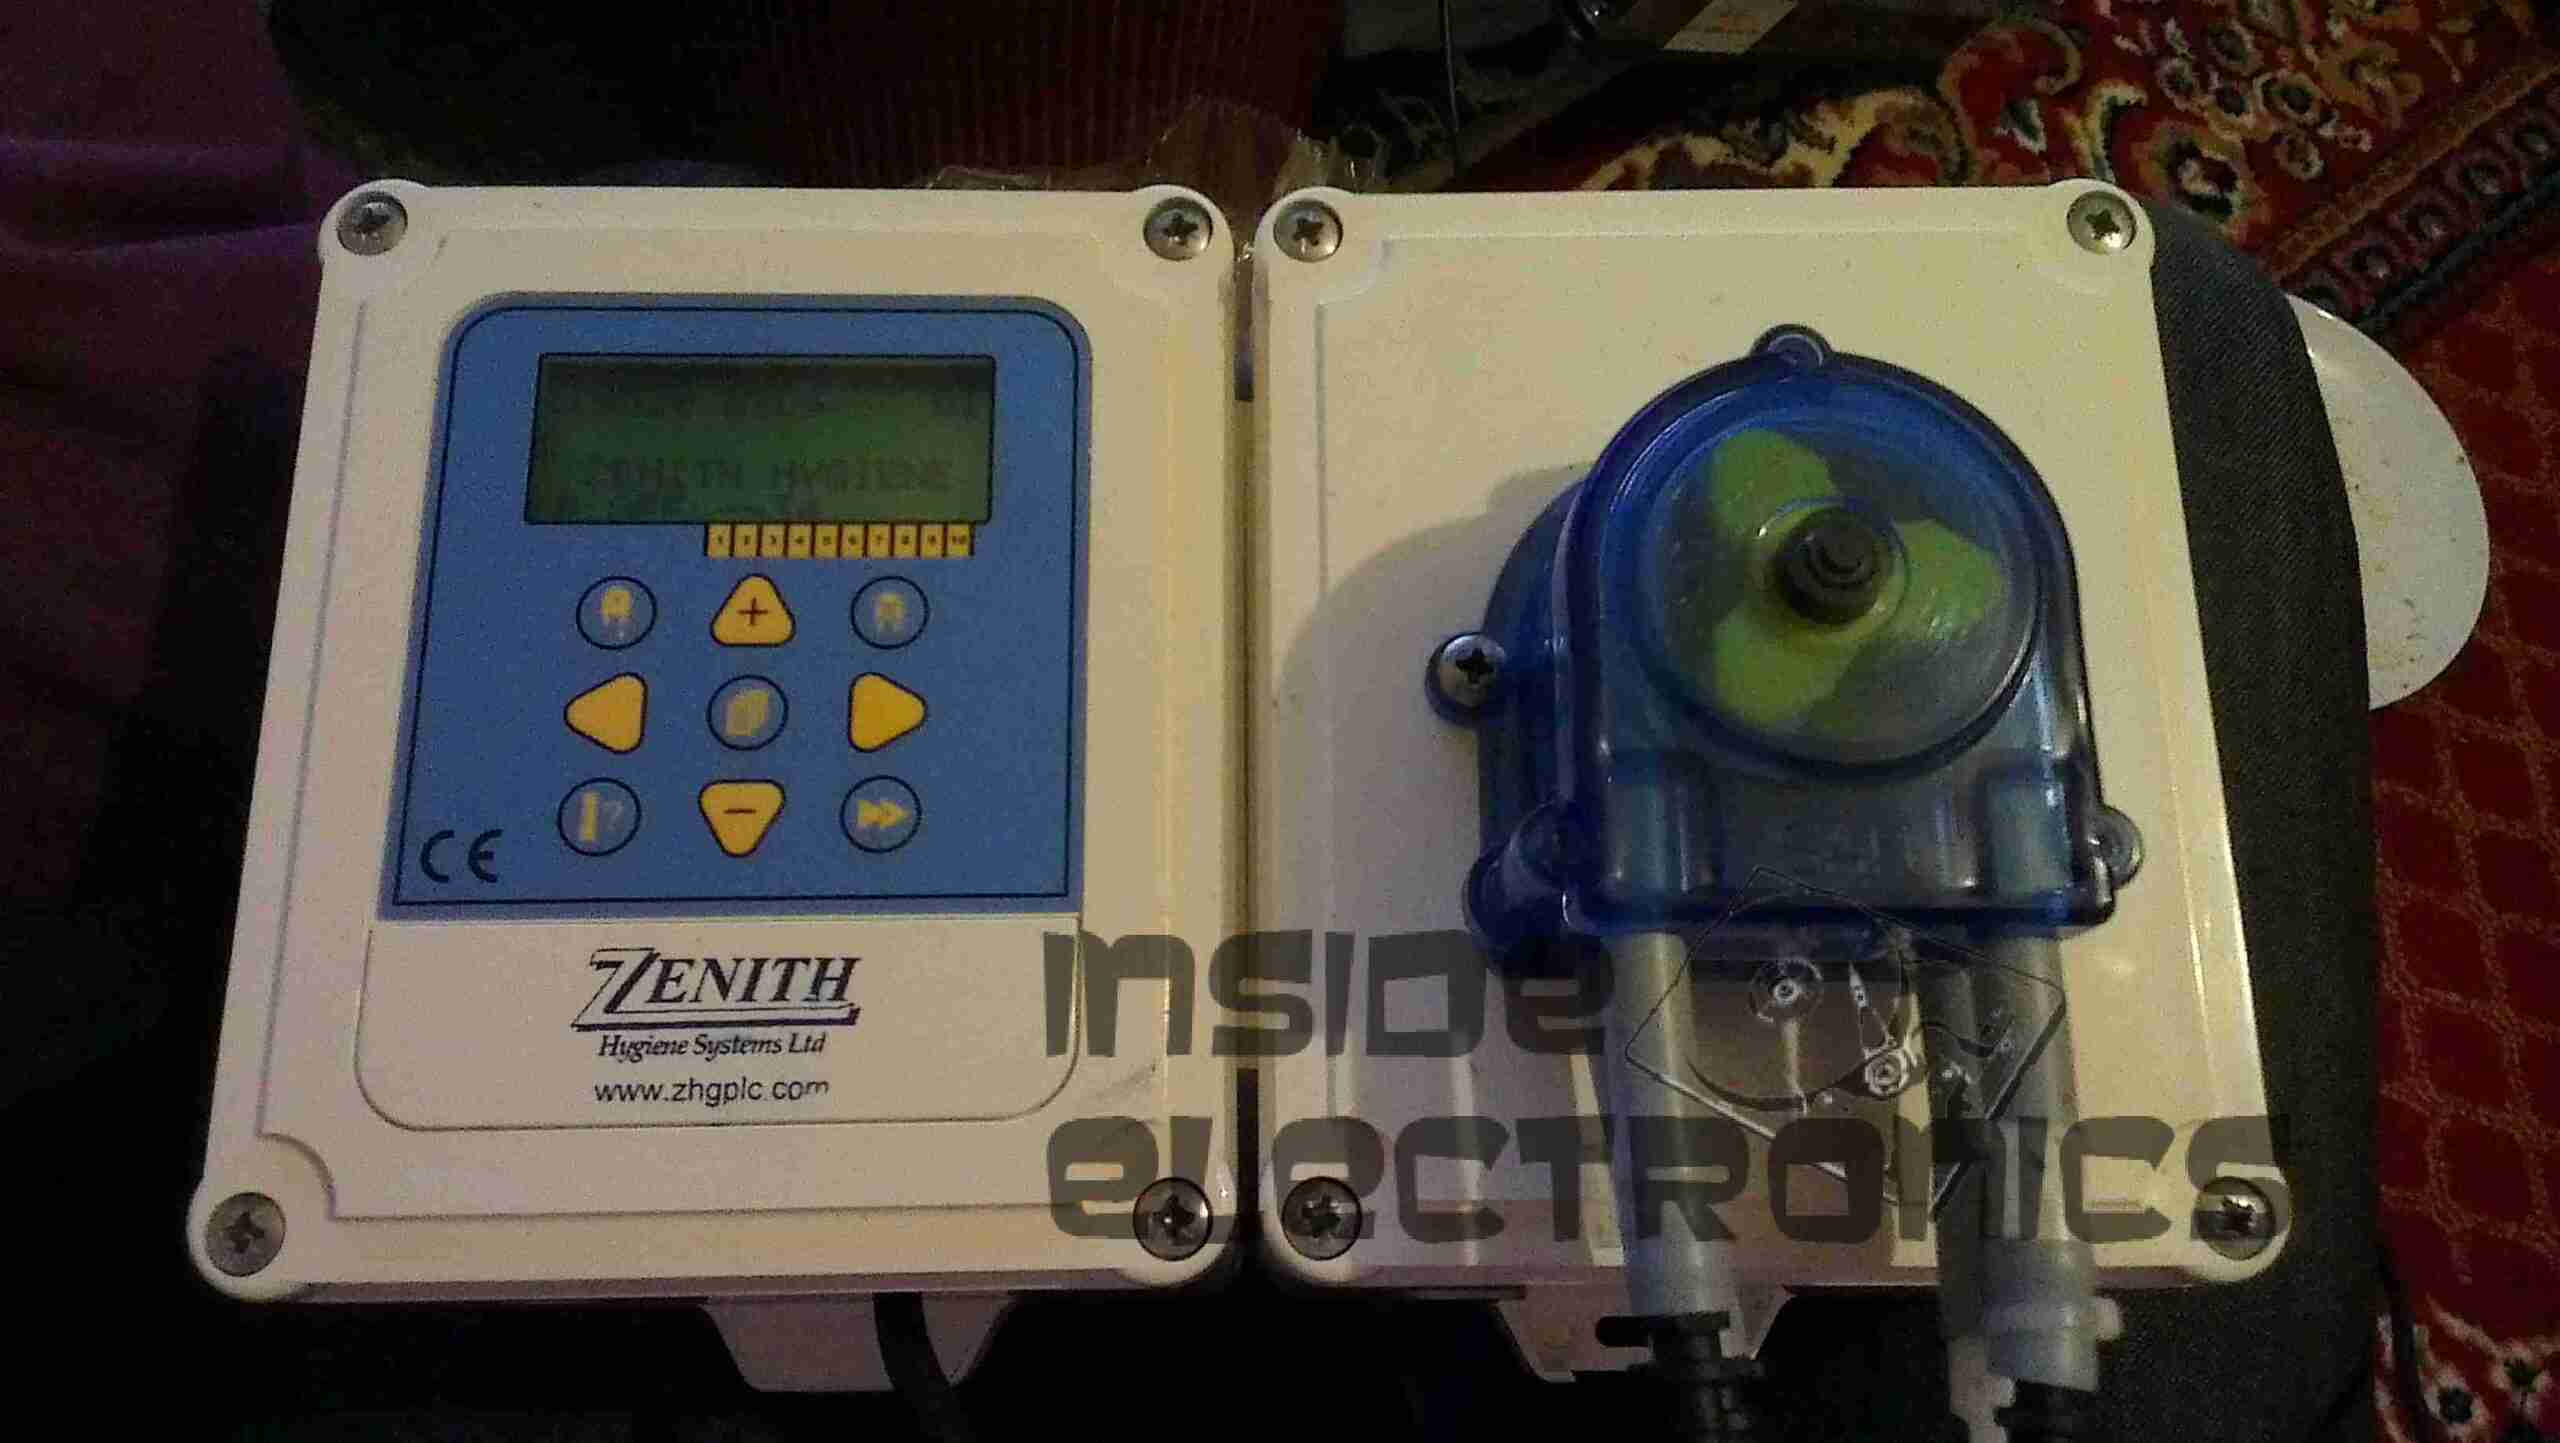
Here is an old chemical dosing system for industrial washing machines. These units are 4-pump models, with dual pumpheads. The motors are reversed to operate alternate pumps in the same head.
From 2006, this is a fairly old unit, and made in the UK.
Main controller PCB, with interface to the power electronics via the ribbon cable, an external serial port for programming to it’s left. Powered by an ST microcontroller. The LCD is below this board.
Main power supply, sense input & motor driver boards. The PSU outputs +5v, +12v & +24v. The inputs on the lower left connect to the washing machine & trigger the pumps via the programming on the CPU. The motors are driven by L6202 H-Bridge drivers from ST.
Motor & gearbox assembly on the back of the pumphead. These are 24v DC units with 80RPM gearboxes.
UPDATE:
As it seems to be difficult to find, here is the user manual for this unit:
[download id=”5557″]
Routemaster Control Unit
This is the control unit for a Routemaster system, that downloads traffic information for the area local to the vehicle.
Here is an overview of the unit, in it’s aluminium box.
Here is the unit with the top cover removed, showing the pair of PCBs. The bottom PCB is the main control PCB, the top one holds an IC similar to a SIM card & part of the radio.
Here is the main PCB removed from the casing, contains the program ROM & microcontroller. for the system
Daughtercard view. This holds another programmed CPLD, the custom SIM-like IC & the RTC battery, along with some power conversion circuitry.
This is the radio receiver, looks to be AM, the large loop antenna can be seen at the bottom of the box.
Update!
Well things have been hectic over the past couple of months.
With a new job & a new addition to the family I’m not getting much time to update the site, however there are a few things on the way!
More Raspberry Pi stuff will be arriving soon, running the GPIO with a web interface.
I found a fault with Dell servers that I’ve managed to fix without having to replace some very expensive parts! This might be of interest to people with such servers, more info to come soon!
Vintage Optical Block
I thought this would be of interest, as it’s from a drive circa 2001, (DVD-CD-RW).
It’s the biggest & most complex optical block I’ve ever seen, with totally separate beam paths for the IR CD beam & the visible DVD beam. It also combines the use of bare laser diodes & combined diode/photodiode array modules for the pickup.
Here’s a look at the optics inside the sled, on the left is a bare laser diode & photodiode array, for the CD reading, and the bottom right has the DVD combined LD/PD array module. The beam from the CD diode has to pass though some very complex beam forming optics & a prism to fold it round to the final turning mirror to the objective lens at top center.
There are also two separate photodiodes which are picking up the waste beam from the prisms, most likely for power control.
OMXPlayer Series Play
This is a little script to make OMXPlayer on the Raspberry Pi cycle through every file in a specified folder, useful for playing sequential movies or series of episodes.
1 2 3 4 5 6 7 8 9 |
#!/bin/bash if [ x"$1" = x"help" -o x"$1" = x"--help" -o x"$1" = x"-help" ];then echo "Usage: omxseries [audio mode] [folder path]" echo "Audio Mode can be either 'hdmi' or 'local'." echo "Folder Path is the full path to the video files on your system." echo "This script will attempt to play every file in the target folder, with any file extension," echo "so ensure that only valid video files are present in the target folder to avoid errors." exit fi |
1 2 3 4 |
for file in $2/* do omxplayer -o $1 $file done |
Example:
[root@raspbian ~]# omxseries hdmi /media/stuff/videos
would play everything in /media/stuff/videos and send the audio over the HDMI port.
Download the script to your Pi with this code:
1 |
wget -O /usr/bin/playseries http://www.experimental-engineering.co.uk/wp-content/plugins/download-monitor/download.php?id=1 && chmod +x /usr/bin/playseries |
AutoFace HID Ballast & Bulb
I bought one of these cheap HID kits from eBay to build a high-brightness work light that I could run from my central 12v supply.
At £14.99 I certainly wasn’t expecting anything more than the usual cheap Chinese construction. And that’s definitely what I got 😀
The casing is screwed together with the cheapest of screws, with heads that are deformed enough to present a problem with removal.
As can be seen here, the inside of the unit is potted in rubber compound, mostly to provide moisture resistance, as these are for automotive use.
The ballast generates a 23kV pulse to strike the arc in the bulb, then supplies a steady 85v AC at 3A, 400Hz to maintain the discharge.
This module could quite easily be depotted as the silicone material used is fairly soft & can be removed with a pointed tool.
Here is the bulb removed from it’s mount. Under the bulb itself is a solenoid, which tilts the bulb by a few degrees, presumably to provide dim/dip operation for a headlight. This functionality is superfluous to my requirements.
Closeup of the arc chamber of the bulb.
Atari 2600 Service Manual
Sony FTL-PT22 Service Manual
The Finest Hour
Reprinted from The Pirate Bay. Thought this deserved as much net coverage as possible.
February 2011, MAFIAA Lobbyists began a massive attack against the European Union.
Defending the union were seeds and peers of The Pirate Bay along with the Telecomix, Anons, and the Pirate parties. The MAFIAA relied on an aggressive battle plan, utilizing modern communications such as radio and telefax to direct troops in the field. The Allies, for their part, assumed a defensive posture, just as they had done at the start of World Internets War of 2003, and in many cases still relied on irc.
As a result, the MAFIAA blitzkrieg caught the Allies off-guard. MAFIAA’s smooth talks and bribes against key players in the EU staged a surprise attack, then turned northward and soon surrounded the bulk of the EU headquarters in Belgium.
After just a few weeks of battle, MAFIAA’s armies had conquered the right, the left and the liberal parties.
I expect that the Battle of Internets is about to begin. Upon this battle depends the survival of an Uncensored civilization! Upon it depends our own free life, and the long continuity of our sites and our trackers. The whole fury and might of the enemy will very soon be turned on us.
MAFIAA knows that they will have to break us in Brussels or lose the war. If we can stand up to them, all Europe may be free and the life of the world may move forward into broad, sunlit uplands. But if we fail, then the whole world, including all that we have known and cared for, will sink into the abyss of a new Dark Age made more sinister, and perhaps more protracted, by the lights of perverted science.
Let us therefore brace ourselves to our duties, and so bear ourselves that if the free internets and its multitude of sites last for a thousand years, citizens will still say, This was their finest hour.
Yours, Winston Bay.
Full news article here.
Monox Compact-S CO Sensor Cell
Here is an old electrochemical type carbon monoxide detector cell, from Monox. Hole in the centre is the inlet for the gas under test.
DO NOT TRY THIS AT HOME! Electrochemical cells contain a substantial amount of sulphuric acid, strong enough to cause burns.
This is a type of fuel cell that instead of being designed to produce power, is designed to produce a current that is precisely related to the amount of the target gas (in this case carbon monoxide) in the atmosphere. Measurement of the current gives a measure of the concentration of carbon monoxide in the atmosphere. Essentially the electrochemical cell consists of a container, 2 electrodes, connection wires and an electrolyte – typically sulfuric acid. Carbon monoxide is oxidized at one electrode to carbon dioxide while oxygen is consumed at the other electrode. For carbon monoxide detection, the electrochemical cell has advantages over other technologies in that it has a highly accurate and linear output to carbon monoxide concentration, requires minimal power as it is operated at room temperature, and has a long lifetime (typically commercial available cells now have lifetimes of 5 years or greater). Until recently, the cost of these cells and concerns about their long term reliability had limited uptake of this technology in the marketplace, although these concerns are now largely overcome. This technology is now the dominant technology in USA and Europe.
Rear of unit with connection pins. Hole here is to let oxygen into the cell which permits the redox reaction to take place in the cell when CO is detected, producing a voltage on the output pins.
Cell disassembled. The semi-permeable membrane on the back cover can be seen here, to allow gas into the cell, but not the liquid electrolyte out. Cell with the electrodes is on the right, immersed in sulphuric acid.
Closeup of the electrode structure. Polymer base with a precious metal coating.
Membrane & filter on the test gas input port.
The Truth About DWP Cuts From A DWP Worker On The Front Line
A bit of a shift from my usual content, but I thought this deserved a place for people to see. Only relevant for people of the UK though.
“I’m a DWP worker sticking his head above the parapet and hoping not to get shot…
I work in a busy Jobcentre and my customers are those 25+ who’ve been out of work for 13 weeks or longer. Probably 60-70% of the one hundred or more people I see every week [who] are evidently not fit for work and yet, in theory, it’s my job to whip them through the same hoops as everybody else, persecute them, attempt to stop their benefits and generally shame them into applying for all manner of wholly unsuitable jobs that they’re never going to be able to do.
In reality, what I do is tell them the system sucks and advise them of ways they can stay beneath the radar, or suggest they sign off JSA and move onto ESA and do whatever I can to make the transition as trouble free as possible.
On the other side of the office to me are the Pathways team, who deal with customers on ESA. We all know that over the coming months most of them will be forced to migrate over to the JSA bods like myself and we won’t be able to cope with either the numbers or the particular problems that this customer group represents.
The point of all this waffle is that the policy makers have embarked upon their catastrophic journey without consulting the frontline workers who, without exception in my experience, KNOW that the planned changes CANNOT work.
I would advise people worried about a forced transition from ESA to JSA to be brave and try not to lose too much sleep about it… It’s just not do-able in the real world, there’ll be a horrible mess and people’s lives will face some awful but shortlived disruption and then it’ll be business as usual.
Also, for those who face the indignity of having to venture into a jobcentre from time to time, please be assured – the majority of those who work in them are actually on your side, and have probably less faith in our political masters than you do, and just as much awareness as yourselves that all their vitriolic guff about benefit scroungers and feckless layabouts is simply empty, venomous scapegoating…”
Please feel free to copy and paste this to your own notes/blog, etc. Spread the truth.
Audi TT Roof Hydraulics
This is the hydraulic system from an Audi TT that would power the soft top. Here is the hydraulic pump unit. Oil Tank is on the left. Power is 12v DC at ~20A
The pair of hydraulic cylinders that attached to the roof mechanism.
One of the cylinders has a limit switch built in. The brass bolt coming out of the side of the head is one contact. The other contact is the cylinder body.
Marking on the hoses. This is Parker Polyflex hydraulic hose. 1/8″ ID.
Drive motor for the hydraulic pump. Standard DC permanent magnet motor.
Motor power terminals & suppression capacitors. As the reversing relays actually short the motor out when de-energized, there is a lot of arcing at the brushes without some suppression.
Reversing relay stack. Each relay is a SPDT configuration. The pair are arranged as a DPDT bank to reverse the motor, depending on which relay is energized.
Detail of the oil tank showing the level markings.
Solenoid valve on top of the unit. This valve provides full pump pressure to the cylinders when energized.
Fluval 203 Canister Filter
Here is an old fish tank external filter & a few pics of the insides.
Label on the front of the pump head. Fittings on either side of the motor are water I/O.
Underside of the pump head, inlet is on the right, outlet from the pump is on the left. Pump intake in centre.
Pump disassembled. This pump requires no shaft seals as the impeller is driven magnetically with a synchronous motor.
Filter stack removed from the unit. From left: foam media, activated charcoal/gravel & ceramic pellets.