Posted on Leave a comment

Is SMART Really Useful?

Being in technology for a long time, I have seen my fair share of disk failures. However I have never seen a single instance where SMART has issued a sufficient warning to backup any data on a failing disk. The following is an example of this in action.

Toshiba MQ01ABD050
Toshiba MQ01ABD050

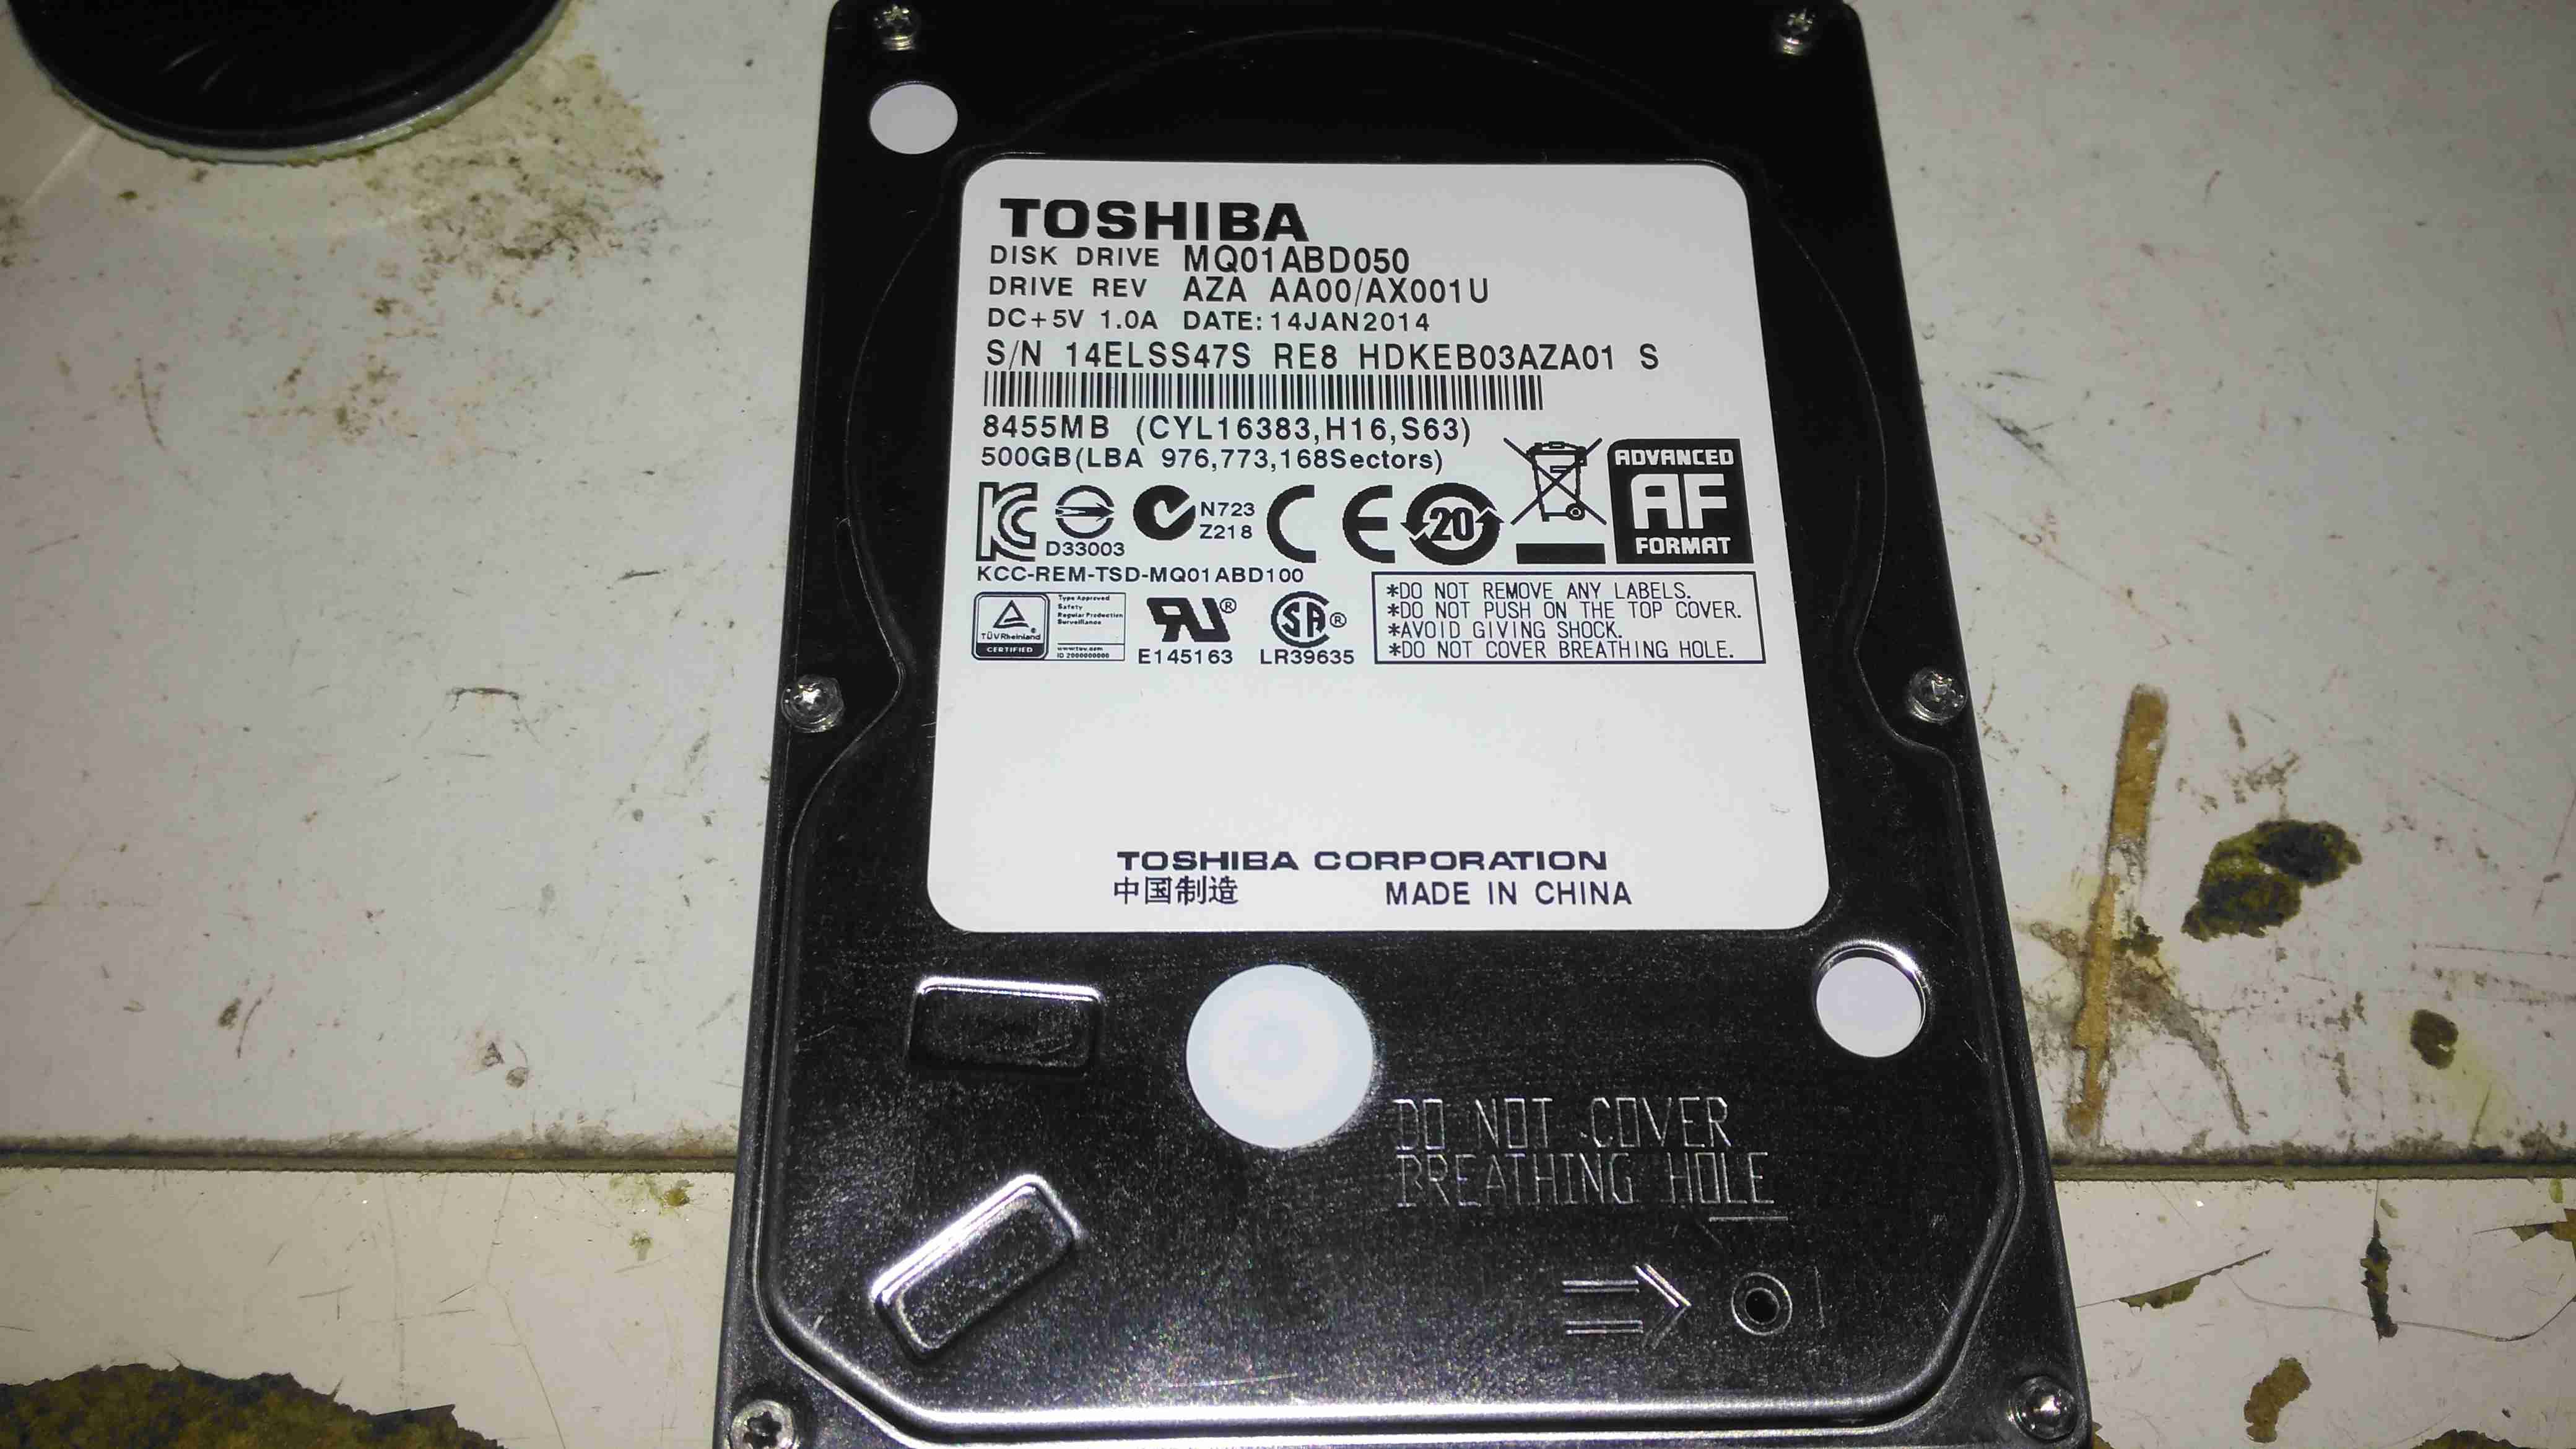
Here is a 2.5″ Toshiba MQ01ABD050 500GB disk drive. This unit was made in 2014, but has a very low hour count of ~8 months, with only ~5 months of the heads being loaded onto the platters, since it has been used to store offline files. This disk was working perfectly the last time it was plugged in a few weeks ago, but today within seconds of starting to transfer data, it began slowing down, then stopped entirely. A quick look at the SMART stats showed over 4000 reallocated sectors, so a full scan was initiated.

SMART Test Failure
SMART Test Failure

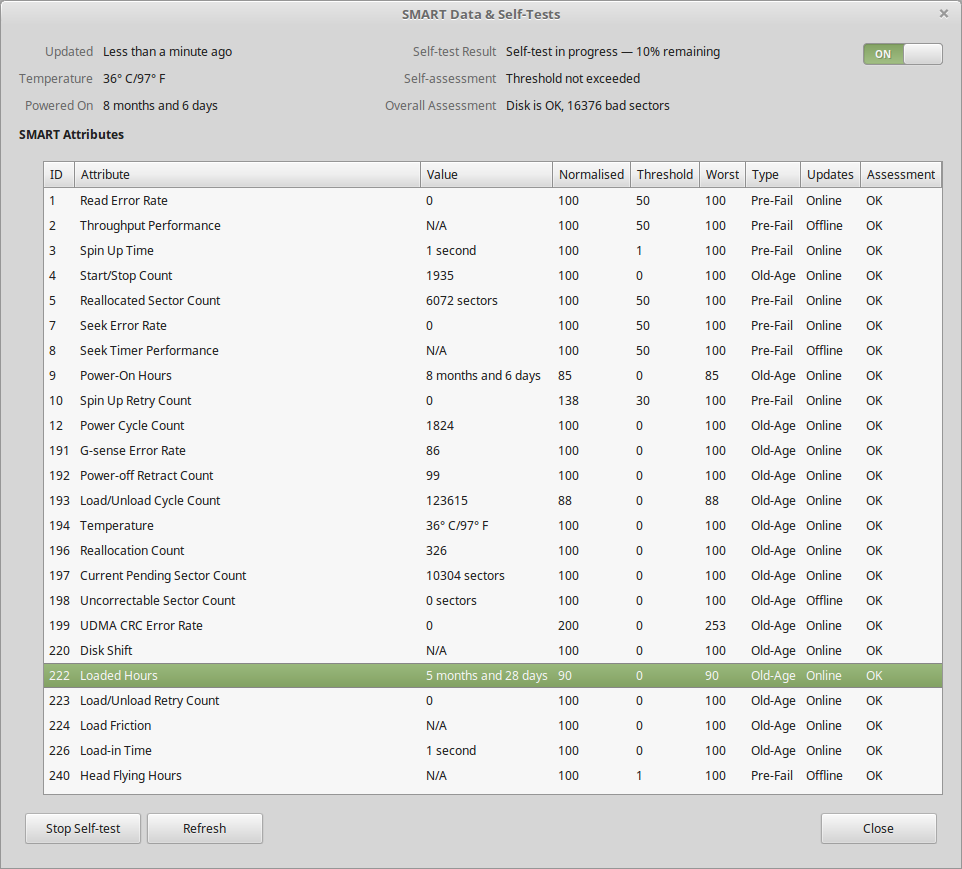
After the couple of hours an extended test takes, the firmware managed to find a total of 16,376 bad sectors, of which 10K+ were still pending reallocation. Just after the test finished, the disk began making the usual clicking sound of the head actuator losing lock on the servo tracks. Yet SMART was still insisting that the disk was OK! In total about 3 hours between first power up & the disk failing entirely. This is possibly the most sudden failure of a disk I’ve seen so far, but SMART didn’t even twig from the huge number of sector reallocations that something was amiss. I don’t believe the platters are at fault here, it’s most likely to be either a head fault or preamp failure, as I don’t think platters can catastrophically fail this quickly. I expected SMART to at least flag that the drive was in a bad state once it’s self-test completed, but nope.

Internals
Internals

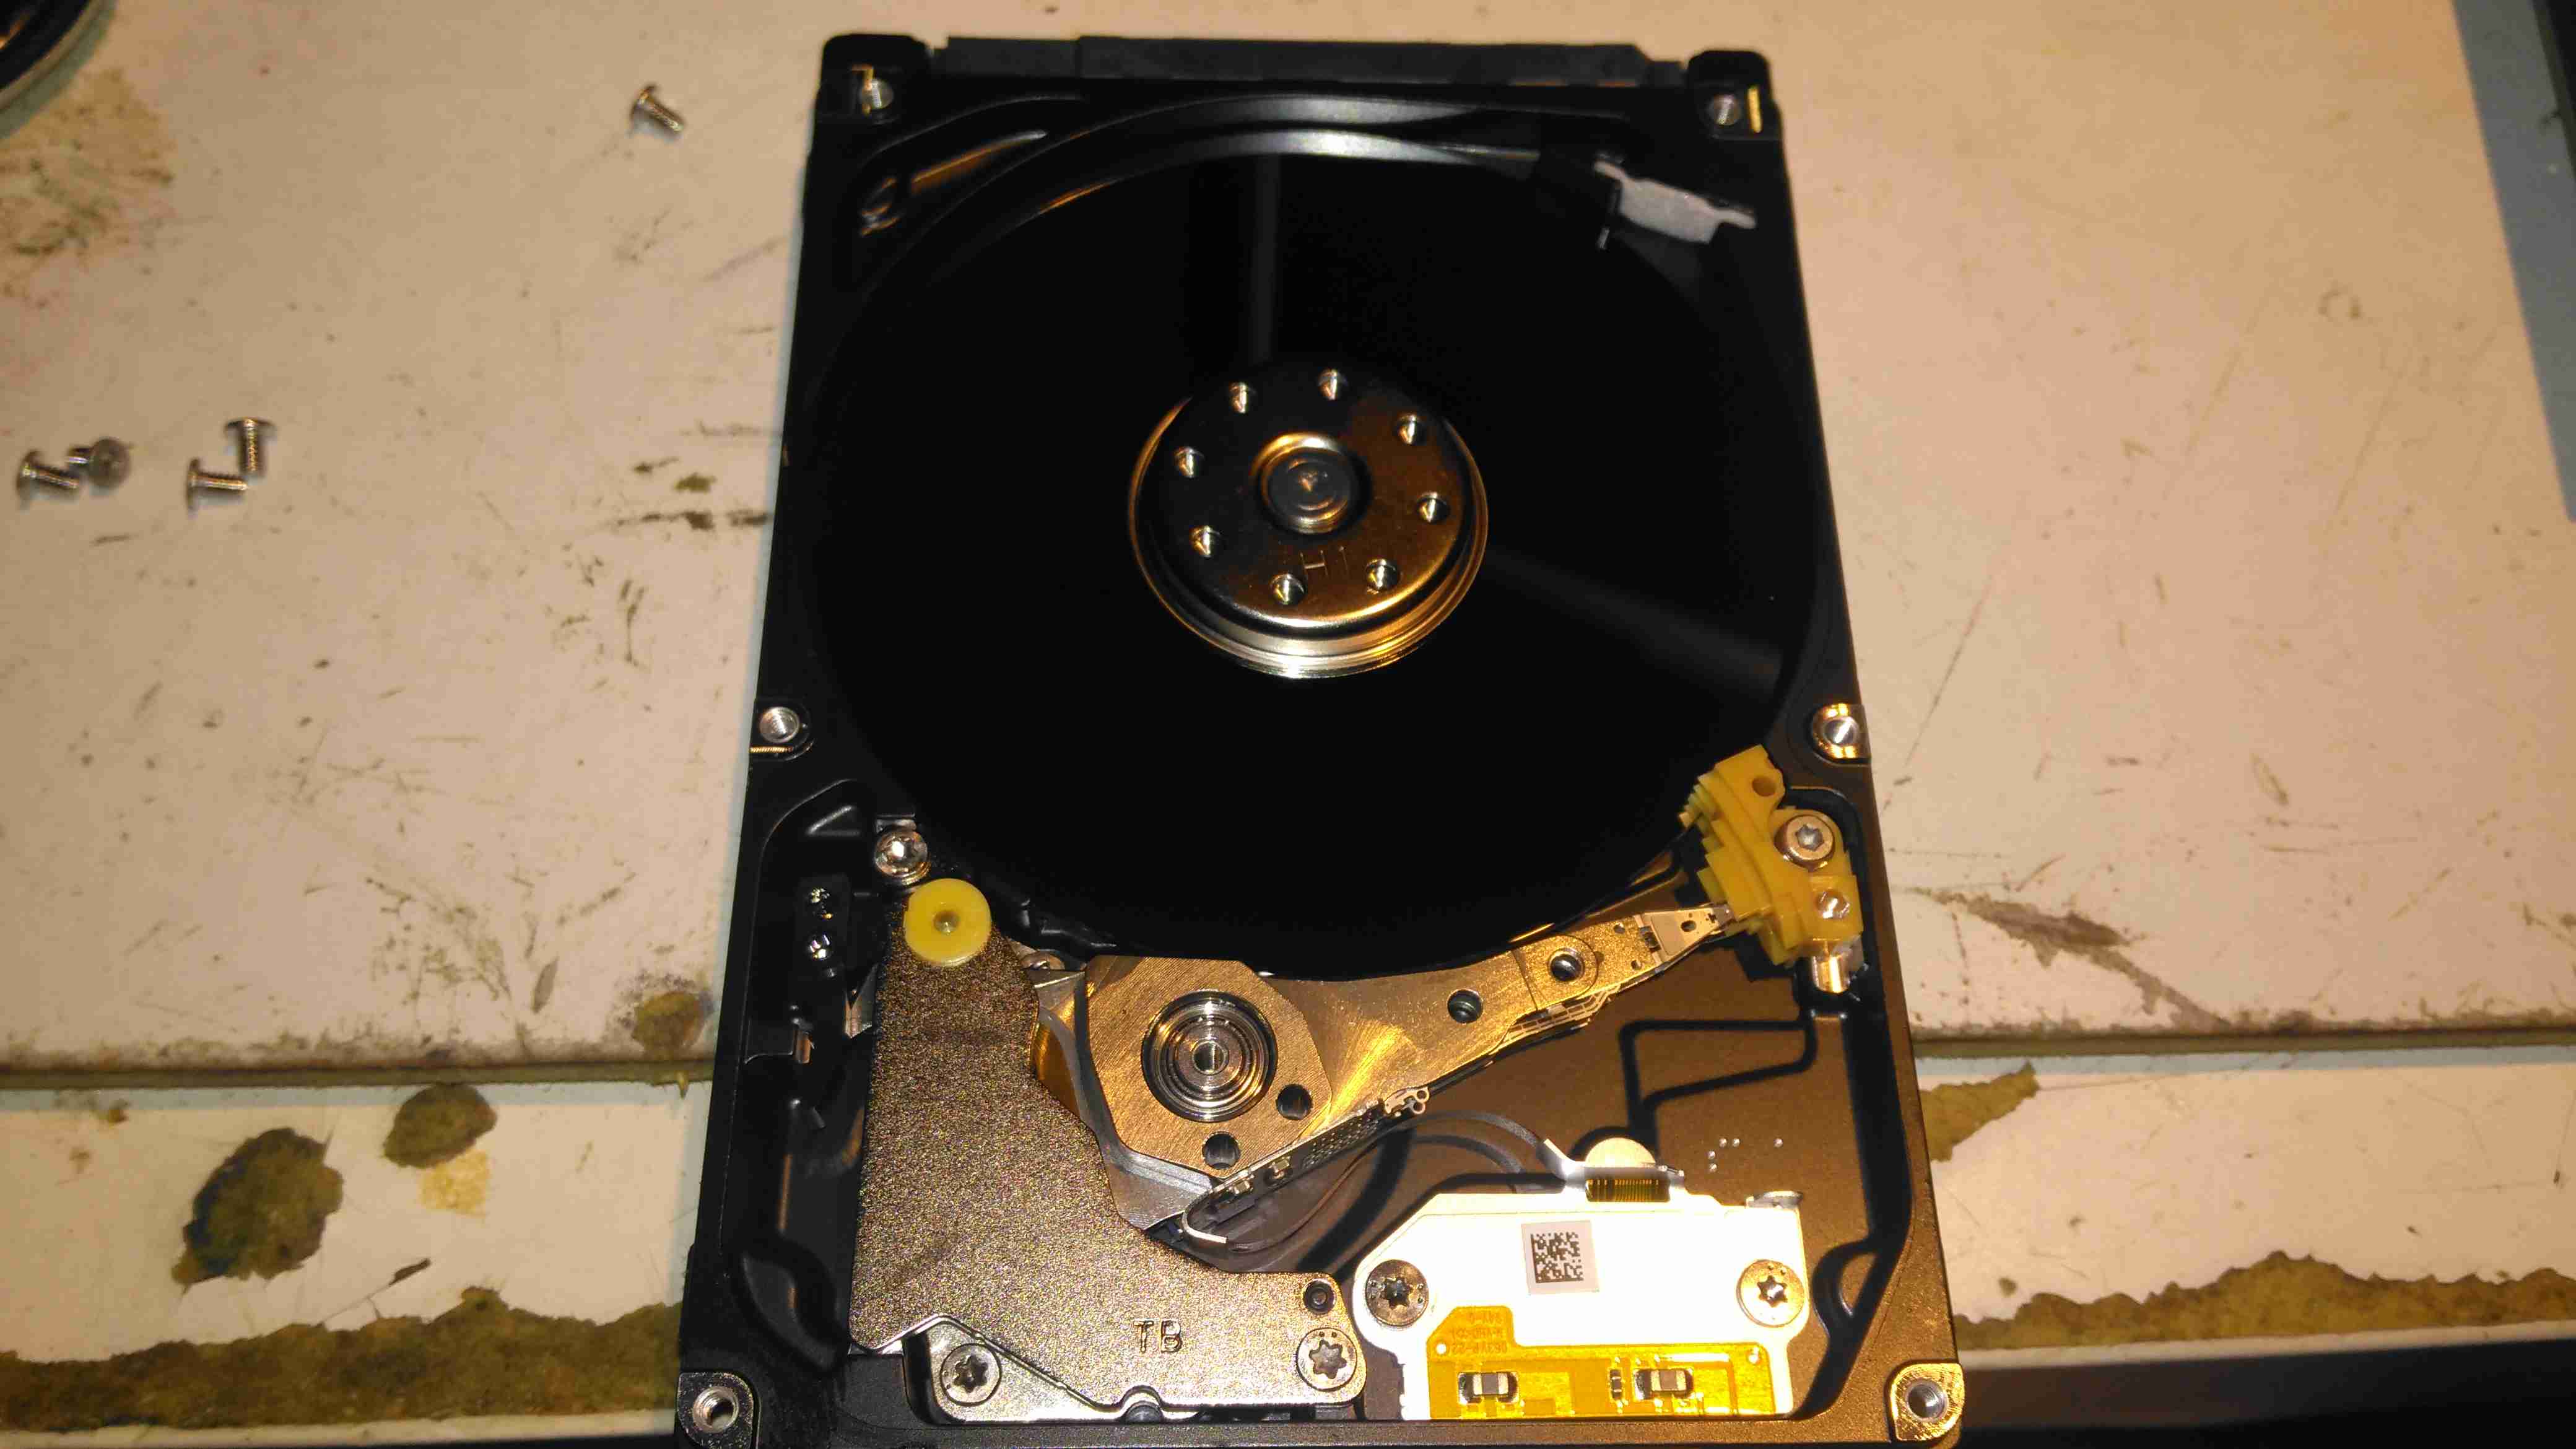
After pulling the lid on this disk, to see if there’s any evidence of a head crashing into a platter, there’s nothing – at least on a macroscopic scale, the single platter is pristine. I’ve seen disks crash to the point where the coating has been scrubbed from the platters so thoroughly that they’ve been returned to the glass discs they started off as, with the enclosure packed full of fine black powder that used to be data layer, but there’s no indication of mechanical failure here. Electronic failure is looking very likely.

Clearly, relying on SMART to alert when a disk is about to take a dive is an unwise idea, replacing drives after a set period is much better insurance if they are used for critical applications. Of course, current backups is always a good idea, no matter the age of drive.

Posted on Leave a comment

Raspberry Pi 3 Model B+ Initial Tests & Benchmarks

Raspberry Pi 3 Model B+

Yesterday, the Raspberry Pi community got a nice surprise – a new Pi! This one has some improved features over the previous RPi 3 Model B:

  • Improved CPU – 64-Bit 1.4GHz Quad-Core BCM2837B0
  • Improved WiFi – Dual Band 802.11b/g/n/ac. This is now under a shield on the top of the board.
  • Improved Ethernet – The USB/Ethernet IC has been replaced with a LAN7515, supporting gigabit ethernet. The backhaul is still over USB2 though, so this would max out at about 300Mbit/s
  • PoE Support – There’s a new 4-pin header, and a matching HAT for power over ethernet support.
Chipset
Chipset

The USB/LAN Controller is now a BGA package, supporting gigabit ethernet. The USB connections are still USB2 though, limiting total bandwidth. This shouldn’t be much of an issue though, since anything over the 100Mbit connection we’ve had previously is an improvement.

CPU & Radio
CPU & Radio

The CPU now has a metal heatspreader on top of the die, no doubt to help with cooling under heavy loads. As far as I know, it’s still the same silicon under the hood though. The WiFi radio is under the shielding can to the top left, with the PCB trace antenna down the left edge of the board.

Power Controller
Power Controller

The power supplies are handled on this new Pi by the MaxLinear MxL7704, from what I can tell from MaxLinear’s page, it seems to be somewhat of a collaborative effort to find something that would do the best job, since they apparently worked with the Foundation to get this one right. This IC apparently includes four synchronous step-down buck regulators that provide system, memory, I/O and core power from 1.5A to 4A. An on-board 100mA LDO provides clean 1.5V to 3.6V power for analog sub-systems. This PMIC utilizes a conditional sequencing state machine that is flexible enough to meet the requirements of virtually any processor.

PCB Bottom
PCB Bottom

The bottom of the PCB has the Elpida 1GB RAM package, which is LPDDR2, along with the MicroSD slot.

A quick benchmark running Raspbian Lite & a SanDisk Ultra 32GB Class 10 SD card gives some nice results:

Posted on Leave a comment

Blog Housekeeping & More Of The Same

Since I’ve been working on the backend servers a lot over the past few days, I’ve decided it was time to get some broken things on the blog fixed.

Firstly, the radiation monitor graphs. Originally I was using a Raspberry Pi to grab the data from the local monitor, and that was connecting via FTP to the server over in the datacentre to push it’s graph images. Since the server is now on the same local network as the monitor, there’s no need to faff about with FTP servers, so I’ve rejigged things with some perl scripts from cristianst85 over on GitHub, running on the web server itself.
I deviated from the suggested place to put the scripts on the server & opted to store everything within the Experimental Engineering hosting space, so it gets backed up at the same time as everything else on a nightly basis.

This is also accessible from the menu at top left, the script pulls data from the monitor & updates the images every 60 seconds via a cron job.

I’ve removed a couple of dead pages from the blog system, along with some backend tidying of the filesystem. Over the years things have gotten quite messy behind the scenes. This blog is actually getting quite large on disk, I’ve hit the 15GB mark, not including the database!

Caching is enabled for all posts on the blog now, this should help speed things up for repeat visitors, but as most of my content is (large) image based, this might be of limited help. I’m currently tuning the MySQL server for the load conditions, but this takes time, as every time I change some configuration settings I have to watch how things go for a few days, before tweaking some more.

Server Control Panels – More Of The Same

Sorry Sentora. I tried, and failed to convert over to using it as my new server control panel. Unfortunately it just doesn’t give me the same level of control over my systems, so I’ll be sticking with Virtualmin for the foreseeable future. Sentora stores everything in, (to me at least), very odd places under /var/ and gave me some odd results with “www.” versions of websites – some www. hosts would work fine, others wouldn’t at all & just redirect to the Sentora login interface instead. This wasn’t consistient between hosting accounts either, and since I didn’t have much time to get the migration underway, this problem was the main nail in the coffin.

Just storing everything under the sun in /var/ makes life a bit more awkward with the base CentOS install, as it allocates very little space to / by default, (no separate /var partition in default CentOS), giving most of the disk space to /home. Virtualmin on the other hand, stores website public files & Maildirs under /home, saving /var for MySQL databases & misc stuff.

The backup system provided is also utterly useless, there’s no restore function at all, and just piles everything in the account into a single archive. By comparison, Virtualmin has a very comprehensive backup system built in, that supports total automation of the process, along with full automatic restore functionality for when it’s needed.

Sentora did have some good points though:
It handled E-Mail logins & mail filters much more gracefully than Virtualmin does, and comes with Roundcube already built into the interface ready to use. With Virtualmin the options are to use the Usermin side of the system for E-Mail, which I find utterly awful to use, or install a webmail client under one of the hosted domains (my personal choice).
Mail filtering is taken care of with Sieve under Sentora, while Procmail does the job under Virtualmin.

Sentora does have a nicer, simpler, more friendly interface, but it hides most of the low-level system stuff away, while under Virtualmin *everything* on the system is accessible, and it provides control interfaces for all the common server daemons.

Posted on Leave a comment

16-Port SATA PCIe Card – Cooling Recap

It’s been 4 months since I did a rejig of my storage server, installing a new 16-port SATA HBA to support the disk drives. I mentioned the factory fan the card came with in my previous post, and I didn’t have many hopes of it surviving long.

Heatsink
Heatsink

The heatsink card has barely had enough time to accumulate any grime from the air & the fan has already failed!

There’s no temperature sensing or fan speed sensing on this card, so a failure here could go unnoticed, and under load without a fan the heatsink becomes hot enough to cause burns. (There are a total of 5 large ICs underneath it). This would probably cause the HBA to overheat & fail rather quickly, especially when under a high I/O load, with no warning. In my case, the bearings in the fan failed, so the familiar noise of a knackered sleeve bearing fan alerted me to problems.

Replacement Fan
Replacement Fan

A replacement 80mm Delta fan has been attached to the heatsink in place of the dead fan, and this is plugged into a motherboard fan header, allowing sensing of the fan speed. The much greater airflow over the heatsink has dramatically reduced running temperatures. The original fan probably had it’s bearings cooked by the heat from the card as it’s airflow capability was minimal.

Fan Rear
Fan Rear

Here’s the old fan removed from the heatsink. The back label, usally the place where I’d expect to find some specifications has nothing but a red circle. This really is the cheapest crap that the manufacturer could have fitted, and considering this HBA isn’t exactly cheap, I’d expect better.

Bearings
Bearings

Peeling off the back label reveals the back of the bearing housing, with the plastic retaining clip. There’s some sign of heat damage here, the oil has turned into gum, all the lighter fractions having evaporated off.

Rotor
Rotor

The shaft doesn’t show any significant damage, but since the phosphor bronze bearing is softer, there is some dirt in here which is probably a mix of degraded oil & bearing material.

Stator & Bearing
Stator & Bearing

There’s more gunge around the other end of the bearing & it’s been worn enough that side play can be felt with the shaft. In ~3000 hours running this fan is totally useless.

Posted on Leave a comment

Cheap eBay Molex-SATA Power Adaptors

Molex to Dual SATA Power

To do some upgrades to my NAS, I needed some SATA power adaptors, to split the PSU out to the planned 16 disk drives. eBay has these for very little money, however there’s a good reason for them being cheap.

Wire Marking
Wire Marking

The marking on the wire tells me it’s 18AWG, which should be good for 9.5A at an absolute maximum. However these adaptors are extremely light.

Wire Comparison
Wire Comparison

Here’s the cheapo eBay wire compared to proper 18AWG wire. The cores in the eBay adaptor are tiny, I’d guess about 24AWG, only good for about 3A. As disk drives pull about 2A from the +12v rail on startup to spin the platters up to speed, this thin wire is going to cause quite the volt drop & possibly prevent the disk from operating correctly.

Posted on Leave a comment

Evening Musing – Linux RAID Rebuilding

My main bulk storage for the home LAN is a bank of 4TB drives, set up in a large RAID6 array. Due to a brownout this evening on the +12v supply for one of the disk banks, I’ve had to start rebuilding two of the disks.

Core NAS
Core NAS

The total array size is 28TB after parity – 9 4TB disks in total. The disks are connected through USB3 to the file server.

mdadm Detail
mdadm Detail

Here’s the current status of the array. Two of the disks decided that they wouldn’t rejoin the array, so they got their superblocks cleared & readded manually. This forced the array into rebuilding.

Rebuild Progress
Rebuild Progress

Rebuilding an array of this size takes a while, as can be seen from the image above, it’s going to take about 7200 minutes, or 5.2 days.

Posted on Leave a comment

Raspberry Pi Timelapse Video Generator Script & Full Script Pack Download

To cap off the series of scripts for doing easy timelapse video on the Raspberry Pi, here’s a script to generate a H.264 video from the images.

#!/bin/bash
INPUTFOLDER=$1
INPUTNAME=$2
OUTPUTNAME=$3

if [ -z $1 ]
    then
    	echo "Raspberry Pi Timelapse Video Generator Script v1.0"
		echo "2015 Ben Thomson 2E0GXE"
		echo "This script will take an image folder created by the timelapse script & convert it into H.264 Video"
		echo "This script expects some options in the following format:"
		echo "./makevid.sh <Folder> <File Prefix> <Output Video File Name>"
		echo "<Folder>"
		echo "The folder name with all the images"
		echo "<File Prefix>"
		echo "The file prefix before the frame number. Do not include the underscore before frame number."
		echo "<Output Video File Name>"
		echo "The output file name. The .mp4 file extension will be added by the script."
		echo "Running this script on the Raspberry Pi itself is likely to be very slow. Recommend running on a fast"
		echo "PC with a multicore CPU for high framerate."
		exit 0
fi

avconv -r 10 -i ./$INPUTFOLDER/"$INPUTNAME"_%d.jpg -r 10 -vcodec libx264 -crf 20 -g 15 $OUTPUTNAME.mp4

echo $INPUTNAME
echo $INPUTFOLDER
echo $OUTPUTNAME

This should be run on a powerful PC rather than the Pi – generating video on the Pi itself is likely to be very slow indeed.

I have also done a quick update to the timelapse generator script to generate images of the correct size. This helps save disk space & the video generation doesn’t have to resize the images first, saving CPU cycles.

#!/bin/bash

INPUTFILE="$1"
INPUTFILE+="_%d"
FRAME_INTERVAL="$2"
FRAME_INTERVAL_MIN="1250"
RUNTIME="2073600000"
DATE=$(date +"%T_%m-%d-%y")
if [ -z $1 ]
    then
		echo "Raspberry Pi Timelapse Script v1.2"
		echo "2015 Ben Thomson 2E0GXE"
		echo "Images will be taken in 1920x1080 format for transcoding into video."
		echo "This script expects some options in the following format:"
		echo "./timelapse.sh <File Prefix> <Frame Interval>"
		echo "<File Prefix> The script will prepend this name to every image as a unique capture session identifier."
		echo "A sequential number is appended to the end of the filename for frame identification."
		echo "<Frame Interval> This is the interval between frames, in milliseconds. Minimum 1250."
		echo "This minimum is required to retain stability & prevent dropped frames."
		echo "Every time the program is started, a new folder with the current date & time is created for the images."
		exit 0
fi
if [ $FRAME_INTERVAL -lt $FRAME_INTERVAL_MIN ]
	then
		echo Frame Interval Too Low!
		echo This will cause dropped frames! Exiting!
		exit 0
fi

mkdir -p ./$DATE-$1
echo Image Folder $DATE-$1 Created
echo Image Capture Interval $FRAME_INTERVAL ms 
echo Starting Timelapse Capture... CTRL+C To Exit...
raspistill -k -n -ex auto -awb auto -mm average -w 1920 -h 1080 -o ./$DATE-$1/$INPUTFILE.jpg -tl $FRAME_INTERVAL -t $RUNTIME

echo Timelapse Complete!
echo File Prefix: $INPUTFILE
echo Frame Interval: $FRAME_INTERVAL ms
echo Folder Name: $DATE-$1

[download id=”5595″]

73s for now!

Posted on Leave a comment

eBay Special 2.5″ HDD USB Case

Since I have a fair few 750GB disks sat doing nothing, I figured I’d get some USB3 caddies for them. Back when USB -> IDE caddies appeared, they were hideously expensive. Not so much these days!

USB HDD
USB HDD

For £6 on eBay, you get a basic plastic box with the required bridge circuitry.

USB - SATA Bridge
USB – SATA Bridge

Here’s the PCB – a very basic affair, with only 2 ICs. The large QFN IC on the left is the USB-SATA bridge. It’s a JMicron JMS567. Unfortunately JMicron are rather secretive about their bridge chips & I can’t find much information about it, nor a datasheet.

PCB Reverse
PCB Reverse

Here’s the other side of the bridge PCB – not much on here, the activity indicator LED is a bit of a bodge job, but it’s functional. The IC on the right is a Pm25LD512 512Kbit SPI EEPROM. This is used to store things like the USB device & vendor IDs, device name, type, etc. Here’s what dmesg spits out when the disk is connected on my standard Linux system:

[10397.893298] usb 2-3.1.1: new SuperSpeed USB device number 8 using xhci_hcd
[10397.909019] usb 2-3.1.1: New USB device found, idVendor=152d, idProduct=1562
[10397.909025] usb 2-3.1.1: New USB device strings: Mfr=1, Product=2, SerialNumber=3
[10397.909027] usb 2-3.1.1: Product: ELEMENTS
[10397.909028] usb 2-3.1.1: Manufacturer: ELEMENTS
[10397.909029] usb 2-3.1.1: SerialNumber: 0F00000000157DC
[10397.912679] scsi host13: uas
[10397.913198] scsi 13:0:0:0: Direct-Access     WD       ELEMENTS         0225 PQ: 0 ANSI: 6
[10397.914043] sd 13:0:0:0: Attached scsi generic sg11 type 0
[10397.914179] sd 13:0:0:0: [sdk] Spinning up disk...
[10398.917575] .....ready
[10402.939800] sd 13:0:0:0: [sdk] 1465149168 512-byte logical blocks: (750 GB/698 GiB)
[10402.939803] sd 13:0:0:0: [sdk] 4096-byte physical blocks
[10402.940358] sd 13:0:0:0: [sdk] Write Protect is off
[10402.940363] sd 13:0:0:0: [sdk] Mode Sense: 53 00 00 08
[10402.940662] sd 13:0:0:0: [sdk] Write cache: enabled, read cache: enabled, doesn't support DPO or FUA
[10403.038847]  sdk: sdk1
[10403.040572] sd 13:0:0:0: [sdk] Attached SCSI disk
[10404.347605] device-mapper: table: 252:0: adding target device sdk1 caused an alignment inconsistency: physical_block_size=4096, logical_block_size=512, alignment_offset=0, start=4096
[10404.347611] device-mapper: table: 252:0: adding target device sdk1 caused an alignment inconsistency: physical_block_size=4096, logical_block_size=512, alignment_offset=0, start=4096
[10404.626320] device-mapper: table: 252:0: adding target device sdk1 caused an alignment inconsistency: physical_block_size=4096, logical_block_size=512, alignment_offset=0, start=2100224
[10404.626325] device-mapper: table: 252:0: adding target device sdk1 caused an alignment inconsistency: physical_block_size=4096, logical_block_size=512, alignment_offset=0, start=2100224

Here’s some speed benchmarks:


USB2 Benchmark
USB2 Benchmark

First attached to a USB2 port, above

USB3 Benchmark
USB3 Benchmark

And finally attached to a USB3 port, above

Tests were done with a 320GB 5400RPM Samsung HM321HI drive, direct into the root hub, for the shortest possible signal length.


Posted on Leave a comment

Raspberry Pi Timelapse – Resequencing Images

Sometimes while taking timelapse video on the Pi, it misses frames, for no apparent reason. I have been playing with various combinations of disks/SATA cases to see what the bottleneck is. Oddly enough a faster drive actually made the problem worse!

Really Bad Frame Skipping

Here’s an example of some really bad frame skipping, this is with a frame interval of 1250ms, which has worked fine in the past. The disk used is a 750GB WD Black 7200RPM, so disk access time shouldn’t be an issue.

Since frame skipping is rarely a problem in timelapse video I do, I’ve been searching for something to automatically renumber all the frames for processing into video – after writing my own script, which was a bit crusty, I came across a very handy script on SourceForge. It required a couple of small modifications to work correctly with what I want, but here’s the slightly modified version.

#!/bin/bash
################################################################################################
# Author:     	Paul Weibert (paul.weibert@gmail.com)
# Version:		0.1
# Dependencies: ls, sort, printf, mv, grep
# Features: 	Performs numbering of files from the specified input folder. 
#				Input files are sorted before numbering. Leading zeros can be added
# 				to the targetnumber (option -L <number of digits>).  Also a pre- and a suffix can be 
#				added to the target name (-p and -s). The sorting method can be specified (-o); 				
################################################################################################

PATHTOFOLDER=""
PREFIX=""
SUFFIX=".jpg"
SORT="modtime"
NUMBER=$(( 0 ))
LSCOMMAND="ls -1"
DIGITFORMAT="%d";
RENAME=0
GREPCMD="grep"
FILTER="\'.*\'" #match all by default

# define print function for error messages
echoerr(){ echo "$@" 1>&2;}

# prints usage information
printUsage(){ 
	echoerr "usage: numerate -d \"<path to filefolder>\" [-p \"<file prefix>\"] [-s \"<file suffix>\"] [-b <first number of target file>] [-o <order input={numerically/extension/modtime/none}>] [-L <number of digits in target number>] [-f <filename filter in grep syntax>]";
}

OPTIND=1 #Reset (just in case of prior usage)
while getopts "d:p:s:b:L:o:rf:" opt 
do
#Parse arguments
	case $opt in
		d) PATHTOFOLDER="$OPTARG";;
		p) PREFIX="$OPTARG";;
		s) SUFFIX="$OPTARG";;
		b) NUMBER="$OPTARG";;
		o) SORT="$OPTARG";;
		L) DIGITFORMAT="%0""$OPTARG""d";;
		r) RENAME=1;;
		f) FILTER="$OPTARG";;
		?) printUsage;
		   exit 1;;
	esac
done

#directory parameter is mandatory
if [ "$PATHTOFOLDER" == "" ] || [ ! -d "$PATHTOFOLDER" ]; then
	printUsage
exit 1;
fi

#parse sorting parameter for the input files
echo "Set file filter to: $FILTER"
case $SORT in 
	"modtime") 
		files=$($LSCOMMAND $PATHTOFOLDER -tr | $GREPCMD "$FILTER");;
	"extension") 
		files=$($LSCOMMAND $PATHTOFOLDER -X | $GREPCMD "$FILTER");;
	"none") 
		files=$($LSCOMMAND $PATHTOFOLDER -U | $GREPCMD "$FILTER");;
	"numerically") 
		files=$($LSCOMMAND $PATHTOFOLDER -U | $GREPCMD "$FILTER" | sort -n );;
	*) 
		echoerr "unvalid order parameter -o <param>!"
		printUsage;
		exit 1;;
esac


# save value before changing it
TMPIFS=$IFS
IFS=$( echo -en "\n\b")
# perform / simulate rename operations
for f in $files;
do
		## format number
		NUMBERSTR=$( printf "$DIGITFORMAT" $NUMBER ) 
		SOURCE="$PATHTOFOLDER/$f"
		TARGET="$PATHTOFOLDER/$PREFIX$NUMBERSTR$SUFFIX"
		PROCESSDESCRIPTION="simulating rename"
		
		if [ $RENAME == 1 ];
		then 
			PROCESSDESCRIPTION="performing rename"
			mv $SOURCE $TARGET
		fi
		
		echo "$PROCESSDESCRIPTION \"$SOURCE\" to \"$TARGET\"";
		
		NUMBER=$(( $NUMBER + 1 ))
done

IFS=$TMPIFS

With the small modifications, it renumbers the images correctly for processing by AVConv.

More scripting to come when I sort out an automatic transcode kludge!

73s for now

Posted on Leave a comment

QSO Logging Systems

As per my site update post, I have migrated my radio log onto a new system, from CQRLOG.

CQR log has served me well since I first started in Amateur Radio, however it’s a bit complex to use, requires a backend MySQL server for it’s database, and as it’s a local application, it’s not possible to share my log with other Hams without some difficulty.
The only other major system with an online logging system is QRZ, and I find that particular site a bit of a pain, and many of the features there aren’t free. (Although it’s not horrendously expensive, I’m on a very tight budget & I must save where I can).

CQRLOG
CQRLOG Screenshot

Because of these points, I went on a search for something that would better serve my needs. I have discovered during this search that there’s liitle out there in the self-hosted respect.

I did however find Cloudlog, a web based logging system in PHP & MySQL.
This new system allows integration with the main site, as I can run it on the same server & LAMP stack, it’s very simple to use, is visually pleasing and it even generates a Google Map view of recent QSO locations.
It will also allow me to save some resources on my main PC, running a full-blown MySQL server in the background just for a single application is resource intensive, and a bit of a waste of CPU cycles. (CQRLOG and it’s associated MySQL server is 300MB of disk space, CloudLog is 27MB).

Backups are made simpler with this system also, as it’s running on my core systems, incremental backups are taken every 3 hours, with a full system backup every 24 hours. Combined with offsite backup sync, data loss is very unlikely in any event. All this is completely automatic.
I can also take an ADIF file from Cloudlog for use with any other logging application, if the need arises.

Cloudlog is built & maintained by Peter Goodhall, 2E0SQL.
From the looks of Github, there’s also a version 2 in development, although now I have version 1 up & running, I might just stick with it, unless an easy upgrade path is available.

When I am not operating mobile, new QSOs should appear in this system almost immediately, with their respective pins on the map. (These are generated by the Grid Square location, so accuracy may vary).
If you’ve spoken to me on the air & I haven’t updated it, I’m most likely away from an internet connection, in which case your callsign will appear as soon as I have access.

73s for now folks!

Posted on Leave a comment

RasPi Terminal Customisations


As seen in the previous post, the SSH terminal of my Pi gives some useful stats. This is done using GNU Screen, with a custom config file.

This file is .screenrc in your user’s home folder. My personal code is posted below:

I have uploaded the pair of scripts for the backticks, and they can be found here:

mem.sh
disk.sh

More to come once my new 16GB Class 10 SD Card arrives!

Posted on Leave a comment

IDE Zip Drive

Top
Top

An old IDE interface Zip drive. This fits in a standard 3.5″ bay.

Cover Removed
Cover Removed

Top cover removed from the drive, IDE & power interfaces at the top, in centre is the eject solenoid assembly & the head assembly. Bottom is the spindle drive motor.

Head Assembly
Head Assembly

Head assembly with the top magnet removed. Voice coil is on the left, with the head preamp IC next to it. Head chips are on the end of the arm inside the parking sleeve on the right. Blue lever is the head lock.

Controller
Controller

Controller PCB removed from the casing.

Spindle Motor
Spindle Motor

Spindle motor. This is a 3-phase DC brushless type motor. Magnetic ring on the top engages with the hub of the Zip disk when insterted into the drive.

Magnets
Magnets

Magnets that interact with the voice coil on the head assembly.

Head Armature
Head Armature

Head armature assembly removed from the drive. The arm is supported by a pair of linear bearings & a stainless steel rod.

Posted on Leave a comment

USB Flash Drive

Disk
Disk

Here is a cheap chinese made flash drive given out for free by Westlaw UK. Capacity 512MB

PCB
PCB

Here is the PCB removed from the casing, USB connector on the left, followed by the clock crystal for the flash controller, a CBM2092, which is a Chipsbank part. 512MB flash memory IC, unknown maker.  Access LED on far right of the board.